Transitioning from Winter to Spring Worm Composting

Winter is the time of year when many raising red worms will find it difficult.

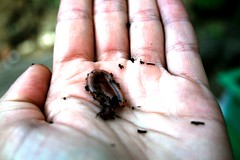
They find their worms are dying off.

This can easily be avoided if you take precautions when raising your red worms.

Seasonal changes affect the way one raises their red worms. When winter arrives we concentrate on keeping our red worms warm. It is much easier when raising red worms to keep a worm bin warm than trying to keep it cool enough during the warmer months.

Raising red worms and transitioning from winter to spring can be relatively simple if you approach it properly. Here are some tips to help you make that transition:

Make sure your worm bin does not have too much moisture. Moisture and heat do not mix when it comes to keeping a worm bin. A soil moisture meter can be purchased at most hardware, home improvement and even discount stores this time of year. A good year round moisture percentage to maintain is 60% to 70%.

Add less green items and more brown items to reduce the heat in your worm bin. Brown (carbon) products consist of shredded newspaper and cardboard for one. These products will not generate nearly as much heat within your worm bin as green products do.

Avoid certain vegetables. As we start to transition from winter to spring avoid melons and vegetables such as cucumbers for a while.

These tips will save you and your worms some grief as the warmer months start to approach.

Please Note: This post was contributed by one of my sponsors, Rainbow Worms. For additional information on raising red worms, connect with Rainbow Worms on Facebook, Twitter or subscribe to their blog.

Image courtesy of Vancour on Flickr

Charlotte Airport to Open Recycling Center With Composting System

One of my most favoritest sites, Earth911, had a post titled Charlotte Airport to Start Worm Composting.

They post said:

The airport plans to open a new $1.1 million recycling center in February with a worm-based composting system that can handle up to two tons of waste per day, the Charlotte Observer reported.

This is such a dope idea. The airport will be using the compost generated on their facility. Whatever is left, they will be packaging and selling it.

It would be great if other facilities around the country took on similar projects.

What’s your thoughts on the composting program and have you seen any others similar to it?

Photo courtesy of Vancour on Flickr.

Using Compost in Your Container Garden

When you are growing in containers, you need to make sure that you amend your soil because the nutrients are being washed through the container or absorbed by the plant.

One way that you can amend the soil is by adding compost to it.

To use the compost, you’ll want to add some to the container especially around the base of the plant. Then you’ll need to water it in. This will allow the compost to make it’s way into the container and into the plants.

A sign that your plant is lacking nourishment is when the leaves begin to yellow. Ideally you don’t want it to get to that point though.

Once the plant is established in your container for a few weeks, you might want to add some compost to feed it and gauge it from there.

What are some other ways to feed and nourish your plants?


What It’s Like Feeding My Worms

Wanted to give a glimpse into what it’s like feeding my worms.

Since I’m using a Worm Factory 360, I needed to start a new tray. Here’s what I did:

  • Added some blended food scraps to the bottom.
  • Covered them with some browned fallen leaves.
  • Topped that with shredded newspaper that I sprayed down with a water bottle.
  • Covered everything with a sheet of newspaper that I sprayed down as well.

It’s quick and easy. Here’s a video to see what it’s like.

httpv://www.youtube.com/watch?v=p7xCkWDXM8A

Testing Soil Amendments: Manure Tea vs Compost

Now that I’ve remembered to amend the soil in my container garden, I’m going to be running a side-by-side test of soil amendments.

Here is the test that I’m going to run. I have two cucumber containers on my balcony garden. In one of them, I have amended the soil with straight compost. The other container I have watered with the cow manure tea that I brewed up.

The plant that I used the cow manure tea already started out slightly smaller than the other, but I want to test and see if the manure tea help to promote better growth.

I’ll monitor progress and report back in a few weeks. Which do you think will yield better results?

httpv://www.youtube.com/watch?v=MRvZ_KKVKlY

How to Make Cow Manure Tea

I am making cow manure tea to use as a soil amendment in my container garden.

I’m brewing cow manure tea from Authentic Haven Brand.

The brewing process will take 1-3 days to complete. You’ll need the following:

  • One five-gallon container filled with water
  • Bag of cow manure tea bag
  • Towel or cloth to keep the bugs out

You just need to drop the tea bag into the bucket of water and let it steep for 1-3 days until it looks golden brown. Put a cloth over the top of it if you are keeping it outside to keep the bugs out.

For more complete instructions on how to make manure tea check out ManureTea.com.

httpv://www.youtube.com/watch?v=jEqI2VL8w3o

Using Worm Leachate In The Garden

I’m using the worm leachate that was produced by the Worm Factory 360 in my garden. The leachate was mixed up with 3 parts water and put into a spray bottle and the plants were sprayed down.

Since my kale leaves are yellowing, aphids have infested my purple kale and cabbage worms wiped out the oak greens, I’m hoping that this will help to help both fertilize the plants and to keep the the insects away.

The leachate is produced by all of the excess moisture that the worm bin has been drained out of the worm bin. This is different than compost tea, which is made from brewing up finished compost with water.

I’ve heard that leachate isn’t as desirable to use in your garden as worm tea because some of the matter in it might not be fully broken down and in a toxic state. I know I’m crazy and still decided to give it a try and sprayed some on my plants. What’s the worst that’s going to happen?

httpv://www.youtube.com/watch?v=5p_dV1qwOX0

Insects or Mold In My Worm Bin?

Now that I’ve arrived in Los Angeles, along with my worms, I’m starting to get the hand of this worm composting thing.

The Worm Factory 360 is definitely performing much better than the bins that I had built and killed all my worms with. Though in checking in on them, I’ve noticed that there are little white dots on the food scraps.

There seems to be insects, but could possibly be mold as well. I tried to take a decent pic of it above and capture it on video, but they are mad small and hard to get into focus.

I assume if it’s mold that it’s ok since it’s old food and that’s what it does. My concern is that if it is indeed insects – What kind are they? Will they provide problems for the compost? For now the worms are alive and over a month old. This is the longest that they’ve lasted for me. So unless the white dots kill em, I won’t be too concerned.

Any thoughts?

httpv://www.youtube.com/watch?v=krGEoQww1xY

How To Ship Worms

When I decided to move to Los Angeles, one of my concerns was figuring out the best way to ship my worms.

Well, I figured it out and the worms safely made it. I had a pound of worms and filled up 4 plastic containers that were checked along with my luggage.

Here’s how I packaged and shipped them:

  • Lined the bottom of a large coffee container with shredded newspaper.
  • Piled worms and whatever else was in the bin in the container on top of the newspaper.
  • Added food scraps on top and covered with a sheet of moist newspaper.
  • Put lid on the container and securely taped up with duct tape.

As soon as I got home, I unpacked the worms. They were all nearly at the top of the container, but alive. I put some fresh bedding in the worm bin and dumped them back in along with some fresh food scraps.

Check out the journey of my worms from Brooklyn to Los Angeles:

httpv://www.youtube.com/watch?v=fPfSLlztMWs

Starting to Move the Worms To LA

I began the first part of moving the Worm Factory and the worms with me to LA when I moved them to my Grandmother’s. They will be stored there until I move out to LA.

In order to make sure that the bin didn’t break open in the car ride to my Grandmother’s, the working tray cover was duct taped to bin and the bin was duct tape to the base. This is to ensure that the lid remains on keeping the worms in the tray.

They’ll be stored in my Grandmother’s basement until I leave. By that time, I’ll have to figure out the best way to package the worms for the plane ride.

I’m pretty sure that I”m going to stick them in the coffee container with some fresh bedding and food for the trip. The advice that I’ve received has to been a bit conflicting. Some have said to make sure that the container is kept warm and some said kept cool.

You think the worms are going to make it?

What’s The Best Way To Ship Worms?

Now that I’ll be moving my garden and life out to LA, I think that I’ve gotten this worm composting thing down.

It’s been almost a week since I’ve started using The Worm Factory 360 and it’s the most lively that any of my worms have been. That’s not saying much because my worms have mostly wound up dead after a few days.

The fact that the worms are doing well is all peaches and cream, but I need to figure out how to get the worms out there as well. Getting the bin out there will be easy enough, but the worms could prove to be tricky.

I could very well just trash the worms and buy a new set when I arrive in LA, but that would be wasteful considering that I just got these worms and they are doing so well.

Since my flight to LA is in the evening, I was planning on scooping up the worms before heading out the airport and putting them in a large coffee container for the flight.

Do you think this will work? What are your suggestions for shipping the worms?
httpv://www.youtube.com/watch?v=PFX1UOaReXc

Starting The Worm Factory 360

So I’m giving the worm composting another shot after several unsuccessful attempts at it.

The woman at the Lower East Side Ecology Center who sells me the worms was hesitant to sell me another pound because I’ve killed so many. I let her know about the new bin and she seemed genuinely concerned about my previous experiences.

We chatted a bit more, sold me the worms and said to stop by in a few weeks and she’ll give me some more. Very nice and thoughtful of her.

I got back home and set the Worm Factory up. It’s definitely large and not great for smaller spaces.

I’ll check in in a few days to see if these things are still alive.

httpv://www.youtube.com/watch?v=DQ-A5ZUJSdw

Receiving The Worm Factory 360

The fine people at Natures Footprint Inc heard about my worm killing ways and were concerned.

They contacted me and thought that it could be the bin that I was using. Of course they did because they make worm bins. They offered to send me a Worm Factory 360 to try out. I willingly agreed.

It arrived in the mail last week and is quite the beast. I need to read the instructions on how to use and set up.

What I’m nervous about is ordering another pound of worms. The lady from the Lower East Side Ecology Center, where I buy my worms from, jokingly said that she wouldn’t sell me anymore if I continued to kill them.

So now I need to get me some more worms and give this Worm Factory a shot.

Has anyone ever used this bin or any others similar to it?

httpv://www.youtube.com/watch?v=nBIYELP4RBk

Making Kitchen Compost Containers Of All Sizes

Now that I’ve figured out a way to compost in my kitchen without worms, I’ve started to pack as many containers as I can to make compost.

I found an empty container of cat litter on the sidewalk that I brought home and filled. I’ve also had my roommate keep his coffee containers and have begun to use them as well.

More food scraps were added to the original container, but didn’t want it to get too heavy to shake around. This is why I started new ones.

A scoop of old potting soil was added to the bottom of each of them, the blended food scraps were added and then covered with a bit more soil and shredded newspaper.

They were then set off to the side out of the way and are going to be to shaken up every few days. I should have fresh compost in a few weeks. Little hassle and easy to maintain.

This is something that anyone can do and it can be scaled up or down to your needs. I’m not stopping here. I plan to start many more.

When are you getting started on yours?

Five Gardening Mistakes I’ve Made

Since I’m still new to this gardening thing, I’ve made plenty of mistakes in my first year. I’ve also had many successes as well, with the most memorable being my first lettuce harvest.

For this post, I’d like to share the Top Five Gardening Mistakes that I’ve Made. Life ain’t perfect and neither are my gardens. I know hard to believe.

I’ve made these mistakes, learned from them and have become better at gardening (and life) because of it.

  1. Putting too many food scraps in the compost bin. This was one of my first mistakes and happened before I even planted my garden. Luckily, it wasn’t a tell-tale sign of things to come and easily rectified. Though the smell in my apartment was absolutely horrendous for a few days.
  2. Upside down herb gardening. When I first started this, it seemed like a great idea and looked cool as hell too. The first time around, they all died in less than a month. So I tried again with the same results – dead herbs. Then I realized I should turn grow the herbs out of the top, not the bottom…duh.
  3. Planting cherry tomatoes on my fire escape. It was great that I was able to get fresh, ripe tomatoes from my fire escape, but the plant grew to be way too large for my fire escape. I definitely won’t grow it again in such a small space.
  4. Plant fewer or single plants in each container. The celery plant that grew alone in a container was more than double the size of the ones that were packed together. Also I had combined herbs into containers, which stunted the growth of some of them. It was just a case of me being greedy and trying to plant as much as I could.
  5. Worm composting. I went through not one, not two, but three sets of worms that I killed. What can I say? I’m a worm serial killer. They were literally dying to get away from me. It was a major fail.

These are only five of the mistakes that I’ve made while gardening this first time around. There were plenty more and there will be plenty more to come. None of which will stop me from continuing to garden.

What are some gardening mistakes that you’ve made?

Kitchen Compost Bin Minus The Worms

I started a kitchen compost bin since I’m done with worm composting.

Gabriel Withington (@IntegroDesign) gave me a great idea. He said to compost in buckets similar to the
the aerobic compost bin that I built.

The main difference is that there is no need to drill holes to aerate the compost. If you leave enough room, you can shake it up to aerate. If it gets too moist, drain off the liquid and use as fertilizer. Brilliant!

Here’s what I put in the bin in order:

  • Fresh compost (b)
  • Old potting soil (b)
  • Shredded newspaper (b)
  • Old worm compost bin (b/g)
  • Coffee grinds and tea bags (g)

(b) indicates browns
(g) indicate greens

I layered them in the bin in the order above. Some more finished compost and newspaper was laid on top of the coffee grinds and tea bags.

When composting you want a balance of browns and greens. If you have too many greens, it will smell horribly. Trust me.

NYCCompost.org has a good list of browns and greens to add to your compost bin.

If this works out as well, I’ll be starting a lot more of them in my kitchen.

What are your thoughts on composting this way?

httpv://www.youtube.com/watch?v=IPNcNdJCs3o

Done With Worm Composting

I can honestly say that I am done with worm composting after killing my third set of worms. This isn’t much of a surprise since they were literally crawling out of the bin a few days back.

My first set of worms I killed because they were too damp. The second batch were too dry and this batch…obviously I have no clue because I keep killing them.

So I’ll leave it at three pounds of dead worms and likely start more aerobic compost bins in my kitchen.

I’m sure that there are some worms somewhere thanking whoever worms thank that they won’t have to go home with me.

httpv://www.youtube.com/watch?v=IKQ45uPnSdI

Worms Are Crawling Out Of The Worm Bin

I must be making a name in the worm community and not a good one. When I checked on my latest batch of worms some of them crawled out of the bin. The ones that escaped didn’t last long and were dead under the kitchen sink.

Since I started this third bin, I moved it under the kitchen sink to protect them from the light. I also noticed that some of the worms were crawling to the top of the bin, but the lid was on.

Fresh bedding was added because I didn’t want to make the same mistake as before and have too moist of a bedding.

The lid was also removed to get some more circulation going throughout the bin.

Once the bin was removed from the under the sink, there were dead worms that escaped the bin scattered under the kitchen sink. Dried up and dead worms are gross.

Since the worms are escaping, it means that there is something wrong with the bin that they don’t like and want to escape. It could just be a few stragglers or they could’ve heard about me and my worm killing ways and decided it was best to off themselves.

I’m going to add more bedding and toss it together with what’s already in there to freshen it up and aerate.

If this doesn’t work, it’s likely my last go at this.

Any more advice to save these worms?

httpv://www.youtube.com/watch?v=fZwl-uoThhg

Making a Composting Mistake

The composting mistake that I made is pretty simple – I killed my worms.

Shortly after starting my worm compost bin, I had to dry it out because it was too wet from all the coffee grinds.

That didn’t work and the worms were all dead. So I properly buried their remains along with the newspaper bedding at the local community compost.

That didn’t stop me from starting a new worm bin. Why would I let it? I made a mistake, learned from it and now I’m one step closer to success.

I cleaned out the old bin, put a fresh bedding of newspaper and another pound of worms. This time I put the bedding in, dropped in the worms and let them get situated for about 10-15 minutes, sprinkled some food scraps on the top and closed the lid.

I’ll leave them alone for a week or so and periodically check in.

Any tips or advice for my second go around?

httpv://www.youtube.com/watch?v=svy9RKHv19s