How to Grow Broccoli Sprouts at Home! SUPER HEALTHY!!!

Original source of this post: www.howweflourish.com

Growing Broccoli Sprouts at Home

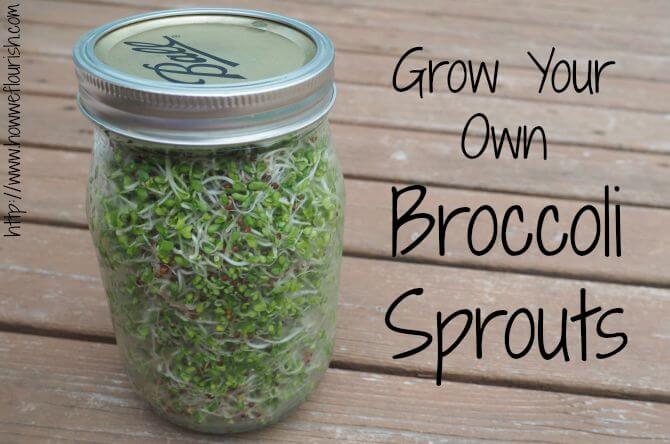
There is a great blog we recently came across, howweflourish.com.  She recently wrote about why and how everyone should be growing and eating broccoli sprouts.  The results are overwhelmingly positive.

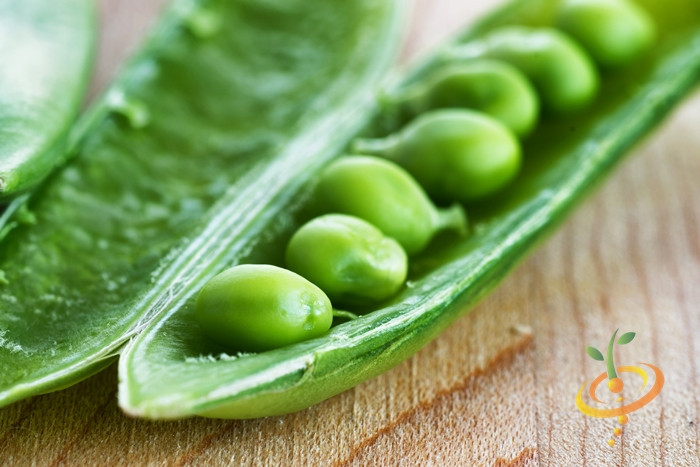
DID YOU KNOW?  Broccoli sprouts are 10x – 100x higher in some cancer fighting compounds than the actual mature vegetable!

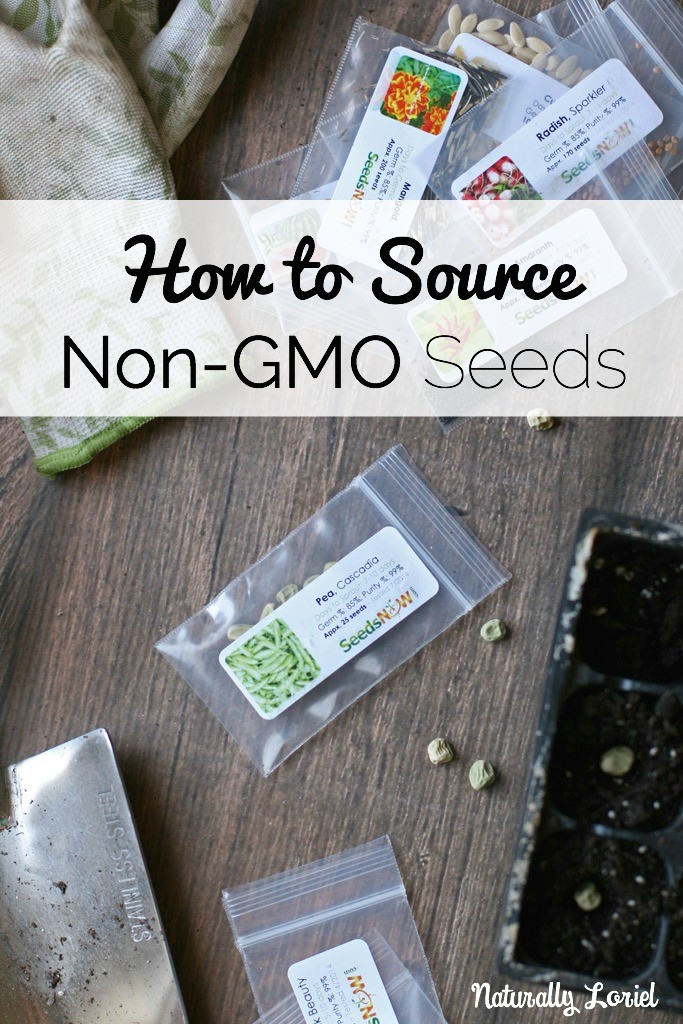
She mentions in her article,  …”this past spring, we purchased the seeds for our garden from SeedsNow. I love this company because all their seeds are non-GMO as well as being raw, untreated, pure heirloom, non-hybridized varieties. This means you can save all your seeds from the plants you grow for next season!

But anyway, while I was there, I noticed that they also sell seeds for growing sprouts. I had just finished reading The Elimination Diet, where the praise the benefits of broccoli sprouts, so I thought I would check it out. I picked up a bag of the sprouts and anxiously awaited my delivery. Remember, I was waiting for my garden seeds AND the broccoli sprouts! It was an exciting day at the mailbox.”

Click here to read the full article about why and how to grow organic broccoli sprouts:

Instructions for Growing Broccoli sprouts:

  1. Add 2 tablespoons of broccoli sprouting seeds to a widemouthed quart jar.
  2. Cover with a few inches of filtered water and cap with the sprouting lid.
  3. Store in a warm, dark place overnight. I use a kitchen cabinet for this.
  4. The next morning, drain the liquid off and rinse with fresh water. Be sure to drain all the water off.
  5. Repeat this 3-4 times a day. Continue to store your seeds in a warm, dark place. After a few days, the seeds will start to break open and grow. The biology major in me is absolutely enamored with this process!
  6. Eventually, the sprouts will be an inch or so long and have yellow leaves. Now you can move the sprouts out into the sunlight.
  7. Continue to rinse them 3-4 times a day until the leaves are dark green. Now they are ready to eat!
  8. This whole process will take about a week. Patience is key!
  9. Once they are ready, replace the sprouting lid with a standard mason jar lid and store in the refrigerator.
  10. Serve on top of salads, stirred into soups, or however strikes your fancy.
Schema/Recipe SEO Data Markup by Yummly Rich Recipes

{Fall & Winter Gardening} Growing Food in 1, 2, and 3-GALLON Containers

2

Fall and winter gardens are possible, even when growing in containers. Stick with these cool-weather crops and planting suggestions for success. Don’t wait.  Now is the perfect time to order your seeds online and start planting! Believe it or not, September – October are great times to start these seeds listed below ….

First, we’re going to break it down by container size.  If you go to a local garden center you’re going to come across the same thing.

1-gallon, 2-gallon, and  3-gallon containers are all great for growing food.  You’d be surprised.

Here’s what you can grow in them:

If you’re using a 1-GALLON CONTAINER:

  • Beets (you can fit about 2- 3 beets in this size container)
  • Carrots (3-4)
  • Celery (1)
  • Collards (1)
  • Kohlrabi (1)
  • Leeks (1)
  • Lettuce (1-2)
  • Mustard Greens (2)
  • Bunching Onion (2-3)
  • Radish (3-4)
  • Spinach (2)
  • Swiss Chard (1)
  • Turnips (2)

– – – – – – – – – – – – – – – – – – – – – – – – – – – – – – – – – – –

If you’re using a 2-GALLON CONTAINER:

You can plant all the same things as you could using a 1-GALLON CONTAINER with the addition of these larger varieties:

  • Broccoli (1)
  • Cabbage (1)
  • Kale (1)

– – – – – – – – – – – – – – – – – – – – – – – – – – – – – – – – – – –

If you’re using a 3-GALLON CONTAINER:

Try even planting these large varieties:

  • Brussels Sprouts (1)
  • Cauliflower (1)

– – – – – – – – – – – – – – – – – – – – – – – – – – – – – – – – – – –

Note: These varieties listed above are for Fall and Winter gardening.  So keep in mind that all these varieties tolerate the cold weather pretty well.  You don’t want to be planting pepper and tomatoes at this time of the year.  Trust me.  Been there.  Done that.

– – – – – – – – – – – – – – – – – – – – – – – – – – – – – – – – – – –

MORE INFO: Check out Sources for Buying Non-GMO Seeds.  Ordering seeds online is easy to do and you get a  wider selection of things to choose from. Find out more here and see how you can Start Container Gardening and How to Use Self-Watering Containers

– – – – – – – – – – – – – – – – – – – – – – – – – – – – – – – – – – –

No excuses.  You need to be growing at least one thing this season!

Why Are My Plants Turning Yellow? [INFO-GRAPHIC]

why-are-my-plants-yellow-safer-brand

How to Read Your Plant’s Yellow LeavesEven the most talented and educated gardeners will have to deal with yellowing leaves at some point or another. And that statement rings truer for those who maintain urban gardens and indoor plants since potted plants have a hard time getting the necessary nutrients they need for sustenance.That’s why Safer Brand put together this infographic that makes it easier than ever to see some reasons your plants might be yellowing, and more importantly, what you can do to make them wholly green again.
If some of the leaves on the plants in your urban garden are turning yellow, ask yourself the following questions:
Am I watering my plants too often?First things first: Make sure you’re not overwatering your plants. If you notice that your plants’ leaves look yellow and wilted – and the soil it’s resting in looks fairly damp though you’ve not watered it recently – you might have a problem with soil drainage. If that’s the case, it’s probably time for you to re-pot your plants.Am I not watering my plants enough? If your plants’ leaves look brittle and are yellowing, you might have problems relating to dehydration. You should make sure that your plants get at least one inch of water each week. It might be worth setting calendar reminders to let you know when it’s time to quench your plants’ thirst.

Are my plants exposed to enough sunlight? Drooping leaves that are losing their color can also serve as a signal for plants that aren’t getting enough sunlight. If you suspect your plants may be yellowing from a lack of exposure to the sun, at least it’s a really easy fix – just reposition your plants in such a way that ensures they get more sunlight.

Are my plants getting the nutrients they need to be healthy? Plants require 13 essential nutrients to remain healthy. If you’ve noticed that the tips of a plant’s leaves and their center veins are becoming yellow, for example, it might indicate that it has a nitrogen deficiency. There’s a simple fix: Add organic compost to the soil – coffee grounds will due, but you could always use manure if you like – and you should be good to go.
So if the leaves of your plants are yellowing, just remember that not all hope is lost. Find the fix for what’s ailing your plants with this graphic, and they’ll be green once again before you know it.

5 Quick Growing Veggies you can Harvest In No Time

5 Quick Growing Vegetables

Gardening isn’t usually a process that should be rushed. It takes time to prepare a spot that you’ll be planting in, and patience usually pays off when you’re growing your own food. There are a few crops, however, that always mature fairly quick.  If you’re short on time during your growing season or just want to get your toes wet as a first time gardener, we’ve put together a list of a few crops that are quick to grow and will have you harvesting your own homegrown veggies in no time at all.


1. Lettuce

shutterstock_107233463_1024x1024Learn how to grow your own organic Lettuce >

Lettuce – (Harvest in about 30 days) Lettuce is a wonderful crop to grow, and matures fairly quickly. Sow new lettuce seeds every 30 days for a continuous harvest that will provide you with fresh leafy greens year-round.  Lettuce prefers cooler temps, somewhere around 50-60 degrees but will also thrive during the summer if grown in the cool shade.  Have a sunny window? It grows wonderful indoors as well.  Short on space? Lettuce loves being grown in containers and usually doesn’t mind being crowded when planted so you can sow your seeds fairly close together as long as you’re not sowing varieties that produce a round head.


2. Radish

shutterstock_45890116_1024x1024Learn how to grow your own organic Radish >

Radishes – (Harvest in about 20-25 days) Want a fast growing crop that packs a ton of flavor?  Radishes take up very little gardening space, grow very quickly, and can come in over 200 varieties with a wide array of colors, shapes, sizes and flavors.   They grow well in containers, and prefer full sun however some varieties can be grown in partial shade.  In cooler climates they can be planted in both the spring and fall. In warmer climates they should be grown over winter.


3. Spinach

700xshutterstock_200666138_1024x1024Learn how to grow your own organic  Spinach >

Spinach – (Harvest in about 30-45 days) Baby spinach leaves can be harvested about a month after planting. The smaller leaves are loaded with flavor, regardless of the variety you choose.  Harvest the larger leaves at the base and allow the plant to continue growing and you’ll be able to harvest from a plant for quite a few weeks before it goes to seed.  It grows a lot like lettuce, so try and grow it in cooler temps. or in the shade during the summer.   Also grows well in containers and doesn’t require a lot of space in the garden.


4. Bush Beans

700xshutterstock_95261911_1024x1024Learn how to grow your own organic Beans >

Bush Beans– (Harvest in about 50 days) Beans love warmer temps. and seeds can be sown every two weeks during the summer to ensure a continuous harvest.  Bush beans usually produce most of their beans within a 2 week period.


5.  Peas

700xshutterstock_194277455_1024x1024Learn how to grow your own organic Peas >

Peas- (Harvest in about 60 days)  Peas are a wonderful cool season crop that take up virtually no space since they grow vertically on a trellis.   They do best when directly sowed. The simplest way to prolong harvest is to plant early, mid season, and late varieties at one time rather than sowing every 2 weeks.

14 Urban Gardening Tips That Will Save You Time, Energy & Money

14 Urban Gardening TipsWhether it’s using leftover coffee grounds from your morning brew, drying herbs on the backseat of your car or using soap under your fingernails before digging into the soil… Paul James, a Master Gardener shares his top 14 gardening tips that will save you time, energy and money in the garden. This post was originally shared on HGTV.com.

Here, the latest tips and tricks from Paul James, host of Gardening by the Yard:

1. To remove the salt deposits that form on clay pots, combine equal parts white vinegar, rubbing alcohol and water in a spray bottle. Apply the mixture to the pot and scrub with a plastic brush. Let the pot dry before you plant anything in it.

2. To prevent accumulating dirt under your fingernails while you work in the garden, draw your fingernails across a bar of soap and you’ll effectively seal the undersides of your nails so dirt can’t collect beneath them. Then, after you’ve finished in the garden, use a nailbrush to remove the soap and your nails will be sparkling clean.

3. To prevent the line on your string trimmer from jamming or breaking, treat with a spray vegetable oil before installing it in the trimmer.

4. Turn a long-handled tool into a measuring stick! Lay a long-handled garden tool on the ground, and next to it place a tape measure. Using a permanent marker, write inch and foot marks on the handle. When you need to space plants a certain distance apart (from just an inch to several feet) you’ll already have a measuring device in your hand.

5. To have garden twine handy when you need it, just stick a ball of twine in a small clay pot, pull the end of the twine through the drainage hole, and set the pot upside down in the garden. Do that, and you’ll never go looking for twine again.

6. Little clay pots make great cloches for protecting young plants from sudden, overnight frosts and freezes.

7. To turn a clay pot into a hose guide, just stab a roughly one-foot length of steel reinforcing bar into the ground at the corner of a bed and slip two clay pots over it: one facing down, the other facing up. The guides will prevent damage to your plants as you drag the hose along the bed.

8. To create perfectly natural markers, write the names of plants (using a permanent marker) on the flat faces of stones of various sizes and place them at or near the base of your plants.

9. Got aphids? You can control them with a strong blast of water from the hose or with insecticidal soap. But here’s another suggestion, one that’s a lot more fun; get some tape! Wrap a wide strip of tape around your hand, sticky side out, and pat the leaves of plants infested with aphids. Concentrate on the undersides of leaves, because that’s where the little buggers like to hide.

10. The next time you boil or steam vegetables, don’t pour the water down the drain, use it to water potted patio plants, and you’ll be amazed at how the plants respond to the “vegetable soup.”

11. Use leftover tea and coffee grounds to acidify the soil of acid-loving plants such as azaleas, rhododendrons, camellias, gardenias and even blueberries. A light sprinkling of about one-quarter of an inch applied once a month will keep the pH of the soil on the acidic side.

12. Use chamomile tea to control damping-off fungus, which often attacks young seedlings quite suddenly. Just add a spot of tea to the soil around the base of seedlings once a week or use it as a foliar spray.

13. If you need an instant table for tea service, look no farther than your collection of clay pots and saucers. Just flip a good-sized pot over, and top it off with a large saucer. And when you’ve had your share of tea, fill the saucer with water, and your “table” is now a birdbath.

14. The quickest way in the world to dry herbs: just lay a sheet of newspaper on the seat of your car, arrange the herbs in a single layer, then roll up the windows and close the doors. Your herbs will be quickly dried to perfection. What’s more, your car will smell great.
View the original post here: http://www.hgtv.com/design/outdoor-design/landscaping-and-hardscaping/14-simple-gardening-tips-and-tricks

5 Container Gardening Tips for Beginners (+ Giveaway!)

Julie from homereadyhome.com just published a great article highlighting important Container Gardening Tips (for Beginners).  Click here to view the original post: http://homereadyhome.com/5-container-gardening-tips-for-beginners/ Here’s a quick preview of what she has has to say about container gardening:

hersteragiveaway4

1. Don’t “grow” overboard.  :)

“Container gardening requires a time commitment. You’ll need to be more hands-on (ie. watering and fertilizing) with plants in pots than plants in the ground. Your container garden will require daily attention so you want to make sure you don’t spread yourself too thin by having too many plants.” … read more

2. Choose the right container.

“Drainage holes are a must. Only consider pots with holes or pots you can drill holes into. Select a container with a broad surface area. Decide what you’ll grow and that will help you to determine how deep your container should be. Root vegetables (think: carrots) and tall plants (like, tomatoes, vines and fruit trees) do better in deep pots. Fast growing crops like herbs and leafy vegetables are fine in a shallow container.” … read more

3. Buy potting soil.

“You may be tempted to fill your container with the free dirt from your backyard, but don’t do it. Dirt from the ground doesn’t work well in containers because it’s dense and heavy. It turns into a hardened clump in your pot and your plants won’t do well. You need soil that is light, drains water quickly but also holds moisture at the same time.” … read more

4. Seek out sunlight.

“Many vegetables need at least 6 hours of sunlight a day, so the more sun you can provide the better. If, like me, you have a lot of shade at your location, no worries. There are still some edibles you can grow. For example, chives, kale, leafy greens, lemon balm, mint, parsley, spinach, swiss chard, peas and radish all tolerate partial shade.” … read more

5. Water your plants.

“Avoid under-watering and be sure you aren’t over-watering your vegetables. How do can you be sure?  I usually wait for the plants to look slightly wilted, then I water. You can also stick your finger in the soil about an inch down and see how it feels. If it’s dry, it’s time to water. My favorite tools for watering my container garden are a watering can and my spray wand that attaches to the hose.  ” … read more

How to Source Non-GMO Seeds

how-to-source-non-gmo-seeds-naturally-loriel-seedsnow-683x1024
Source: NaturallyLoriel.com

Naturally Loriel recently published a blog post on a very important topic:  How to Source Non-GMO Seeds.

She says, “You begin to learn which food companies deserve your support and try to find a local farmer’s market in your area. You realize it’s so important to meet and shake the hands of the farmer that produces your food. Unfortunately though, you’re not as lucky as Lauren is, and the farmer’s markets in your area royally suck. The only other logical solution is to grow your own food.”

Click here to read the original blog post: http://www.naturallyloriel.com/how-to-source-non-gmo-seeds/

Minnesotans Don’t Care About the Snow! Still growing strong.

ows_141875704417544

Season-extending structures are helping some Minnesota gardeners defy winter.

Even in late November, Dawn Pape’s newest garden was a welcome sight for winter-weary eyes.

In her Shoreview yard, under a blanket of snow, is a polycarbonate-topped, 2- by 8-foot box — or “cold frame.” Brush aside the show, lift the lid, and inside was an improbable vision: healthy spinach, kale, salad greens and other veggies growing in the frigid ground.

“It’s so uplifting to see green when it’s kind of bleak outside,” said Pape, a master gardener and garden-book author, who was still harvesting around Thanksgiving — and hoping for at least a few more weeks of homegrown produce. “If I can make it to Christmas, I’ll be pretty happy,” she said.

Cold-weather gardening is not for everyone, but a hardy few are giving it a try.

Some are market gardeners who erect plastic-covered shelters (often called hoop houses or high tunnels) so that they can produce food earlier in the spring and later in the fall. Urban agriculture consultants Cherry Flowers and Tim Page of Page & Flowers (www.pageandflowers.com) grow vegetables in high tunnels at their home in St. Paul and at an apartment in Minneapolis that serves as their office. They sell their produce at the Mill City Farmers Market.

“In the spring, you can get a jump on greens, even in March, and have them ready for the May farmers market,” Flowers said.

Pape is growing on a very small scale, just for her family’s table.

“I’ve read about it [cold-frame gardening] for several years and decided to try it,” she said. She found a kit online (at www.gardeners.com) that was the same size as one of her existing garden beds, ordered it and installed it in the fall, surrounding it with straw bales for extra insulation.

Cold-frame gardening has its limitations in Minnesota, she’s discovered. “The harvest’s not as plentiful” as during the regular growing season. Plant growth is minimal. “You’re not really gardening, just sort of picking. It’s basically a refrigerator.”

But Pape enjoys the challenge of pushing the growing season to its outer limits. “It’s thumbing your nose at Old Man Winter,” she said.

Read the full article here: http://m.startribune.com/lifestyle/homegarden/285986551.html

WHAT?!! 66 Things You Can Grow At Home?? In Containers?!?!?!?

Growing your own food is exciting, not only because you get to see things grow from nothing into ready-to-eat fruits and veggies, but you also don’t have to worry about the pesticides they might contain, and you definitely cut down on the miles they—and you—have to travel.

If you’re up to the challenge—and it really isn’t much of one—growing your own food can be so rewarding. And so much cheaper! Just be sure to choose the right planter or container, learn how to maintain it properly, and go find yourself some seeds! (Or starter plants.)

Here’s a starter list of all the crazy things even urban gardeners, without space for a garden, can grow at home.

1. Apples can be grown in a container; you can also grow them on the balcony or other small space using a technique called espaliering.
2. Kumquats
3. Avocados (plenty of extra tips online if you search)
4. Blackberries
5. Blueberries (sometimes helpful videos are available online)
6. Pomegranate
7. Cherries
8. Figs
9. Pears
10. Dwarf oranges
11. Grapefruit
12. Tangerines
13. Meyer lemons
14. Limes
15. Bananas (look for container gardening tips online)
16. Pineapple
17. Papaya
18. Guavas (several varieties)
19. Hops—yes, as in the ”spice” ingredient in beer. Turns out they’re easy to grow!
20. Aloe Vera
21. Strawberries
22. Tea (well, herbal tea)
23. Quinoa!
24. Tomatoes
25. Summer squash
26. Other squashes, like acorn and pumpkin
27. Hot Peppers
28. Sweet peppers
29. Cucumbers
30. Small cantaloupe
31. Jenny Lind melon (an heirloom cantaloupe)
32. Golden Midget Watermelon
33. Basil
34. Oregano
35. Parsley
36. Rosemary
37. Chives
38. Catnip
39. Thyme
40. Sage
41. Parsley
42. Kale
43. Mesclun greens
44. Spinach
45. Swiss chard
46. Lettuces (plenty of options there, from micro-greens to head or loose-leaf)
47. Mustard greens
48. Collard greens
49. Arugula
50. Carrots
51. Beets
52. Potatoes
53. Sprouts
54. More sprouts: mung bean and lentil sprouts
55. Wheatgrass
56. Kohlrabi
57. Turnips
58. Rutabagas
59. Celeriac
60. Parsnips
61. Jerusalem Artichoke
62. Sugar snap peas
63. Rhubarb (not ideal in a container, but it can work)
64. Mushrooms (again, more tips online if you look)
65. Pole Beans
66. Aaaand… asparagus, although some disagree that it does well in a container. Try it if you’re ok with a risk!

Source: http://planetgreen.discovery.com/home-garden/sixtysixthings-growhome-containers-withoutgarden.html

Why, How & What to Compost

From AvantGardens

“Compost is a mixture that consists largely of decayed organic matter and is used for fertilizing and conditioning land. Home composting reduces the need for water, fertilizers, and pesticides and encourages a higher yield in crops. Consisting of nutrient-rich brown and green material, compost creation is low-maintenance and can be done on both small and large scales.”

compost_infographic_5

Creating your own compost will save you money and is easy to do! With compost starters like Ringer® Compost Plus available to help organically speed up the process, you can start reaping the benefits of your own compost in no time. Your plants and the environment will thank you.” – This infographic, brought to you by Avant Garden Decor, home of Gardener’s Blue Ribbon® vegetable gardening products, shares intriguing facts regarding home compost production and its benefits.

How to Store Your Seeds For the Long-Term… in the Freezer?

Screen Shot 2014-08-04 at 11.42.21 AMThe strangest posts wind up causing some controversy.
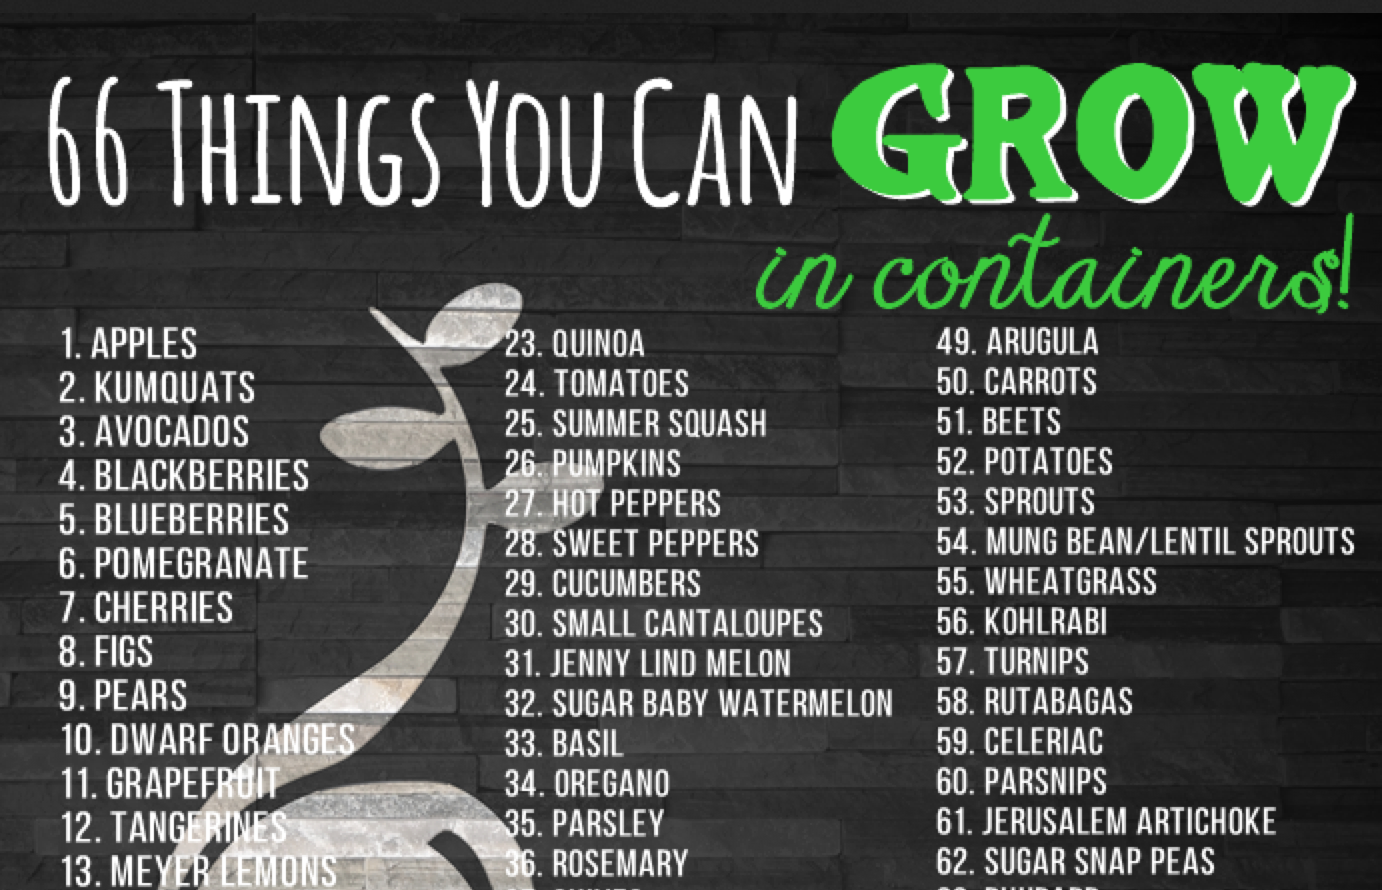
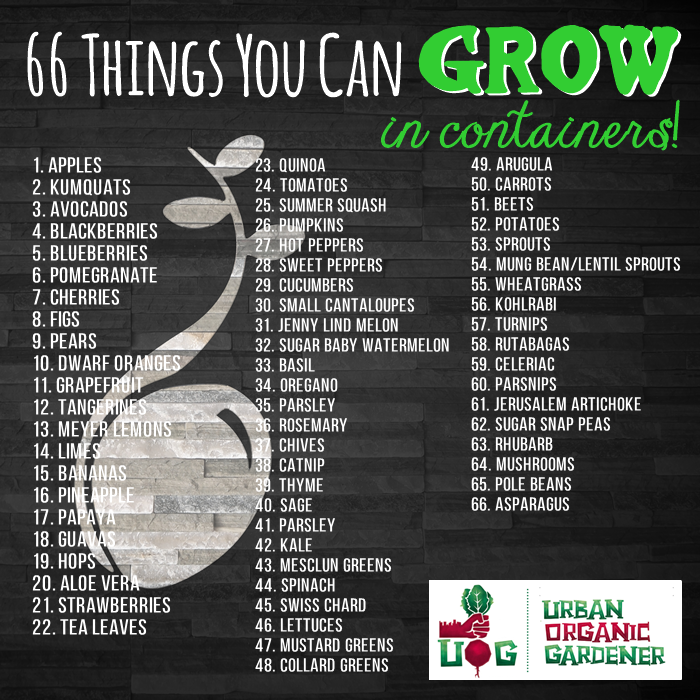
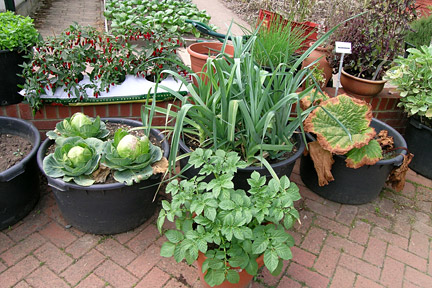
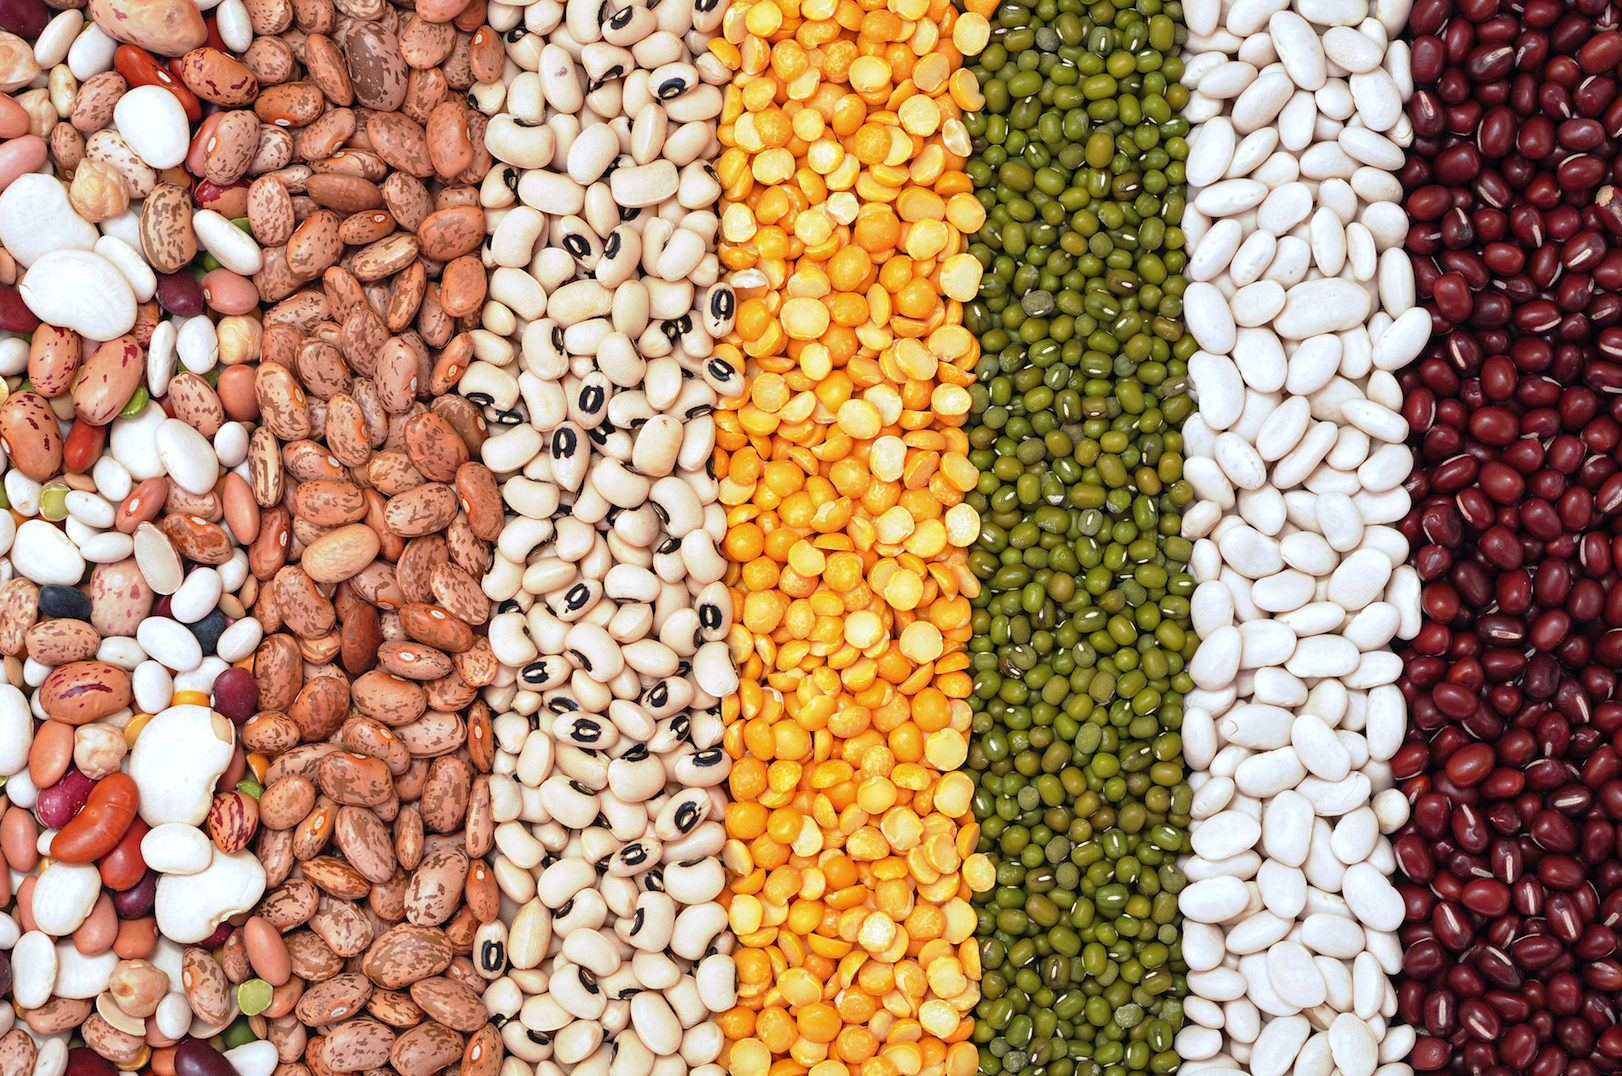
It doesn’t make sense to me.

When I wrote about why having an emergency seed bank is important, I didn’t quite get the reaction that I’d expect.

I received emails, Facebook comments and Tweets saying that I couldn’t be more wrong about storing the seeds and that freezing them was a horrible idea.

I’ll admit that I have never frozen seeds before and then used them. It is a recommendation that I’ve seen countless time before.

So I did a bit of research and here’s some excerpts from sites:

Last year we planted a variety of different seeds that we had put in the freezer over 10 years ago and forgotten about and they came up just fine. They were just in ziplock bags. — via Survivalist Boards

Seeds dried to a low moisture content with silica gel and then stored in a freezer can usually retain viability for many years. — via HowToSaveSeeds.com

Freezing seeds will put the embryo into suspended animation reducing its need to consume the sugars that are encased in the seed. This increases it’s storage life immensely… — via Ready Nutrition

Takeaways for Storing Your Seeds in the Freezer

The main takeaways that I got in my research were the following:

  • Make sure the seeds are dry when placed in the freezer. Using a silica gel pack can help with this.
  • Put the seeds in an airtight container. This can be a mason jar or even a ziplock bag. Vacuum sealing works well too.
  • Allow the seeds to thaw before planting. These are for long-term storage, but good to keep this tip in mind.

How do you store your seeds for the short or long-term?

Get 10% Off your Vegetable Seed Purchase Online from SeedsNow.com

All you have to do is click here and use the discount code URBAN10 to get 10% off.

Why Urban Farm Grows Food in 100% Container Garden

Take a peek at an Urban Garden growing food in containers, right in downtown Fort Lauderdale!

John from http://www.growingyourgreens.com/ goes on a field trip to downtown Fort Lauderdale, Florida to share with you a urban farm who grows food in 100% containers. In this episode, you will learn about Fort Lauderdale Vegetables who grow food in the city and teach about decentralized farming. You will learn some of the techniques they use to grow in a tropical environment that gets lots of rain. You will also discover why smoking is not a good idea around your garden and much, much more.

15 Tips for Growing Food in Metal Troughs AKA Stock Tanks

This post and its images are from this website: http://theyarden.com (link to the article).

trough-600x450

  1. Troughs, also known as stock tanks, make a great and attractive alternative to wooden raised beds. They’re easy to use (no building required!) and cost-wise not a bad investment as they will last forever and keep burrowing animals out. If you pick one 36″ or higher, they’ll also keep bunnies out, too
  2. Look for used stock tanks at farm sales or on Craig’s list. New stock tanks can be purchased at farm stores or some city garden centers like Lake Street Supply in Chicago. If you don’t see them where you buy your garden products, ask the manager to special order troughs for you
  3. Troughs come in a variety of sizes, shapes and heights and the taller ones provide a great option for those who don’t want to bend down to garden
  4. You can get really creative with stock tanks – they don’t just have to be a single lozenge shaped tank. Use your imagination and have fun with the possibilities!
  5. Troughs are heavy so think carefully about where you want to place it. It will be hard to move once filled
    trough3
  6. You will also want to consider reflection from the sun hitting the metal tough when you’re placing them – they may look lovely out your kitchen window but if the glare is blinding you as you wash the dishes, that’s not a great thing
  7. Most of the principles that apply to container planting also apply to troughs
  8. Make sure you have good drainage! You’ll want to drill holes in the bottom of your trough to allow for drainage. You will also want to set your trough on cinder blocks or bricks to allow the water to drain out thoroughly. If you raise the trough to facilitate drainage, make sure you have enough support under the trough so it doesn’t buckle due to the weight
  9. You will want to put 3-6″ of gravel, broken pot shards or other material at the bottom of the trough to help with drainage. You might want to put a fine mesh over the drainage material to keep your soil from slowly leaking out (and potentially clogging  drainage holes)
  10. Like other containers, troughs can dry out faster than in ground plantings or raised beds in hot weather. Be sure to check if the trough needs water frequently by putting your fingers into the soil. If you detect moisture 2-3″ down, you’re good
  11. Don’t over compensate by watering too much. Plants don’t like their roots in soupy soil – it prevents them from “breathing”
  12. Soil rich in compost is great for veggies and works in a trough
  13. Your trough will warm up faster in the spring so you can plant a little earlier. But it will also warm up significantly in the summer so be careful when touching the metal that it isn’t too hot – ouch! “Hot crops” like tomatoes, peppers and eggplant will most likely love the extra soil warmth a trough will provide
  14. From a decorative perspective, troughs can be painted on the outside to match a color scheme.
  15. Troughs are great for water gardens too, although different rules apply. But, consider your trough a very large container and come up with all sorts of ideas that suit your particular gardening situation!

3 Reasons Your Garden Will Fail This Year

Spring is here… getting lots of messages about starting your first container garden.

You are excited and nervous. And for good reason. You’ve lots to do in the next couple months!

Why your garden will fail

The 3 reasons your garden will fail this year.

  • 1. You want to grow a farmers market in your small space.

You want to grow tomatoes, eggplants, cucumbers, peppers, kale, onions, garlic, strawberries and a billion other things.

A lot of those veggies require a bit more time and energy to grow. I’m not saying it’s impossible to grow them, just that to grow all of them when you are starting out might not be the best idea. You get an A for the enthusiasm, but you are just starting out. Chill out a bit.

Start by buying sampler seed packs only $0.99 cents over at SeedsNow.com. They’re 100% NON-GMO.

Growing your own food is overwhelming to start. So why try to grow a farmers market on your balcony?

Growing your own food is overwhelming to start. So why try to grow a farmers market on your balcony? — Tweet This

Scale it down a bit.

  • 2. You read about companion planting

You read in a gardening book, magazine or on some site that you can increase your yield, protect against bugs and that companion planting was smart to do. Now you wanna cram hundreds of plants into one container.

Companion planting is a good practice to employ, but if you are new to the container gardening game, keep it simple. Why introduce other variables into the equation?

Get one crop in a container down first, then introduce others into the mix.

  • 3. You only get 4 hours of sun, but want to grow tomatoes –>

How did I know this? Because everyone wants to grow tomatoes.

If you want to grow tomatoes and don’t get enough sunlight, you will likely fail. This is why it’s so important to determine the amount of sunlight your space gets and grow what suits those conditions. If you get less than 5 hours, then grow some of these shade loving veggies.

3 sources to buy your vegetable seeds


Don’t set yourself up for failure

One of your big concerns in starting out is making sure that you are doing everything right because you are scared of failing.

That’s why I want you to minimize your failure and avoid those three mistakes. I’m not saying those ideas are and dumb and ridiculous, but to start out…they kind of are.

Your turn

I know that you were planning one of these mistakes to start this year. In the comments below, ‘fess up and let me know which one you had planned and will be avoiding.

How to Determine the Amount of Sunlight Your Garden Gets

What can I grow?

That’s the most common question that I get asked.

First, you’ll have to decide on the location of your urban garden.

Then you’ll have to determine how much sunlight your garden space gets.

There are four main categories of sunlight:

  • Full sun. 6+ hours of direct sunlight.
  • Partial sun. 4-5 hours of direct sunlight.
  • Partial shade. 2-4 hours of direct sunlight.
  • Shade Less than 1 hour of direct sunlight.

Since we are living in urban environments, we have other structures that we are dealing with as well. Those can be adjacent buildings, over hangs and walls.

I would assume that most of us fall into the partial sun category and below.

Easily figure out how much sunlight you get

A simple way to figure out how much sunlight your space gets is to monitor it throughout the day.

All you have to do is pop outside for less than a minute every few hours and take some quick notes.

Start off with a quick sketch of your garden space. Section it off as the day progresses because the surrounding structures will cast shade in certain areas.

Here is a video of what the process looks like from my balcony garden:

[vimeo clip_id=”35606437″ title=”0″ byline=”0″ portrait=”0″ width=”525″ height=”393″]

Once you know how much sunlight your garden gets, the list of what you can grow has been narrowed down for you.

My balcony gets only three hours of direct sunlight. Based on that my selection is limited down to certain herbs and vegetables. This is why I’m growing a lot of greens.

Now you can repeat the same process and leave a comment below to let me know how much sunlight your urban garden gets.

5 Things I Learned About Gardening in 2011

It’s December that means it’s time to start breaking out the “2011” lists.

Here are five things that I learned about gardening in 2011.

Getting a Better Yield in Your Container Garden

  • One way to achieve this is through succession planting. That is when you space out your plantings, so as you are harvesting one crop another is growing right behind it.
  • After your seedlings start to grow, you’ll want to thin them out. This will give them room to grow and allow the strong ones to survive.

Organic Doesn’t Mean It’s Great

  • The best example of this is Miracle-Gro and their Organic Choice line. Yes it is organic, but it’s still Miracle-Gro who is partnered with Monsanto.
  • Since I live in a city there are things that I cannot control. One thing is the construction that is going on in my neighborhood. It is likely kicking up all kinds of dirt and toxins into the air, but that doesn’t make my garden any less organic.

Seed Saving

  • I saved seeds for the first time this year. I saved lettuce and parsley. Will get those planted in 2012.

Growing Your Own Food is a Political Act

  • This was one of the more controversial topics when mentioned. By growing my own food and inspiring others too, I see myself as a food activist. It touches on environmental, political, health and a variety of other subjects that most people don’t associate it with.
  • Talking about Michelle Obama and the White House Garden was a topic that pissed a handful of people off and resulted in people no longer reading my site, connecting with me on social media channels, as well as some hateful emails. I see her as a front to distract people from what her husband is doing.

Failure Will Happen

Those are some things that I learned about gardening in 2011, what did you learn?

Using a Scarecrow to Scare Birds From Your Garden

Just because you have a balcony garden or are gardening in a small space, doesn’t mean that birds won’t be picking at your food.

Screenshot 2014-04-10 17.22.38

What I’ve started to do is use a scarecrow to keep the birds away from the seedlings and sprouts in my containers. No clue why birds are scared of scarecrows, but it works. My guess is that they think it’s a person.

All you have to do is put the scarecrow by the containers. Make sure that you move him or every day or frequently. This will trick the birds into thinking that it’s alive and moving, so they won’t go after your stuff.

What are some other ways to scare birds away from your garden?