Health Benefits and Reasons to Grow Mint

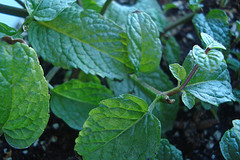
Mint is a commonly grown herb in container gardens…

…but do you know the health benefits of this herb?

Well today, I’ll share some with you some ways that I use it and other ways that it can be used.

Common uses for mint

Soothes aches, pains and stomach problems
You can easily make mint tea by steeping mint leaves in hot water for a few minutes. This has been known to help with:

  • Digestion
  • Hiccups
  • Farting
  • Menstrual cramps
  • Constricted muscles
  • Other minor aches and pains

Antiseptic and antibacterial
“Mint possesses astringent, antiseptic, antibacterial, and antimicrobial properties,” said the Marketing Manager for an online herb company. “Peppermint is great for cleaning abrasions, cuts, burns and wounds. It’s even good for treating acne.- best when steeped with hot water and left to cool, then applied as an external rinse.”

Relieve headaches
If you are suffering from a headache or migraine, you can mash up mint leaves with some oil. Then apply the mixture to where you are feeling the pain.

Decongestant
“It’s also a decongestant and has expectorant and antiviral properties,” said the marketing manager. “Peppermint tea isn’t just a great stress reliever, it’s good for clearing respiratory issues, treating colds and helping to open up nasal and chest passages aided by its mentholated aroma.

I like adding a pouch of it to hot water or to my shower to infuse the steam with peppermint to help me breathe better when sick.”

[vimeo clip_id=”35989867″ title=”0″ byline=”0″ portrait=”0″ width=”525″ height=”393″]

Growing mint

Mint is an herb that you shouldn’t start from seed, and can easily transplant in your container garden.

When you harvest mint a certain way, you can promote even more growth.

You can get a mint transplant from your local nursery or a cutting from a friend.

Sound off

How do you use mint?

5 Herbs You’ll Never Want to Start From Seed

Which herbs should you start from seeds?

You can experiment and find out on your own…

…or you can read the rest of this post and save yourself the hassle.

If you want to save time and energy, continue reading.

Some herbs require too much of your time

There definitely is something fun about starting from seed. You get to take care of the seedling and watch it grow until you finally use. Like a child of yours.

No doubt on that.

But there are some herbs that are too much work and require too much of your precious time to start from seed and you’re better off buying transplants.

This is especially true because we are urban gardening in small spaces like our apartments and in containers. We have to maximize our space.

The herbs that experts say you shouldn’t start from seed

Bay Leaf
“Bay is extremely difficult to germinate because they must be fresh and viable, and must be stratified and kept moist,” said Briscoe White, the owner of an herb company. “That’s one of the reasons bays are in such high demand- they’re hard to find because they’re hard to germinate, have a low germination rate and grow extremely slowly.”

Lavender
“Lavender can be a little tricky because they’re both very slow growing from seed, which can lead to problems with disease or fungus, since the young plants are so susceptible,” said the White. “Lavender also is very finicky with moisture and because of its slow growth can be difficult to keep healthy.”

Flavored Mints
“Many kinds of flavored mints, like chocolate mint or orange mint, can’t be started from seed, only from cuttings,” said Fern from Life on the Balcony. “This is because they’re hybrid varieties that don’t come true to form when grown from seed.”

[vimeo clip_id=”35859819″ title=”0″ byline=”0″ portrait=”0″ width=”525″ height=”393″]

Rosemary
Rosemary is much like lavender and, “It can be frustrating to grow from seed because there are so many varieties,” said the White. “To ensure that you get a true variety, you’re best to take a cutting and propagate from that, rather than seed.”

“Rosemary is so much easier to start from a cutting or from a plant bought at the nursery,” added Fern.

White Sage
“White Sage is also difficult to germinate as it has a 10-15% germination rate and on top of that, just takes a lot of time to get growing,” said the owner. “The viability is so low, that we end up placing 10-12 seeds per cell to try to get enough plants to sprout.”

Where you can buy these herbs

You can get these herbs from

  • Your local nursery
  • A cutting from a friend

Sound off

What herbs are you growing or want to start growing?

Starting an Herb Garden Using a Shipping Pallet

The project of using a shipping palette to make an herb garden is one that I originally saw on Instructables.

The concept is that you water the top plant and it drains through to the plant below that and then to the plant below that.

I followed the basic steps steps that were laid out there. You are supposed to drill the neck of the bottle through the top part of the bottle below it.

The palette that I had the slats weren’t close enough and the bottles weren’t long enough, so I had to adapt.

Here is what I did and what was used.

    Tools and Materials

  • Shipping palette
  • Soda and juice bottles
  • Razor and scissors
  • Drill
  • Wood screws
  • Rocks
  • Newspaper
    Instructions on how to build the herb garden

  • Cut the bottom parts of the bottles off.
  • Screw the first bottle into the top slat. Use two screws spaced out evenly to support the weight.
  • Crumple up some newspaper and stick in the bottom of the bottle. Put some rocks in the bottom too.
  • Line the entire inside of the bottle with newspaper to protect the roots and soil from direct sunlight.
  • Trim off any excess newspaper that’s flowing over the top.
  • If your bottle doesn’t reach the slat below, then you will have to reinforce it with something sturdy. I used hangers that I bent out of shape and chopsticks.
  • Fill the bottles with soil.
  • Plant seeds or transplants as necessary.
  • Be sure to put something under the bottom bottle to catch the water.

[flickrset id=”72157625027314308″ thumbnail=”square” overlay=”true” size=”medium”]

httpv://www.youtube.com/watch?v=Hi4Bazmc6-U

Succession Dill Seed Planting

The dill seeds were planted sometime in the beginning of June. To make sure that I continually have dill available to be I did some succession planting of more seeds.

Succession planting is when you plant seeds in a way that you continually have a fresh crop available. Once one crop is harvested, there is another growing right behind it.

This is great for small space gardening. I never did it on my fire escape garden, but am trying it for the first time on my balcony garden.

Initially there were two rows of dill seeds planted. Now there are four seeds that have sprouted. For some reason, it’s the seeds that were planted in the corners. The ones in the middle have yet to sprout.

For this succession planting, two more rows of dill seeds were planted in between the initial two. I’m hoping that this will provide me with plenty of fresh dill throughout the coming months.

httpv://www.youtube.com/watch?v=UJ1LdsOA_Z0

Creative Herb Garden Container Idea

Most of my planting so far have been of one single herb or veggie in a container. This time I decided to get creative with a herb container idea – I surrounded calendula with basil, cilantro, parsley, and oregano.

I know that’s pretty crazy. It’s summer time, and I’m feeling frisky. Chopsticks were also reused as row markers to tell what the hell was planted where.

There were four sets of calendula seeds that were planted in the center of the container. To the top of basil about five sets of basil seeds were planted. To the left cilantro seeds were planted in about three rows. Parsley seeds were scattered along the bottom and oregano along the right side.

One of the top five gardening mistakes that I made last year was planting too many herbs together.
This is the first time that I’ve mixed up different kinds of seeds in s container like this.

That was in much smaller containers, so I’m hoping that the bigger self-watering container will allow the herbs to grow together. What do you think?

httpv://www.youtube.com/watch?v=v3BjT_1OZqc

Five Gardening Mistakes I’ve Made

Since I’m still new to this gardening thing, I’ve made plenty of mistakes in my first year. I’ve also had many successes as well, with the most memorable being my first lettuce harvest.

For this post, I’d like to share the Top Five Gardening Mistakes that I’ve Made. Life ain’t perfect and neither are my gardens. I know hard to believe.

I’ve made these mistakes, learned from them and have become better at gardening (and life) because of it.

  1. Putting too many food scraps in the compost bin. This was one of my first mistakes and happened before I even planted my garden. Luckily, it wasn’t a tell-tale sign of things to come and easily rectified. Though the smell in my apartment was absolutely horrendous for a few days.
  2. Upside down herb gardening. When I first started this, it seemed like a great idea and looked cool as hell too. The first time around, they all died in less than a month. So I tried again with the same results – dead herbs. Then I realized I should turn grow the herbs out of the top, not the bottom…duh.
  3. Planting cherry tomatoes on my fire escape. It was great that I was able to get fresh, ripe tomatoes from my fire escape, but the plant grew to be way too large for my fire escape. I definitely won’t grow it again in such a small space.
  4. Plant fewer or single plants in each container. The celery plant that grew alone in a container was more than double the size of the ones that were packed together. Also I had combined herbs into containers, which stunted the growth of some of them. It was just a case of me being greedy and trying to plant as much as I could.
  5. Worm composting. I went through not one, not two, but three sets of worms that I killed. What can I say? I’m a worm serial killer. They were literally dying to get away from me. It was a major fail.

These are only five of the mistakes that I’ve made while gardening this first time around. There were plenty more and there will be plenty more to come. None of which will stop me from continuing to garden.

What are some gardening mistakes that you’ve made?

Basil Is Not A Cold Weather Herb

Is there a saying that a plant takes after it’s owner? Well if not, I think someone should start that saying because my basil plant definitely takes after me.

The basil plant, much like myself, has severely wilted and not sure if it’s going to be spring back to life. I’m thinking that I should’ve put the miniature greenhouse on it sooner.

I’m not totally giving up on because my pepper plants already proved me wrong when I talked smack on them.

Let me focus on the positive of the basil plant – I was at least able to harvest it once and get a meal.

Now I’ll have to wait and see if it will spring back to life. What do you think?

httpv://www.youtube.com/watch?v=Awn3Efd7Bz8

What I Learned About Planting Herbs Together

I learned a good lesson about planting herbs together in the same container. It’s not best to do so. Similar to planting celery in the same container – nothing horrible will happen, but the herbs won’t grow as well.

When I first planted them in my backyard vegetable garden in Brooklyn, the herbs were planted two to a container.

It just happened to work out that my grandmother had just enough containers to accommodate that, and I didn’t want to buy any more.

So they were planted based on what I thought tasted well together. Made perfect sense to me. Rosemary and thyme, chocolate and spearmint and so on.

The thyme totally dominated the container and the rosemary barely grew. While both of the mints grew, they got entangled and didn’t last too long.

I definitely think that the herbs would’ve done much better if they were planted in their own containers.

Another lesson learned and no one or thing was harmed.

What’s your experience with planting herbs together?

httpv://www.youtube.com/watch?v=Ie2A1rkvkdo

How to Make a Hanging Herb Garden Using Recycled Soda Bottles

The idea of the hanging garden planter using a soda bottle came after my unsuccessful attempts at upside down vegetable gardening.

One of my readers, Craig Stanton, left a comment saying that I should put the cap back on and grow the vegetables out of the top. That seems so obvious, but I didn’t think of it at all and they’re also easy to make.

These hanging garden planters are a great low cost way to start your own home vegetable garden. You can hang them in a window, on your balcony or anywhere that gets sunlight. I was able to put them on the rails of my fire escape garden.

    Here’s what you’ll need to make one:

  • Tools and materials 2L soda bottle
  • Duct tape
  • Razor
  • Hole puncher
  • Thick twine or thin rope
  • Drill or something to poke hole in bottle cap

httpv://www.youtube.com/watch?v=_gF8Re1Xi7A

    Instructions on how to make a hanging herb planter:

  • Use razor to cut off bottom third or so of soda bottle.
  • Wrap duct tape around the bottom part of the soda bottle. Make sure that half of the duct tape is on the bottle and half is above it.
  • Cut slits about 2-3″ apart in the duct tape and fold over.
  • Punch two holes about halfway down the duct tape. Cut two more on the opposite side.
  • Cut string and thread through two of the holes form the outside in. Do the same on the other side.
  • Drill hole in soda bottle cap to allow for drainage and screw back on.

Do Not Use Soda Bottles for Upside Down Herb Planters

It’s been a bit over a week since I planted my upside down herb garden on my fire escape again. I planted them in soda bottles that were recycled into the upside down planters.

The results are the same though. Death.

So unless I am doing something horribly wrong, I wouldn’t recommend building and using this contraption to grow your herbs.

The first time I planted them, the herbs died quickly as well. It could’ve been because the soil was too heavy or because of my not so gentle hands. So I decided it was time to give it another go.

This time I used the coconut coir based soil and was definitely much more gentle, but the results were still the same.

httpv://www.youtube.com/watch?v=NPitnVwVY8s

Now I need to figure out another way to grow herbs on my fire escape. I need something that I can hang from the railing. Any ideas?

Making an Upside Down Herb Planter

Since I am gardening in such a small space, I need to make sure that I am maximizing every inch possible.

When I was doing my initial research, I came across the Instructable on upside down hanging planters.

Perfect for my fire escape and for this project. Using recycled materials, so it’s inexpensive and efficient. They are also easy to make.

    Tools and materials

  • 2L soda bottle
  • Duct tape
  • Razor
  • Hole puncher
  • Thick twine or thin rope

httpv://www.youtube.com/watch?v=9ei9qBeY2CY

    Instructions on how to make an upside vegetable planter

  • Use razor to cut off bottom third or so of soda bottle.
  • Wrap duct tape around the bottom part of the soda bottle. Make sure that half of the duct tape is on the bottle and half is above it.
  • Cut slits about 2-3″ apart in the duct tape and fold over.
  • Punch two holes about halfway down the duct tape. Cut two more on the opposite side.
  • Cut string and thread through two of the holes form the outside in. Do the same on the other side.

Starting an Upside Down Herb Garden…Again

I finally got around to starting my upside down herb garden after killing it last month.

Since the first go around was such a success, I decided to take it slowly this time and just planted some parsley.

httpv://www.youtube.com/watch?v=_8XDoYSn8os

Here’s a step by step as to how I planted the parsley upside down in my herb garden. I stress “gently” because I was anything but in the first go round.

  • Gently separate out one of the parsley plants.
  • Gently place into the container.
  • Feed through and gently pull through the bottom.
  • Pat down the soil.
  • Fill container with soil.
  • Tie to spot.
  • Fill with water until it begins to leak.

Gently separate out one of the parsley plants.Gently place into the containerFeed through and gently pull through the bottom.Fill container with soil.Tie up and fill with water until it begins to leak.

Start Growing an Herb Garden, Not Killing One

It’s been a rainy week here in Seattle, I mean New York, so I haven’t been paying much mind to the vegetables out on my fire escape.

When I finally checked on them, I was happy to see that the lettuces, peppers and tomatoes looked pretty healthy. Then I looked above them and noticed the sad, sad sight of the herb garden I started to grow in the upside down vegetable planters. They looked the opposite of healthy – dead.

Here’s what I think contributed to my massacre of the herbs:

My surgeon like touch. Much like planting vegetables, you need to be gentle when transplanting the herbs. Let’s just say if I was playing Operation, I would’ve lost and lost quickly.

The soil was too heavy. I used the first batch of potting soil that I made myself. It might’ve been too heavy, retained too much water and over saturated the herbs.

The planters just don’t work. I think this is the least likely of the reasons, but it still needs to be considered.

I think it’s a combination of the first two that lead to the ultimate demise of the herbs. I am heading out of town later this week, for a few days (Bonaroo). When I get back, I’ll get some more herbs set up and planted.

Hopefully, if any of you were thinking about starting to grow your own herb garden, this hasn’t discouraged you. Take this knowledge and use it to your advantage.

Even though the upside down vegetable planters haven’t worked out so far, the self watering containers are doing real well. Peep this video:

httpv://www.youtube.com/watch?v=yOXgkHOoD4I

My Fire Escape Vegetable Garden

I set up my vegetable garden on my fire escape this afternoon with 3 buckets and 5 upside down herb planters.

One bucket has Mottistone Crisphead lettuce, Parris Island Romaine lettuce and Anna Aasa tomato. Another has Mottistone lettuce, Parris Island Romaine lettuce and Buttercrunch. The third bucket has Jimmy Nardello’s sweet pepper and Chile Releno.

The herbs that I planted were parsley, basil, sage, oregano and dill.

Check this video tour of the set-up:
httpv://www.youtube.com/watch?v=ST5rQAt5-_0

Building My First Self Watering Container Insert

I took my first crack at making the insert for the self watering container today. The hardest part was cutting a square into circles that would fit snuggly into the bucket. Yes, I just said snuggly.

    Tools that I needed:

  • Razor blade
  • Scissor
  • Pen
  • Thumbtack
  • Rope or string
  • Something to measure water
    Materials:

  • 5-gallon bucket
  • Coin cup to use as my wicking basket
  • 1 12″x12″ vinyl tile
  • Drill with 1/4″ bit
    Steps in making the insert:

  • Put the cup in the container and fill with water. Stop when the water reached the top of the cup. Was about 9 gallons.
  • Next I traced the top and bottom circumference of the bucket onto the tile.
  • Cutting out the circle of the tile wasn’t as easy as this website implied. Eventually I cut out the circle with the help of a scissor.
  • Once the big circle was out had to cut the circle out in the middle for the wicking basket. This was fun.
  • Now I had to trim down the outer circle so that it would fit into the bucket. Used the scissor for this. It was much easier than the razor blade.
  • Then I had to drill holes in the cup. I used a 1/4″ bit and drilled a bunch of holes to allow the soil to soak up the water and feed the roots.
  • It was then put all together and a 1/4″ hole was drilled in the side of the bucket just under the insert for overflow of water.

First step in building the self watering container bucket was to put the coin cup in the bucket and fill until the water reached the top of the cup. It measured at about 9 gallons.Building a self watering container insert - Next I traced the top and bottom circumference of the bucket onto the tileCutting a circle was difficult. I put a thumbtack in the middle of the cirlce and measured out the radius. The string was cut to that length and razor was tied to the end. I was hoping this would get a good cut. Not so much.Eventually got the circle cut out. Now had to do the same thing for the inner circle.Trimmed down the outer circle so that it would fit into the bucket. Used a scissor for this. It was much easier than the razor blade.Using the scissor made thing easier and faster. The insert fit nicely into the bucket. Next step is to drill 1/4 inch holes into the cup.Drilling the holes in the cup to make it into a wicking basket.A bunch of 1/4 inch holes were drilled into the cup. These will allow the soil and roots of the plants to absorb the water.A 1/4 inch hole was drilled into the side of the self watering container just below the insert. Once water starts leaking from it, I'll know that the container is filled.The first self watering container is nearly complete. Just need the pipe.

One insert down, many more to go. There has to be an easier way to cut the circles.

New Plan: Gardening in Containers & Upside Down


Attribution-NonCommercial License by your idea

After some research, I got more info on the self watering containers. The Homegrown Evolution had a great resource on Self Irrigating Planters posted on April 5.

One site that I checked out, Instructables, had a few different variations. One using 2 liter soda bottles and plastic totes. I like it cheap and green. Fits the criteria.

Before I got too far ahead of myself, I had to talk to my roommate to see if he’d let me put these containers out on the fire escape since it’s out of his window. Luckily, he and I are cool with each other and had no problems with it.

Now I am addicted to checking out how I can recycle materials to grow things for this project and found a way to make an upside down hanging planter for herbs.

Also reserved Incredible Vegetables from Self-Watering Containers from my local library.

This project is back on. Don’t call it a comeback.