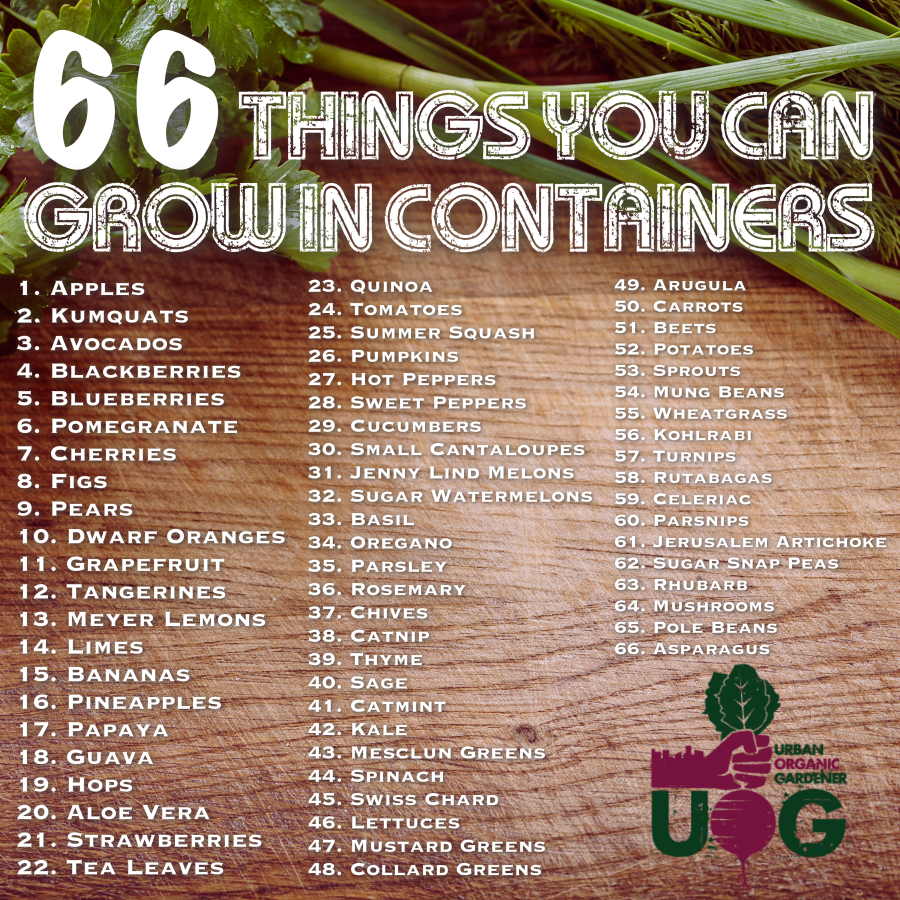
66 Things You Can Grow In Containers


Urban-style organic gardening blog about growing your own food with limited space and creative resources.
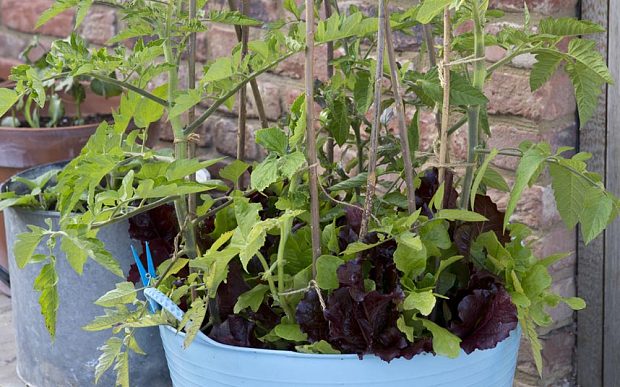
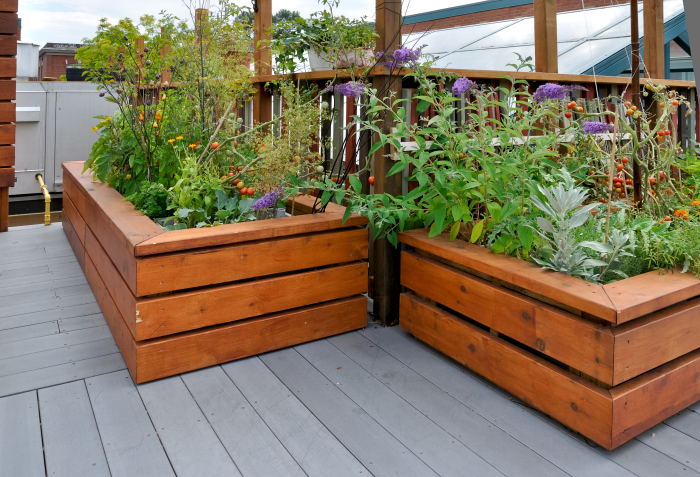
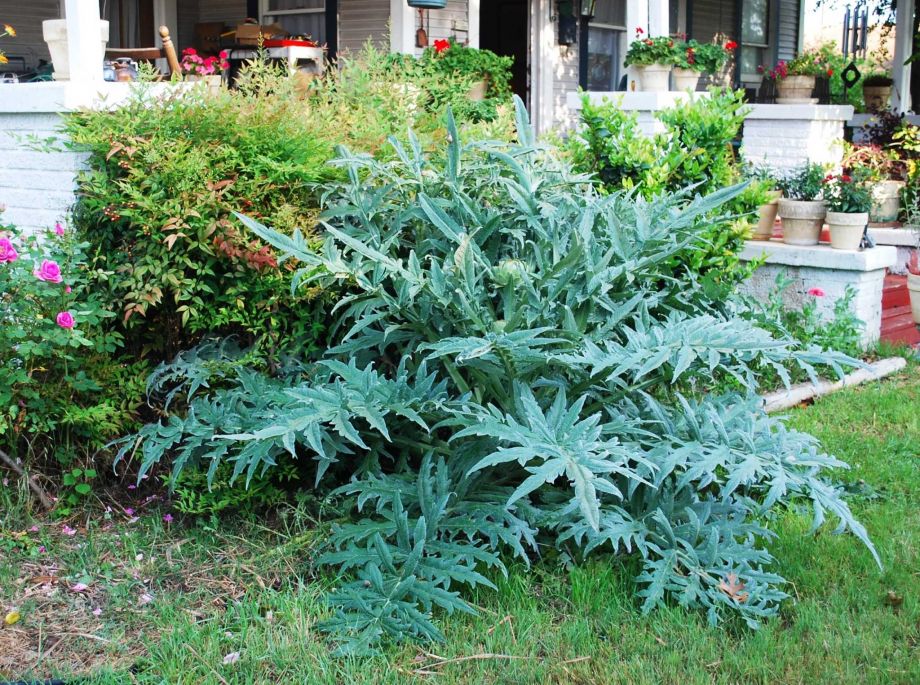
Even if you’re short on space, or gardening in urban areas, you can still grow some of your own food and enjoy a year-round garden. Container gardening can be very productive as long as you maximize your containers potential. As long as you have one large pot, (we suggest 18″ or larger in diameter) you can grow “10 different crops in a single year if you combine compatible plants and plan the growing year carefully.” -source “Telegraph.uk.co”
To Get Started, You will need:
• 1 large pot – a rubber tub bin is ideal or any plastic pot at least 45cm diameter
• Household drill and drill bit if no drainage holes
• Multipurpose, organic, peat-free compost
• A wigwam support made from bamboo canes or any strong flexible sticks such as willow
Click here to read the rest of the article on how to grow 10 different crops in one container!
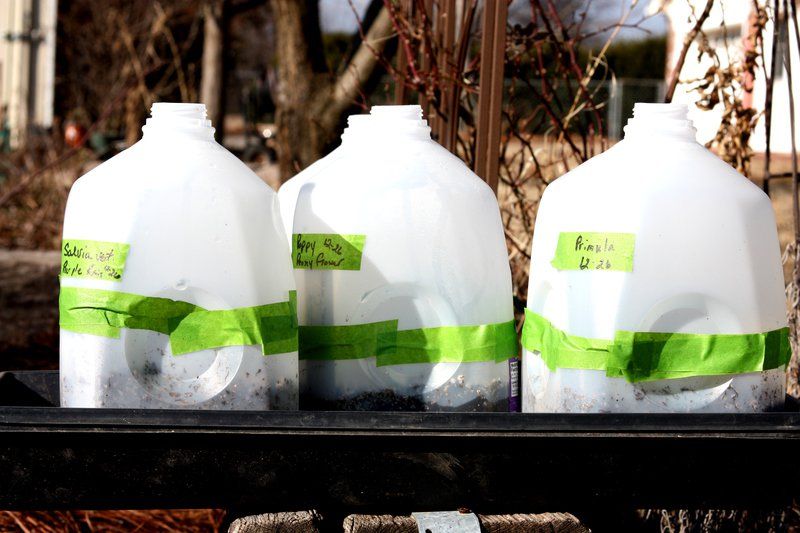
If you want to get a jump start on your gardening outside, but temperatures are still quite cool, you can use milk jugs to create mini-greenhouses.
“Three cold-treatment methods that work include: 1) Plant in recycled containers that are monitored outside; 2) Pre-chill the seeds in the refrigerator; and, 3) directly sow the seeds on prepared beds that are either open to the elements or mulched.”
Steps for making a milk-jug greenhouse:
To read the entire article, visit: “TheMuskogeePhoenix.com”

To read the entire article, visit: “CommercialAppeal.com“
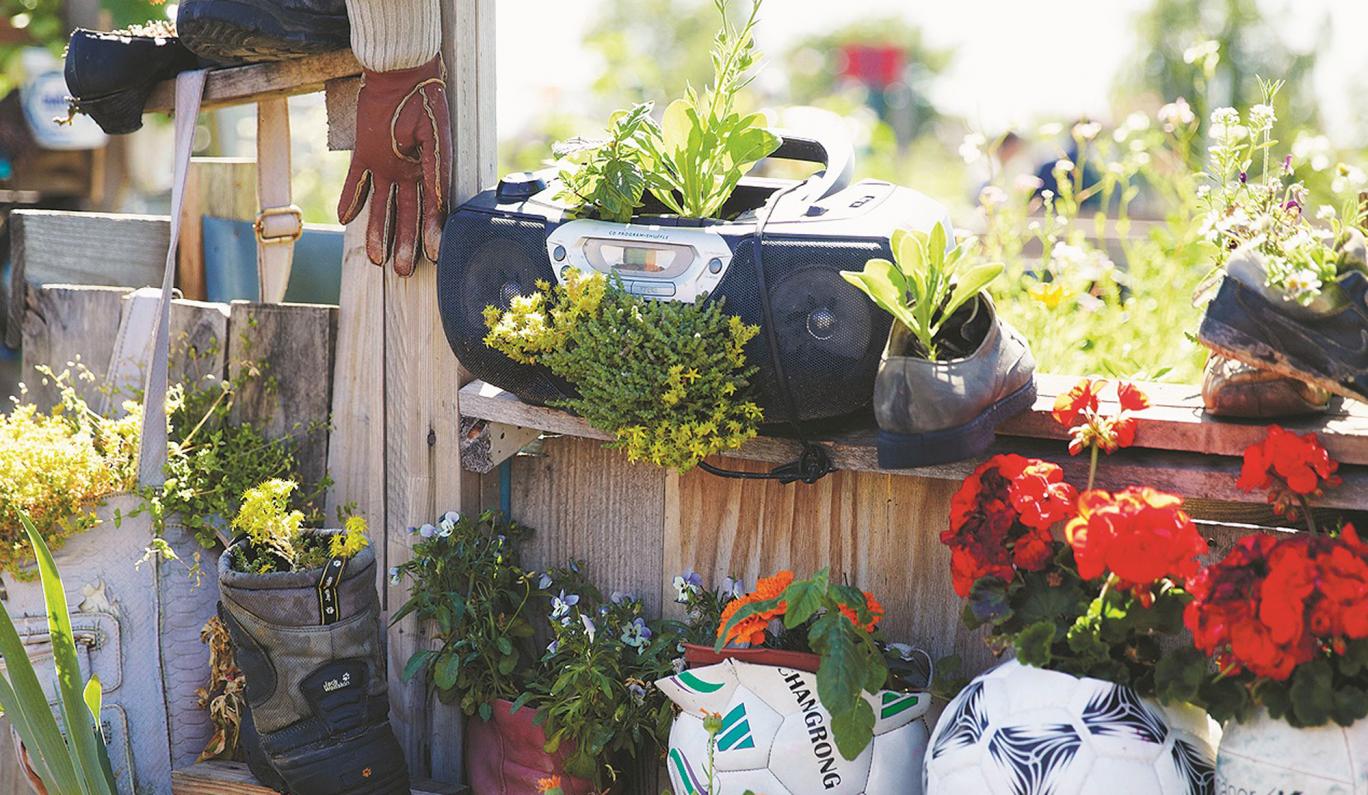
Many urban dwellers have found that even in the smallest of spaces, you can create beauty through urban gardening. All you need is some creativity!
“Inventive urban gardeners don’t dwell on what they don’t have, but use what they do have. ”
Check out the full article here to find out how you can transform any piece of concrete, wall, rooftop or piece of soil into your own little garden oasis…even in the city.
Source: “HomesAndProperty.co.uk“
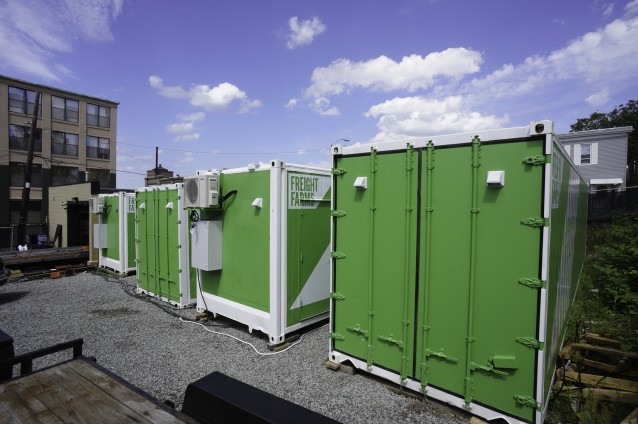
“All Freight Farms units are built in repurposed 40-foot insulated shipping containers. Everything from water to the LED lights in the units are digitally controlled, and each unit is also a Wifi hotspot, connected to the network of Freight Farm units across the country.
Today more than 50 farmers are growing produce in refrigerated shipping containers known as “Leafy Green Machines”. The are functioning mini farms that boast vertical hydroponics and LED lighting systems. The machines “are 320 square-foot self-contained farming units that can grow as much produce as two acres of farmland using less water per day than the average American needs for a single shower.”
To read to full article, visit: “ThinkProgress.org“
People living in urban areas are sometimes frightened about lead being in their soil. In a new study, they found that by using compost you can help keep yourself and your family safe from toxic lead poisoning. “Good compost will also guarantee that you will have plenty of vegetables to harvest.”
The University of Washington led a study that looked at potential risks that commonly are associated with urban gardening. The conclusion was, that the benefits of consuming locally produced vegetables, outweighed any risks from gardening in “contaminated” soils.
“We’ve shown that lead is harmful by eating the dirt, not from eating the lettuce grown in the dirt.”“People are terrified of soils in urban areas. They always think it’s a mystery brew of toxins in the soil, but in vast majority of cases, the contamination is lead,” said lead author Sally Brown, a UW research associate professor of environmental and forest sciences.
Go here to read the rest of the article at: “WashingtonEdu“
Join the club that delivers you garden seeds at just the right time of the year to plant them – hand selected based on your garden specs. Every month you’ll receive a collection of heritage garden seeds and everything you’ll need to get growing. Buy a subscription for yourself or give one as a gift!
Sign up here: https://urbanorganicgardener.cratejoy.com/
It’s simple: $10/month + s/h
Ready to start receiving monthly shipments of seeds, customized for your exact grow zone? START HERE!

Gardening in small space can be just as rewarding and fun as growing in a large garden area. These days, urban gardeners are growing more of their own food in sometimes less than 100 square feet. Balconies, patios, even indoor windowsills are a great place to grow vegetables and herbs. Almost anything can be grown in a container, and if you’re wanting to know what you should plant to maximize your yield in a small area, here are 9 of the best vegetables/herbs to grow in a small garden.
1. Shallots:
Space shallots approx. 4-6 inches apart with the rows 18 inches apart. Plant the bulb root side down, the top of the bulb 1 inch below the surface. Planting too deep grows elongated bulbs that don’t store well.
2. Carrots:
Sow seeds evenly in a very shallow trench, about 1/4 inch deep. Keep seeds moist so they will germinate. Space rows about 12″ apart and when the first leaves emerge, thin to 1″ apart; when true leaves emerge, thin to 3″ apart.
3. Cherry Tomatoes:
To start tomatoes indoors, sow seeds using expanding seed starting soil pods about 8 weeks before the last frost date for your area. Seedlings will be spindly with less than 12-14 hours of light per day, try to keep them in a warm sunny location. When seedlings have 4 leaves, transfer to a deeper pot (3-4″) and again when 8-10 inches tall. Each time, place the uppermost leaves just above the soil line and remove all lower leaves. Transplant into the garden when the stem above the soil has reached 8-10 inches tall. Be sure to harden them off before transplanting them outdoors. Allow up to 10 days for the tomato plants to harden off to the outside temperature fluctuations.
4. Runner Beans:
Set three 6 foot poles in the ground, tepee fashion, and tie together at the top. Leave 3 to 4 feet between the pole groups. Make a hill at the base of each pole, enriched with compost or well-rotted manure, and plant 6-8 seeds in each. After the second pair of true leaves appear, thin to 3 plants per pole. With regular harvesting, the pole beans should bear all summer.
5. Garlic:
Break apart cloves from bulb but keep the papery husk on each individual clove.
Ensure soil is well-drained with plenty of organic matter. Plant in Full Sun.
Plant 4 inches apart & 2 inches deep, in their upright position (the wide end down and pointed end facing up). Come springtime, shoots will begin to emerge.
6. Kale:
Plant Kale in rows 18 inches to 2 feet apart. When the seedlings are 3 or more inches high, thin plants to 10 inches apart and use the thinnings for salads or as a cooked vegetable.
7. Basil:
Try to space your basil plants about 12 inches apart. As long as you harvest the leaves when they are young, basil plants make a wonderful container crop.
8. Lettuce:
Seed should be sown thinly in rows 1 foot apart; for leaf types, thin plants to 2-3 inches apart, then thin again by pulling every other plant when half grown. This will encourage thickly developed plants. For head, Bibb, and cos types, space rows 18 inches apart, plants 8-10 inches apart. Closer spacing results in smaller heads, which may be preferable for small families.
9. Beets:
Sow seed 1/2 inch deep in rows 12-18 inches apart. The beet seed is a compact ball of many tiny seeds. Many plants germinate where each seed is sown, so seed should be placed sparingly. When seedlings are 4-6 inches high, thin plants to stand 1 1/2 inches apart. (They can be used in salad or cooked as spinach.) Then, as these beets grow to about an inch in diameter, pull every other one to allow larger beets to grow.
Original post can be found at: “SeedsNow.com“
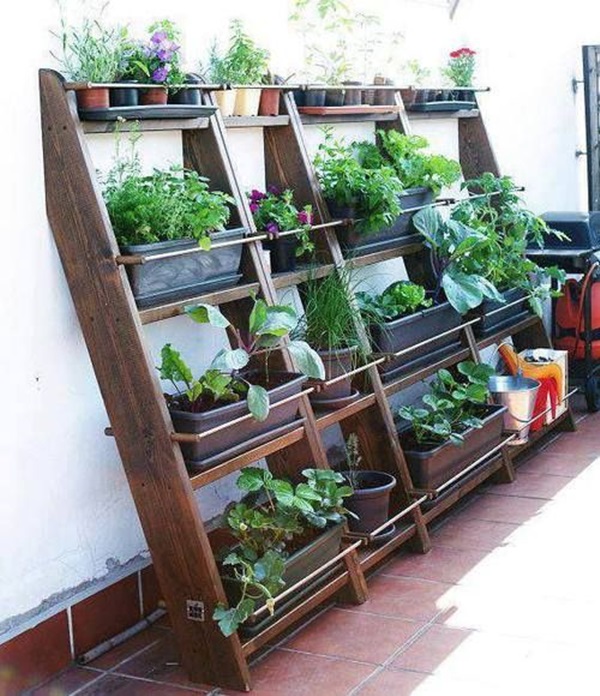
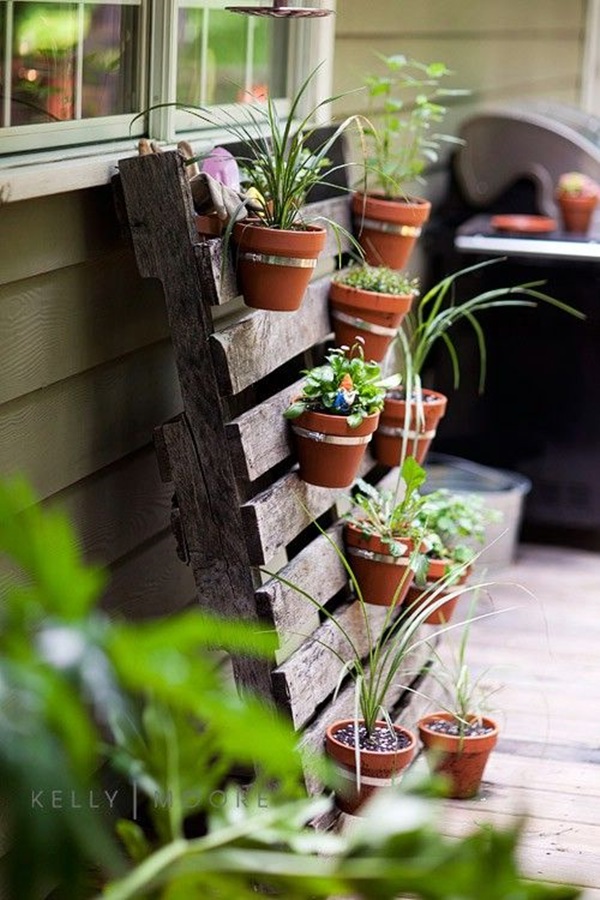
For those who have a desire to garden but are lacking square footage, here are 40 awesome ways you can garden in small spaces! Most of these ideas use repurposed items that you might already have.
1. Grow succulents on top of wine bottle corks that have magnets secured to the back. 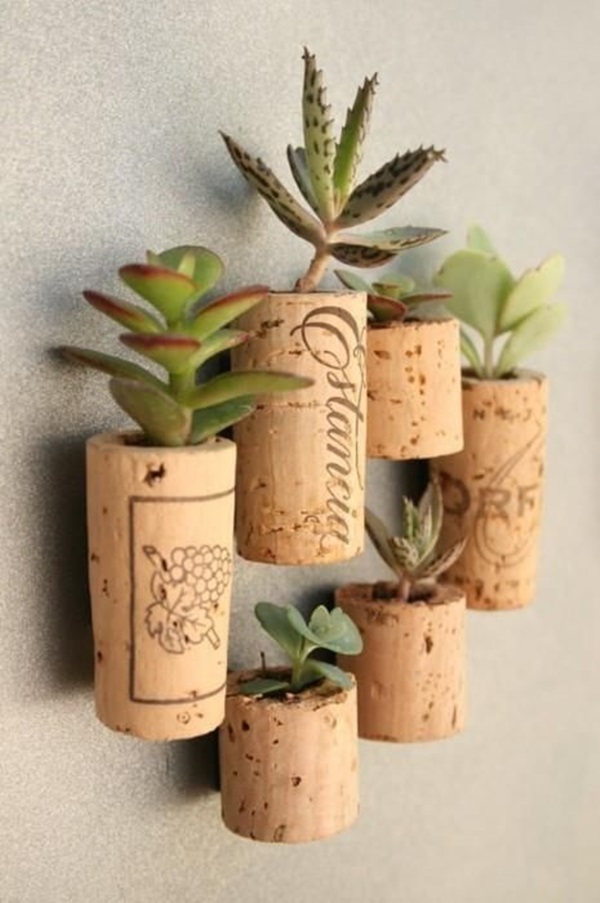
2. Use pallets to grow vertically. Especially useful on decks, patios and balconies.
3. Try growing in a “Dutch Bucket” hydroponic system. 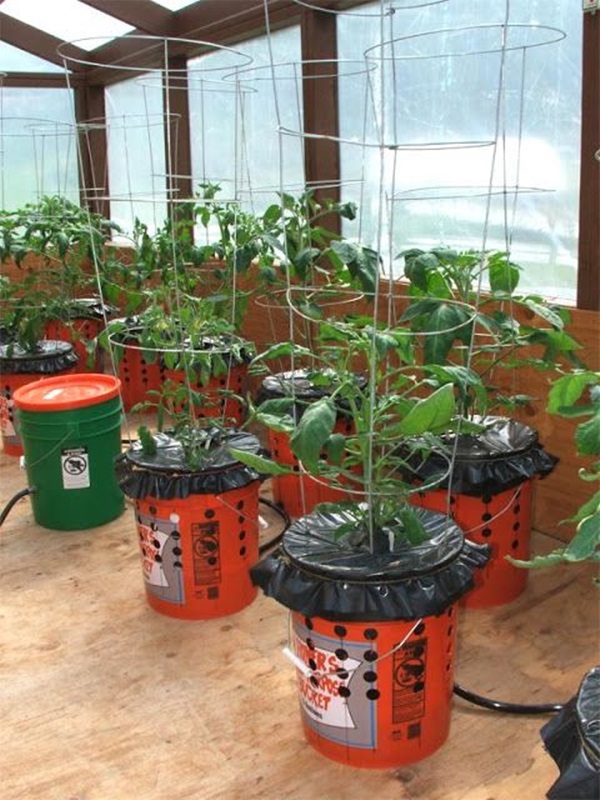
4. Create a vertical hydroponic system using repurposed pipes. 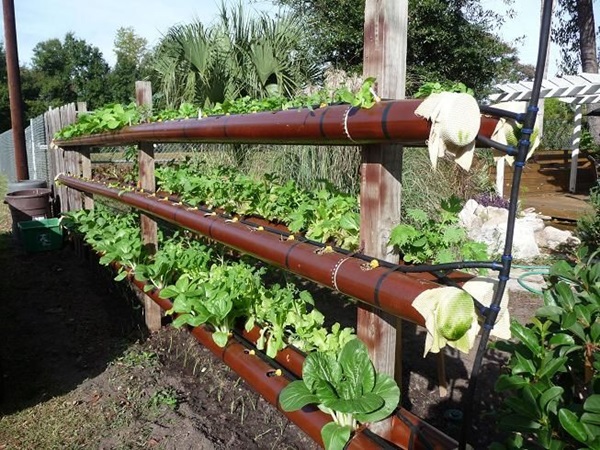
Visit the original article at “art.ekstrax.com” to view more Smart Space Savy Garden Ideas.
Follow Urban Organic Gardener’s board Small Space Gardening Ideas on Pinterest.
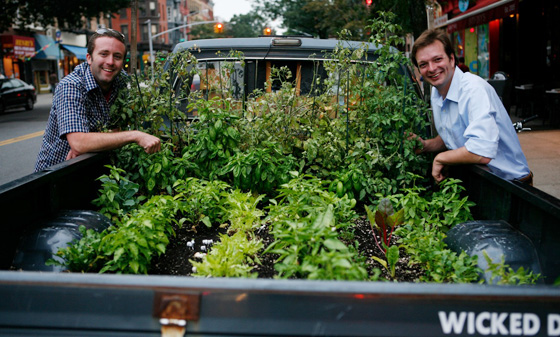
Image source: “Well+Good.com“
Fun and quirky urban farmers tell their story about how they planted vegetables and herbs in the back of a truck’s pick-up bed and literally drove around one of America’s largest cities.
“The design and installation of the Truck Farm was simple, and took less than a day once materials had been collected, all for less than $200. Victoria Foraker of Alive Structures donated the green roof materials for the bed, with PaulMankiewicz of the Gaia Institute providing the lightweight soil necessary for keeping the truck from buckling under a heavy load.” They ordered their heirloom seeds and once planted, they germinated within a few days.
“A time-lapse camera, powered by a small solar panel atop the truck’s cab, captured the progress of the plantings every 5 minutes, thanks to the clever gadgetry of physicist Dan Larsen. Once the seeds started to grow, Ian moved the Truck Farm to find shade on hot days, to borrow a bit of water from the hose spigot of the Italian restaurant down the block, and of course to dodge the street cleaners on Mondays and Fridays.”
To read more about America’s first “Truck Farm”, visit the original article at: “TruckFarm.org“

Off the coast of northwest Italy a group called the Ocean Reef Group along with a team of agricultural experts are installing ballon like mini greenhouses under the sea. Inside they are growing things like basil, strawberries, cabbage and beans. They currently have 7 pods which can each hold around 22 potted plants.

“Unlike underground hydroponic systems and greenhouses, which rely on various heating and cooling systems and LED lights to regulate the temperature, submersion in seawater offers a stable temperature while avoiding exposure to extreme weather conditions on land. When it comes to sunlight, studies have shown that a majority of plants – although not seaweed – are dependent on the red spectrum in light for physiological development; the red can filter out at depths of around five to 15m. To address this, the pods are submerged five to eight metres below the surface; they could potentially go deeper but more data is needed to work out the viability of this.”
You can read the full article at: “TheGuardian.com“
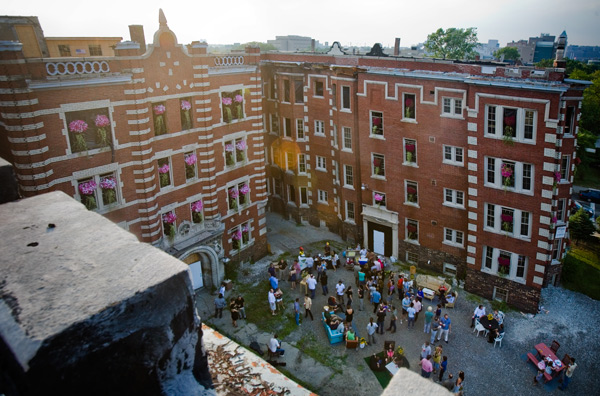
“Through Woolly Pocket’s community outreach discount, Team Detroit was able to bring life back to the tragic destruction of the century-old ‘Forrest Arms’ building in Mid-town Detroit. Team Detroit’s “Green the City” project was a success in creating dramatic hanging gardens by using Woolly Pockets!” -via “Youtube.com“
photo via: “http://www.modeldmedia.com“
If you’re looking to landscape your yard why not landscape with edibles? These edible plants will not only provide you beautiful surroundings to look at, but some healthy and nutritious food to eat. These days a lot of people are finding ways to put their yard to work for them by planting edible trees, shrubs, and vines which will provide their family with edibles year-round.
Before you go laying all new sod or traditional hedges/bushes think outside the “norm” by focusing on herbs, vegetables, edible vines and ground covers, maybe even some fruit trees.
Try planting in a wheelbarrow.
“What you plant depends on the depth of the wheel barrow. Carrots may not work because they need plenty of soil to grow in. But shallow-growing greens such as Swiss chard as well as strawberries and most herbs, including thyme and basil, should all be right at home in a wheelbarrow garden.
Finally, before filling it with dirt, drill several drainage holes in the bottom of the wheelbarrow to help keep the soil from getting — and staying — too wet.”
Try herbs as borders.
“Consider planting herbs such as bay or rosemary instead. Not only will they provide a year-round screen, thrive in full sun and require little water or other maintenance once established, but you can use the leaves while cooking.”
Try planting veggies in the front yard.
“For example, ornamental sweet potato vines, are popular for their attractive leaves, but the sweet potato tubers they produce tend to be bitter. How about planting pumpkin, melon or cucumber instead? They grow well in full sun, all produce long, interesting vines that, at the end of the growing season leave you with something good to eat.”
To read the rest of the article and find more ways you can landscape with edibles, visit: “ExpressNews.com”
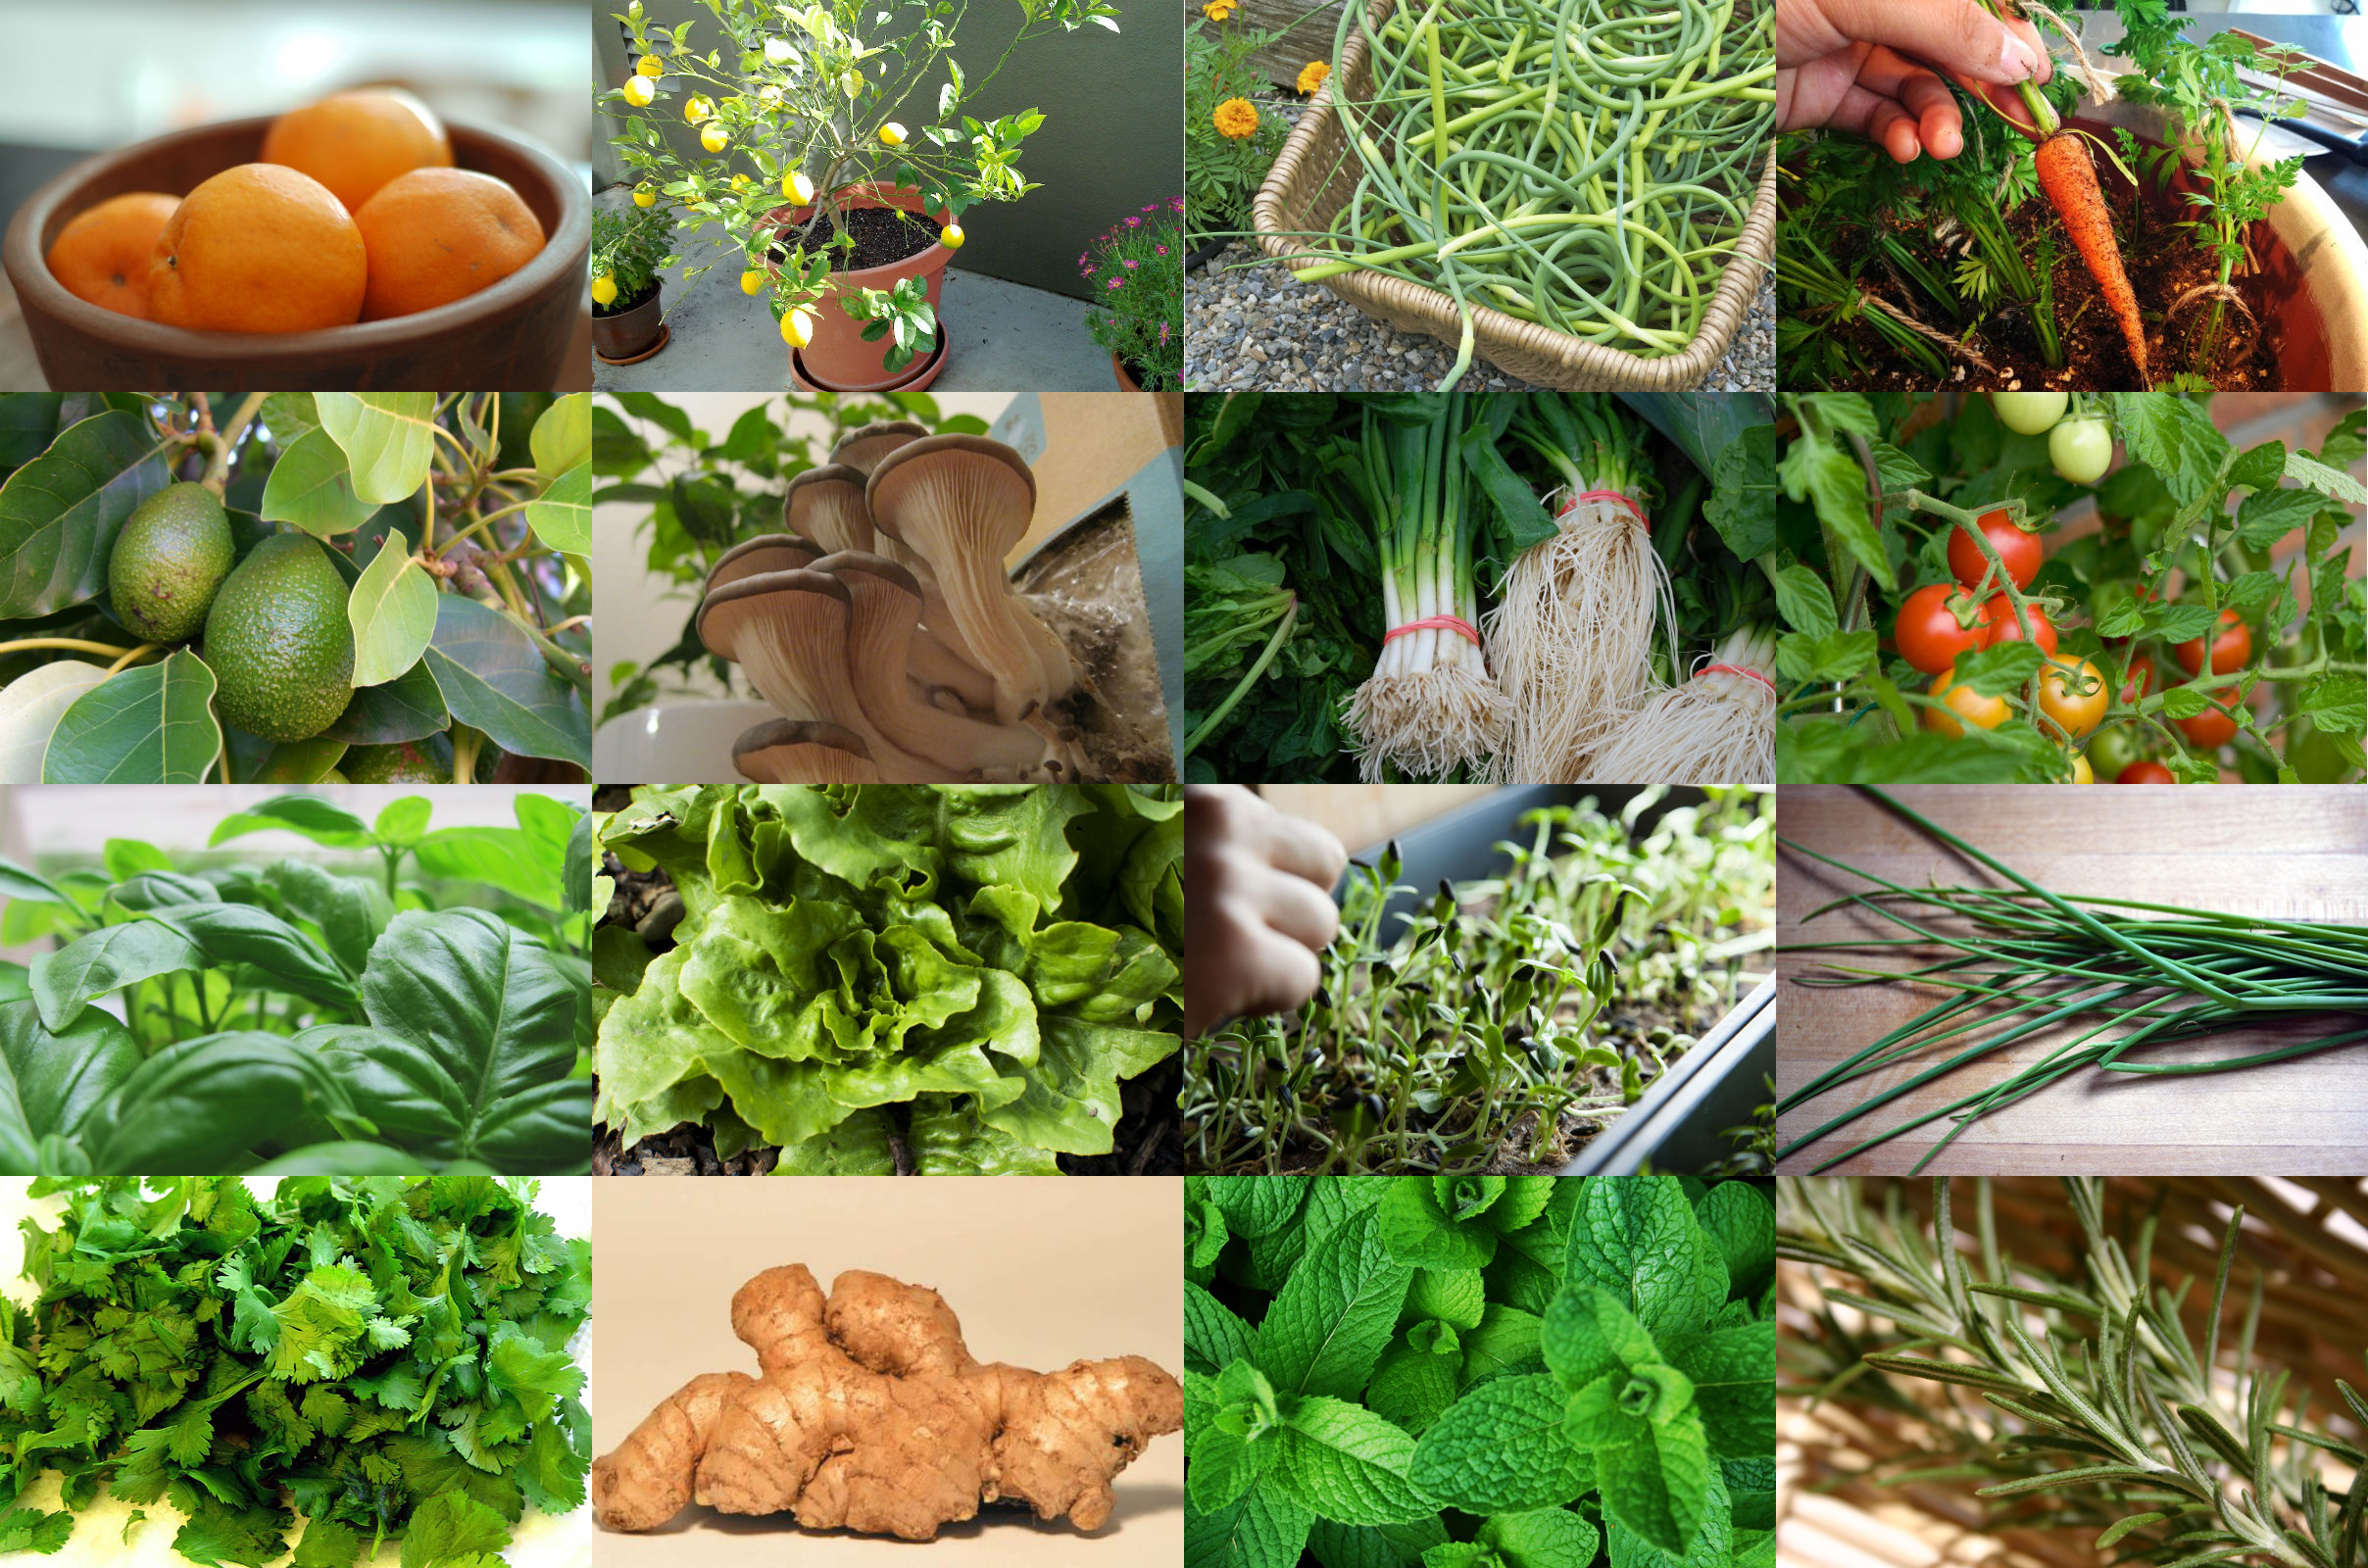
Some of the most delicious herbs, fruits and vegetables can easily be grown indoors providing you give them the adequate light, soil and water they require. Here’s a simple list of 16 Edibles You Can Grow Indoors. To read the entire article along with more detailed instructions, you can visit the original article at: “AGreatist.com“.
1. Avocado: It’s possible to grow an avocado tree from an avocado pit, but doing so may not yield edible fruit. If you want to eat what you sow, it’s best to purchase a dwarf avocado plant (varieties that yield the larger green-skinned fruit or the more common black-skinned fruits are equally good) . To tend for your tree, add some sand to the bottom of a large, well-draining pot before filling it with regular potting mix and planting your tree. Water the tree regularly but make sure the soil is never soggy — avocado roots don’t take well to being waterlogged. Prune the shoots regularly, and be sure to place the tree in an area with high ceilings — even dwarf trees can grow higher than 10 feet!
2. Carrots: Purchase carrot seeds and a pot or window box that’s at least a foot and a half deep and wide, with drainage holes at the bottom. Fill the container to within an inch of the top with a humus-rich potting mix. Water the soil before planting the seeds. Plant the seeds one inch apart in rows that are six inches apart from each other, pressing the seeds gently into the soil and covering them with a thin layer of soil. Water. Place the container in an area that receives tons of light. Keep the soil moist, but not soaked. To help preserve moisture, soak some peat moss in water overnight and then spread it on top of the seeds. Expect the seeds to germinate (i.e., start sprouting) in about two weeks.
3. Garlic Greens: Note: Growing actual garlic bulbs indoors is a bit tricky, but you can easily grow garlic greens, which can be used just like scallions. Start by purchasing a few garlic bulbs with small cloves, and don’t be afraid to buy a shattered bulb (i.e., one that’s started to burst or is fully pulled apart). Select a four-inch pot with drainage holes at the bottom (a quart-size yogurt container with holes poked through the bottom will also work) and a small bag of potting soil. Fill the pot with soil to about half an inch below the top of the container. Break the bulbs into individual cloves (leave the peel on), and push each individual clove about an inch into the soil, pointy end up. Plant about 12 cloves close together. Water well and place the container in a sunny spot. Water regularly, making sure that the soil remains moist but not soggy. Green shoots should appear in about a week.
4. Lemons: If you want the option of harvesting fruits right away, purchase a two-to-three-year-old dwarf tree at a nursery. Choose a clay, ceramic, or plastic pot slightly larger than the root ball of your tree, and make sure it has several holes in the bottom. Fill the drainage dish with stones to allow air to circulate. Use a potting soil specifically formulated for citrus trees, or choose a slightly acidic, loam-based potting mix. Place the plant in an area that will receive eight to 12 hours of sunlight each day and will ideally maintain a temperature between 55 and 85 degrees Fahrenheit. Water regularly, but be sure not to over-saturate the soil (it should be moist, not sopping wet). Citrus trees like moist air, so regularly misting the leaves with a spray bottle will help keep the leaves perky.
5. Mandarin Oranges: Purchase dwarf mandarin orange trees for the best chance of growing fruits successfully indoors. The trees will grow best in spacious pots with drainage at the bottom, and in rich soil. They also require a sunny location (rotate the plant regularly to ensure that it receives light evenly on all sides). Water regularly, allowing the soil to dry out slightly between waterings. The trees can grow up to six feet tall, and their root system grows along with them — when the roots begin to grow back on themselves or out of the drainage holes, it’s time to re-pot in a container that’s at least 2 inches larger in diameter.
6. Microgreens: Start by purchasing a variety of seeds, such as radishes, kale, Swiss chard, beets, basil, and dill. Fill a shallow tray (no more than 2 inches deep, often called “seedling trays”) or a shallow pot with a drainage hole and fill the tray to the top with potting mix. Moisten the soil with water, making sure that it’s damp but not wet. Sprinkle the seeds evenly over the soil (they should be close to each other but not touching). Sift a thin layer of soil over the top to cover the seeds. Using a spray bottle, lightly mist the soil. Place the tray on a sunny windowsill in a room that’s between 60 and 70 degrees Fahrenheit. Mist or lightly water the soil daily so it remains moist; don’t let the soil dry out, but also make sure that it isn’t waterlogged. In about three to five days, the seeds will likely germinate — once they do, make sure they get 12-14 hours of light every day. Keep the soil moist at the roots, but avoid soaking the leaves.
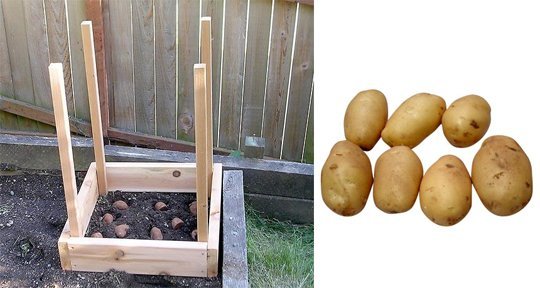

Do you love growing spuds but you don’t have room in your garden to have rows of mounding hills? By building a “potato box” you’ll increase your yield of food without having to use more square feet in your garden space. Plus, by using this method or one similar, you can grow up to 100 lbs. of potatoes without taking up much room in your garden at all!
Here are some pointers from the original article over at “ApartmentTherapy.com“!
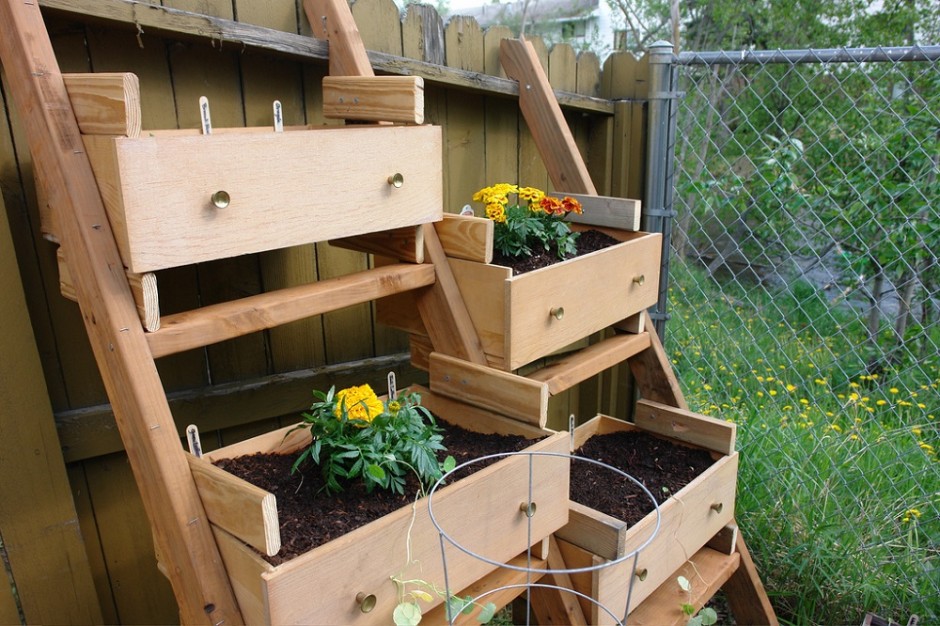
Old dressers are easy to come by and for balcony gardeners or anyone who’s wanting to grow more food in less space by creating a vertical garden, this project might just be for you! “Making a container garden from up-cycled dresser drawers is pretty simple. You’ll want to start with a plan. Things you’ll want to consider…
Once you know what you want to plant and where your garden will grow, it’s time to inspect your drawers.
Next, you’ll need to drill holes in the bottom of your drawers so moisture has somewhere to drain out. Now it’s time to fill your new dresser drawer vegetable garden with potting soil. Be sure to add some of your homemade compost to give your veggies an extra boost!
At this point, you’re finally ready to plant your seeds. Be sure to read the instructions on the seed package and properly space the seeds so your plants have room they need to thrive.”
Read the full article and find more step-by-step instructions here: “Earth911.com“.
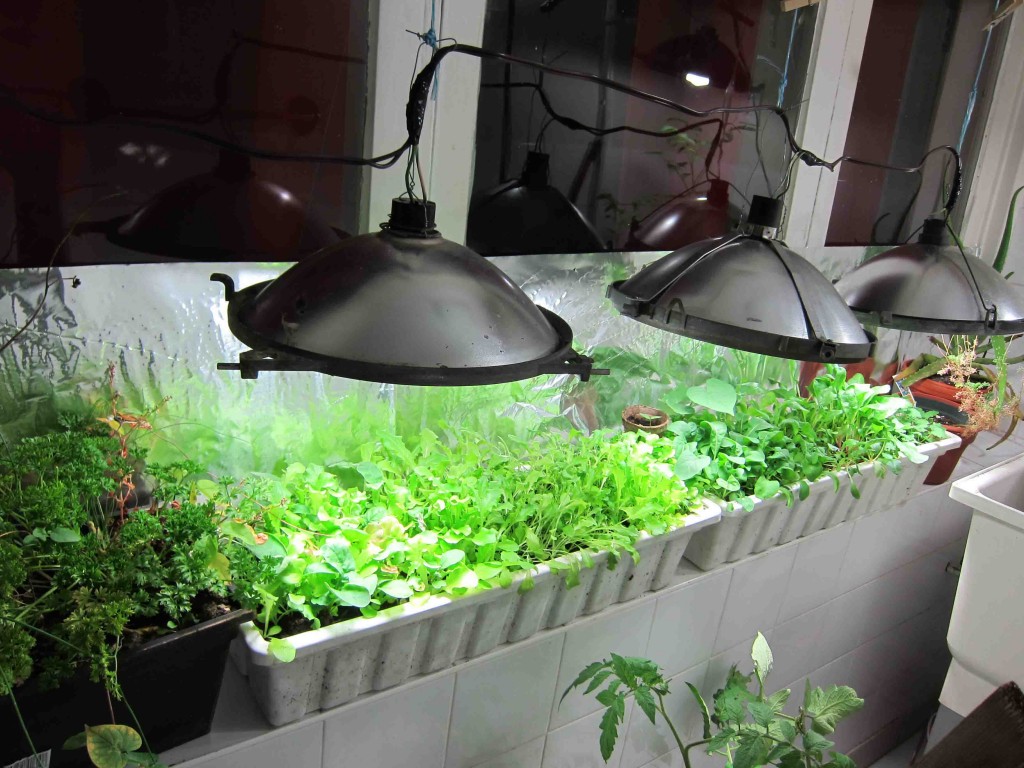
Here’s how to make your very own environmentally-friendly indoor green house.
Green house Equipment
• 3 x 23W Compact Fluorescent bulbs (CFLs)
• 3 Recycled light hoods
• 2 window boxes
• Triple mix and soil
• Seeds
• Hooks
• String
Method
We simply wired the hoods together and popped in the light bulbs. We turned the hooks into the wall and hung the hoods with string so that we can adjust the height of the lights as the plants grow. The three lights run for ten hours a day. You can substitute foil for the light hoods if you can’t find recycled ones.
Read the full article with more detailed instructions at: “GreenMoxie.com“
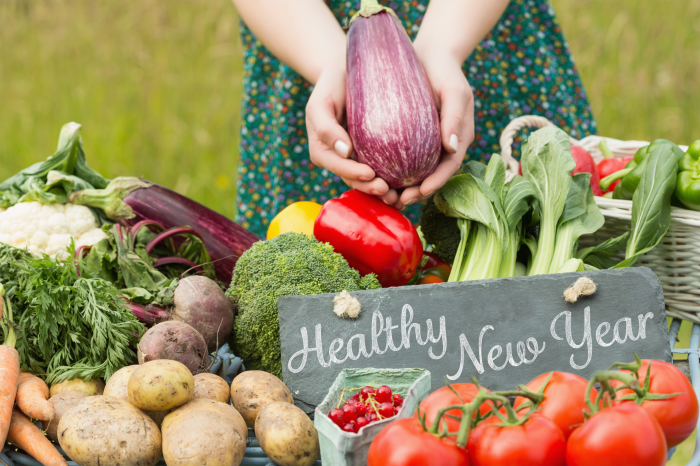
 “The new year is the perfect time to set new goals for yourself, especially if you have been thinking about growing a garden. THIS IS YOUR YEAR! Don’t be discouraged by lack of space, or knowledge about growing specific varieties. Set some small attainable goals for yourself in the gardening department and before the year is over you’ll be sporting that new green thumb you’ve always wanted but thought you’d never have.”-SeedsNow.com