4 Seed Labeling Options, So You Don’t Forget What You Planted

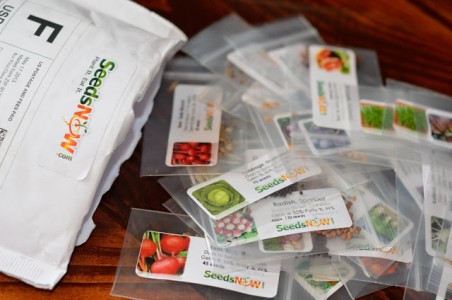
You’ve started your seeds (3 sources to buy your vegetable seeds), and didn’t label them…

…there’s no need to because you know you’ll remember.

Wrong.

We all tell ourselves that and sure enough we always forget what we planted and when we started them.

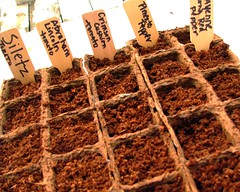
Label your seedlings. You think you are going to remember what you planted where, but you won’t. — Tweet This

That’s why this is one of my basic seed starting tips for beginners.

On the labels you can write as little or as much information that you’ll like such as the exact type of seed, date started and approximate time to germination.

Now I’ll share five (5) options to allow you to easily label and identify your seeds. These will range from the simple to a bit more fancy.

4 Ways to Label Your Seedlings

1. Rocks

Rocks are simple and inexpensive ways to label your seedlings and then use in your garden. I’ve used these on my balcony garden as a garden marker.

Collect the rocks from your own yard or “borrow” them from your neighbors. To decorate them, you can simply write on them or decorate them to make them more stylish. The choice is yours.

When writing the name of the seed on the rock, I’d recommend being a bit more generic because you can’t erase what’s on the rock and want to be able to use it again.
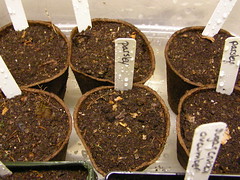

2. Popsicle Sticks

You can get popsicle sticks from your local craft store in bulk at a cheap rate.

Much like the rocks, you can be as simple or as fancy as you’d like. They can easily be slipped into the soil to label the seedlings.


3. Clothes Pins

This is an idea that I got from Becky at EatDrinkBetter. She used clothes pins to label her seedlings.


4. Plant Label Sets

If you just want to buy something and have it done for you already, then you can buy plant label sets from an online garden supply company such as The Greenhouse Catalog (a sponsor of mine).

These come in a many designs from the simple plain white to fancier designs with pictures and other information.

Your Turn

With these four options, you have plenty of choices to make sure that your seedlings are labeled this year. I’ll be sharing other creative ways to label your seedlings in the future, so be sure to subscribe to keep up to date.

What are you going to use to label your seedlings?

Image courtesy of Circulating on Flickr

Indoor Seed Starting Tips for Beginners

Today I am going to share basic indoor seed starting tips

…along with common mistakes and how to avoid them.

It will be a good starting point if it’s your first time, and reminder for those of you who have done this before.

The main reason that you are going to want to start your seeds indoors is so that you can get a jumpstart on the season and to the harvest quicker.

I’ll say that again —

Start your seeds indoors, so you can get to the harvest quicker. — Tweet This

4 Basic Tips for Starting Your Seeds Indoors

Start Your Seeds on Schedule
Seed packets come with a lot of information on them. Most of which gets ignored. If you look closely, the seed packet will tell how approximately how many days until the seed will sprout and be ready to be planted. It will also let you know when is the recommended time to plant outdoors. Do a little bit of math and figure out when you should get those seeds started.

Know What You Planted
This sounds ridiculously obvious, but often gets overlooked. We think we’ll remember and don’t label them and sure enough as soon as we walk away, we forgot. Happens every time. Don’t take the lazy way out and just label them from the start.

Give the Seeds Even Sunlight
The tendency is often to keep the seeds in one position and just water them. When you do that, you’ll notice your seeds start to develop a lean to them. That’s because they are stretching towards the sun. To prevent that rotate the seed tray every few hours. That should help to straighten them out.

Know Your Seed Source
You are going to want to make sure that you are buying from a seed company that cares as much about your health and environment as you do.

[vimeo clip_id=”37359992″ title=”0″ byline=”0″ portrait=”0″ width=”525″ height=”393″]

4 Common Seed Starting Mistakes and How to Avoid Them

I asked Michelle Moore, owner of the year round gardening supply company The Greenhouse Catalog (one of my sponsors), about common indoor seed starting mistakes and how to avoid them. Here is what she said:

Over or Under Watering
“Using a media like coconut pith or coir is a wonderful way to control the moisture content-especially if you water from the bottom,” said Moore. “The coir wicks water as needed so seeds don’t get soggy. Don’t forget to add diluted fertilizer within 72 hours after the first leaves appear.”

Growing in Low-Light Conditions
“South facing windows may work well, as long as the spot isn’t drafty and daylight lengths are greater than 12 hours,” suggested Moore. “Supplementing with grow lights (up to 18 hours of light) will speed up growth. Make sure to read the directions for each grow light as it’s a common mistake to place the light source too far away from the plants.”

Temperatures Too Cool for Root Growth
“Cool temperatures on the surface encourage compact growth, but roots need warmth,” said Moore. “Adding bottom heat with a seedling heat mat encourages healthy root growth, which makes for healthy plants. Make sure to use a media that won’t dry out too quickly with bottom heat.”

Not Starting Enough Seeds
“It’s also a good idea to plant more seeds than you will need,” recommended Moore. “This will allow you to pick the healthiest starts to plant.”

Your turn

Now that you have some basic tips and mistakes to avoid laid out, in the comments below let me know what vegetable seeds you’ll be starting indoors and when.

Image courtesy of normanack on Flickr

3 Sources to Buy Your Vegetable Seeds

You are growing your own food because it’s best for your health and the environment.

When you are first starting out, knowing where to buy your seeds from can be intimidating.

It’s difficult to tell the difference between the companies, types of seeds and who is owned by which company.

seedsnow-452x300

My goal is to not only help you maximize your space when growing, but also to help you save time in the process.

In the past I’ve looked up seed companies to see which ones provided non-gmo seeds and had no ties to companies that I didn’t support.

All I came across were huge lists with lots of descriptions. They didn’t save me any time. You’ve likely come across the same lists.

Seed Companies You Can Trust

That’s why I wanted to compile a quick list of seed companies that you can buy from. Again this is a quick list because an exhaustive one wouldn’t save you any time.

SeedsNOW.com

SeedsNow is a family owned business right in Los Angeles that provides 100% Pure GMO-FREE Non-Hybridized/Heirloom seeds. All their seeds are raw and always un-treated. Without getting into the specifics, the seeds they have are the most natural most pure form of seed you can get.  Knowing that their site doesn’t offer any hybrid seeds is a really good thing for me.  With their heirloom open-pollinated varieties I know that I’ll be able to save my seeds after harvest. Can’t do that with hybrid or GM seed!

One of the things that I like most about SeedsNow.com is that they have seed sampler packs starting out at  99¢. At those prices you can afford to try growing a lot of different things.   A lot of people don’t know this but their “sampler” packs actually have the equivalent amount of seed (or more) than regular sized packs form other companies.

They have a huge variety of NON-GMO seeds for you to start growing your own food. Definitely a site worth checking out:  www.SeedsNow.com

You can get 10% off your SeedsNow.com purchase by using the code URBAN10.

Botanical Interests

Botanical Interests is one of the larger seed supply companies that you might’ve seen in your local health food store.

One of the things that they are most well known for is the art on their seed packets.

Their seed packet collection is also quite extensive. You can spend hours pouring through their catalog.

Seed Savers Exchange

I have never used Seed Savers Exchange before, but a lot of you have recommended them before, so I added them to the list.

These three companies should give you a good start for buying your seeds online. Yes, there are dozens of other companies that can be added to this list, but that wouldn’t save you much time.

Your turn

Have you purchased from any of these companies before? Who else would you add to this list? Let me know in the comments below.

GMO Basics: What You Need to Know

GMOs are feeding the world…

GMOs are destroying our health and environment.

With all of the conflicting information out there about GMOs, it’s hard to understand.

That’s why I am going to break down the basics of GMOs for you and tell you why you should care.

What are GMOs?

GMO stands for Genetically Modified Organism and is most often referred to when it comes to our food.

The DNA from other plants, viruses, animals and bacteria are injected into the cells of existing species. This is supposed to make them more resistant to the rain, drought, pests, etc. Up until this point, these viruses and bacteria have never been a part of the human food supply.

More information on what GMOs are

This sounds great. What’s so bad about them?

At face value this might sound great, but there are risks that are involved in such technology. GMOs have not been proven safe and have significant restrictions or outright banned in over 30 countries across the globe.

They are widely grown and used in the food supply in the United States and there is no way for us to know. GMOs should be labeled, so we can make decisions for ourselves. Whether they are good or bad is a moot point. It’s a right to know issue.

I’ll say it again —

It’s not about if GMOs are good or bad. It’s about our right to know what we are eating. — Tweet This

More information on the effects of GMOs

Who produces GMOs?

The company that is responsible for producing most of the GMOs is Monsanto. This is the same company that produced Agent Orange during the Vietnam War. They are a chemical company and now they are producing our food. To me that’s reason enough not to trust their “food.”

Monsanto has been able to patent their GMO seeds, so they own the seed. They also have an exclusive deal with Scotts Miracle-Gro who sells Round-Up.

Now there is a company that owns and sells a seed that is resistant to a spray that they profit off of also. Monsanto makes money off the consumer on both ends.

The fact that a company can own a seed and have that much control over our food supply is a scary thought. Monsanto currently owns about 90% of the seed supply out there. That means they control distribution, costs, etc. Scary.

More information on Monsanto

The World According to Monsanto

httpv://www.youtube.com/watch?v=Rml_k005tsU

The Future of Food

httpv://www.youtube.com/watch?v=EnD-DiDRIJA

If GMOs aren’t considered safe, why would government allow them in our food system?

“The Federal Food, Drug, and Cosmetic Act requires the FDA to prevent consumer deception by clarifying that a food label is misleading if it omits significant, “material” information,” said Naomi Starkman founder of Civil Eats and contributor to the Just Label It campaign.

“In 1992 however, the FDA issued a policy statement that defined “material” by the ability to be sensed by taste, smell, or other senses.

The FDA determined that GE Foods were “substantially equivalent” to conventionally produced foods, so there was no material difference – and no labeling was required. After almost 20 years, this policy is still in effect today.”

If you also look closely at who holds federal positions, you will notice that many of them have held positions with Monsanto as well. Click the image below to get the full picture of the connections between Monsanto and Federal Positions.

What are the most common GMOs?

According to the Just Label It campaign:

  • 59% of sugar produced in the US is made from sugar beets and 90% of the beets are genetically engineered
  • Over 90% of canola oil is genetically engineered
  • 90% of the cotton planted in the US is genetically modified
  • 94% of all soybeans planted in the US are genetically modified
  • 88% of US Corn is genetically modified

Your turn

Now on to the most important part…what you can do.

  • “If you are looking to avoid GE foods, your best options are to buy USDA certified organic, as the USDA organic standards prohibit the use of GMOs,” said Starkman. “Look for Non-GMO Project Verified goods, and to buy unprocessed foods such as fruits, vegetables because few whole foods are genetically engineered.”
  • Start your own urban garden using non-gmo seeds.
  • Sign the petition at JustLabelIt.org to let the FDA know that you want GMO foods labeled as such.
  • Use the buttons below to share this post with friends and family to let them know about GMOs.

Image courtesy of WayTru on Flickr

How to Grow Your Own Sprouts Indoors

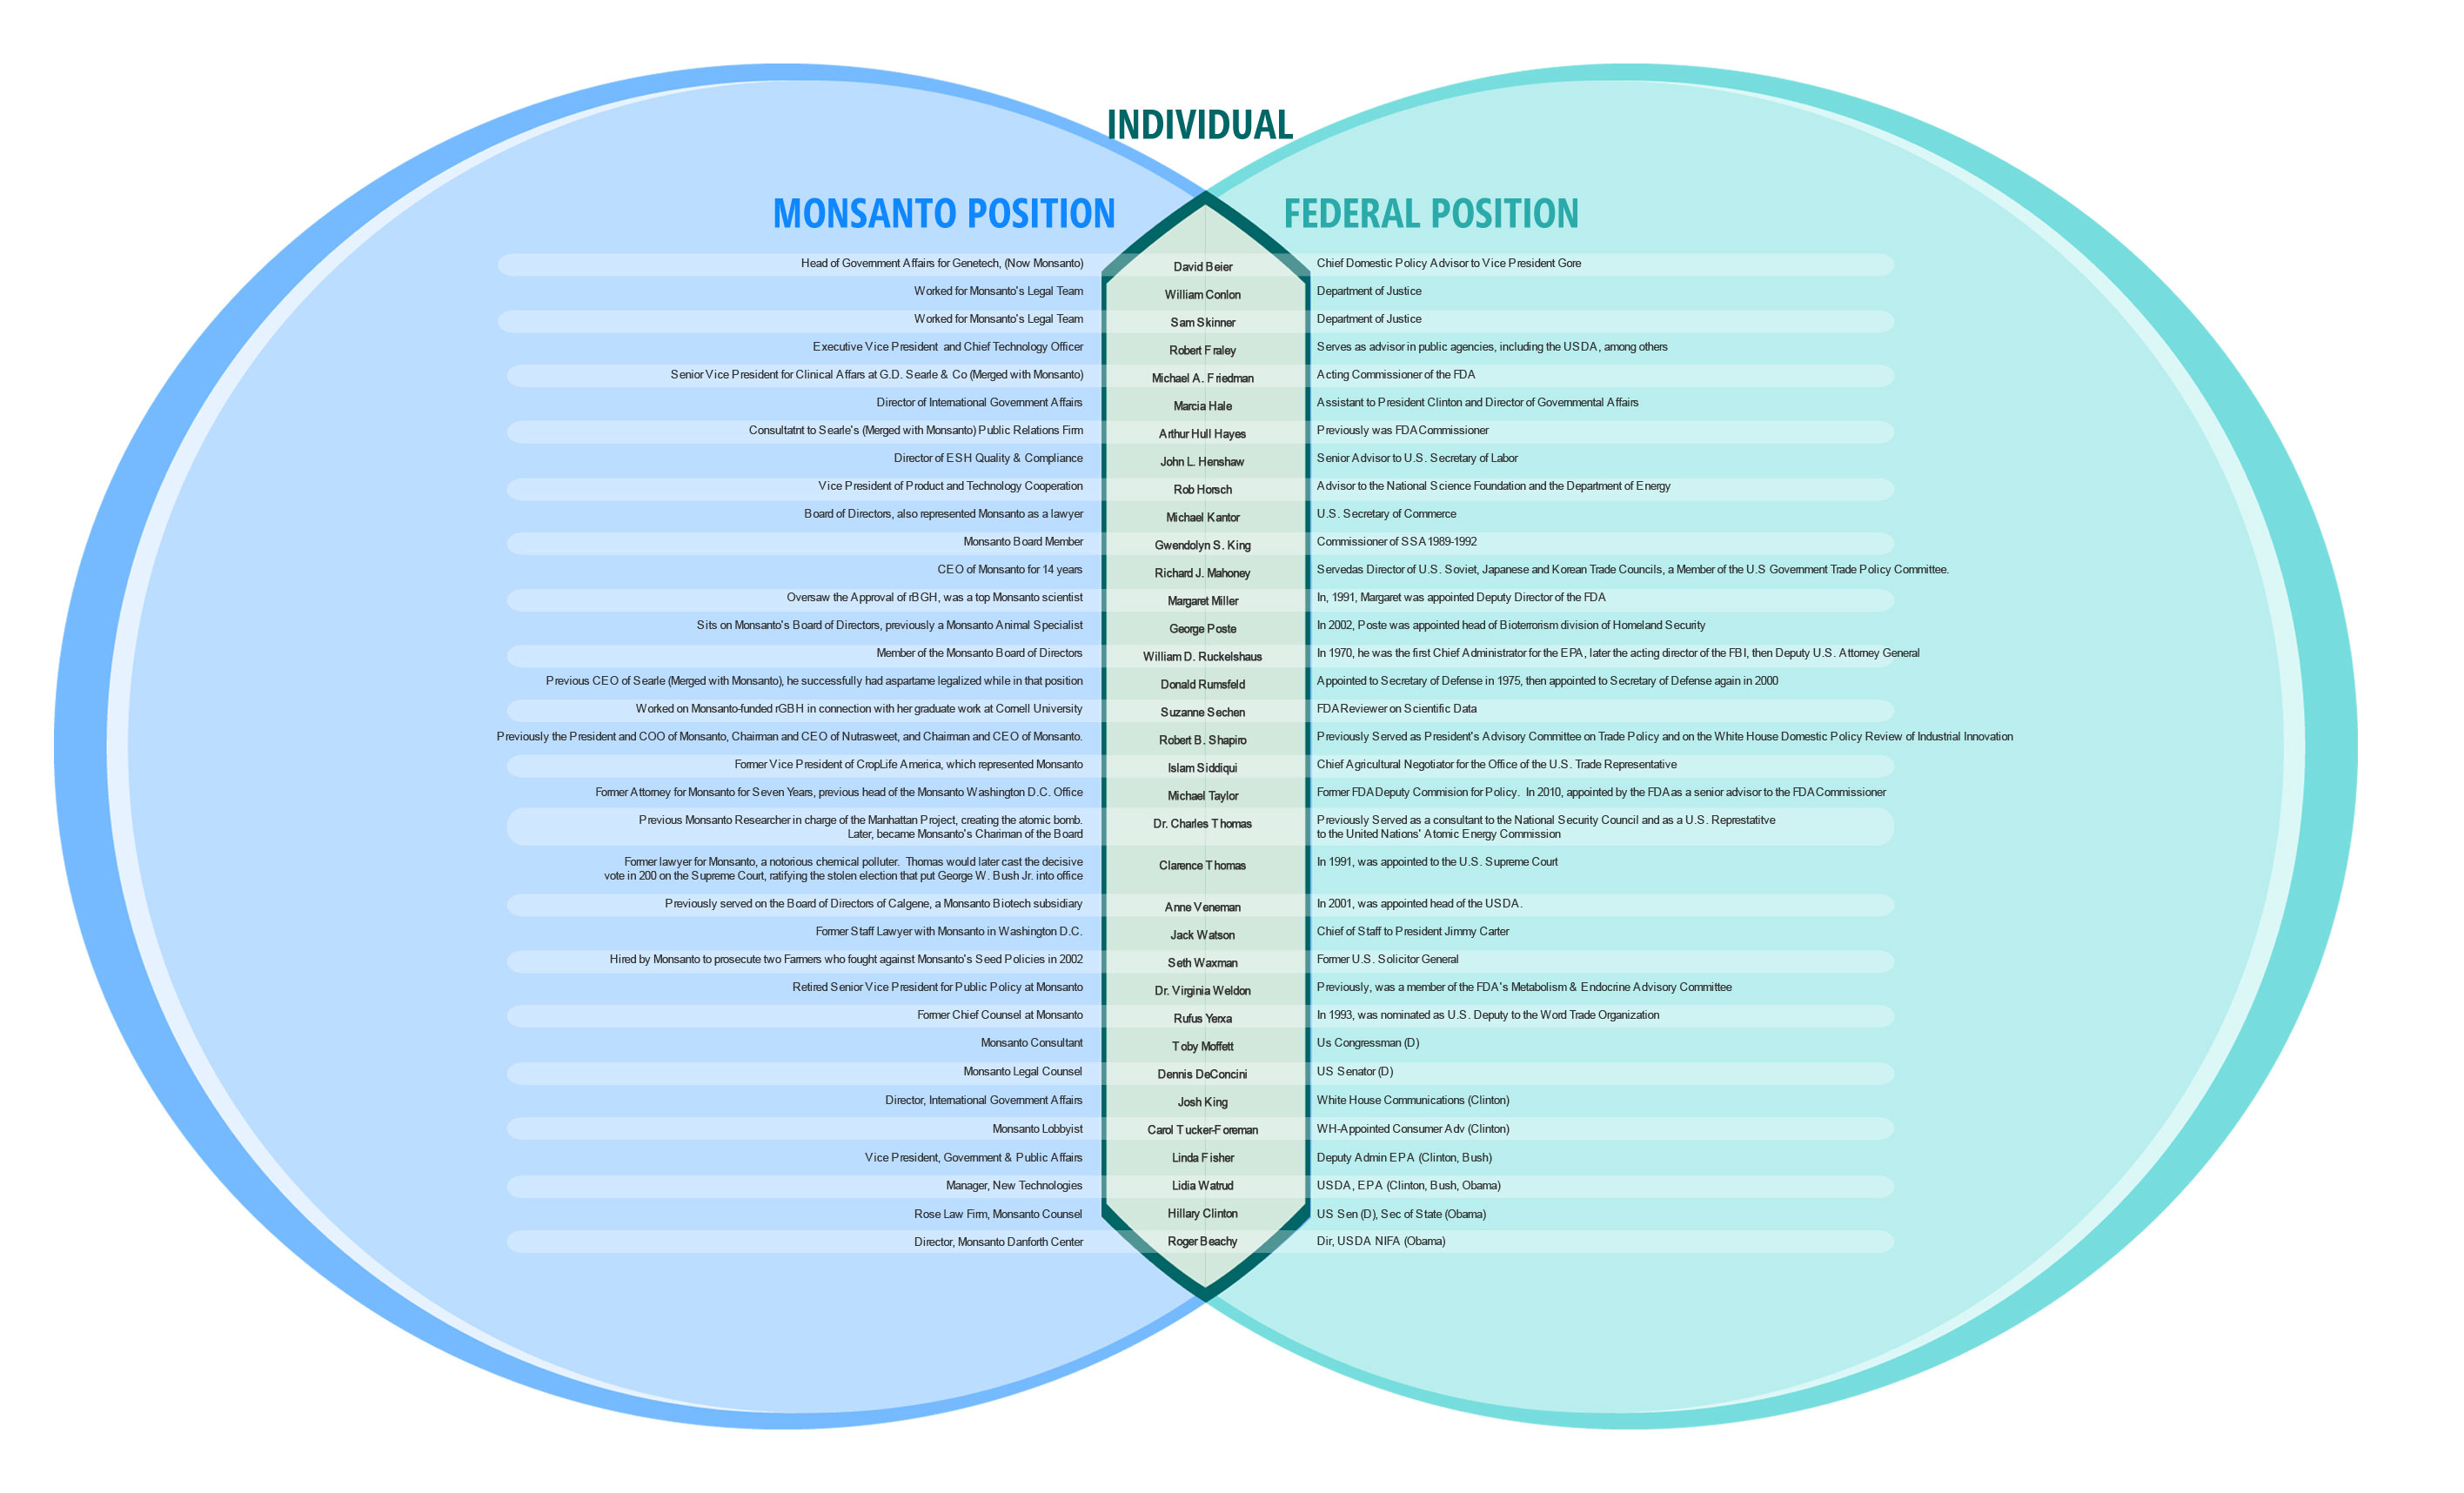
Today I am going to show you the easiest way that you can start to grow your own food.

And you won’t need any outdoor space…

You just need a spot on your kitchen counter.

I am going to share with you how to grow your own sprouts indoors.

No need to buy fancy gadgets or machines. You can do this on the cheap.

You ready?

Let’s do it!

What you’ll need to grow your sprouts

  • Mason jar
  • Cheescloth or another breathable cloth
  • Canning lid or rubber band
  • Bowl or dish

Steps to grow your own sprouts

  • The first thing to do is to soak the seeds for 8 hours in the mason jar. I prefer to do this right before I go to bed to let them soak overnight.
  • The next morning, put the cheesecloth over the mouth of the jar and secure it with the canning lid. Drain out the water. Refill with water to rinse the seeds and drain again. Place the jar out of direct sunlight at an angle in a bowl. This will allow the rest of the water to drain.
  • Repeat the previous step every 8-12 hours (about 2 times per day).
  • Generally it’ll take 5-7 days for them to be ready to eat. The seeds are ready to eat as soon as they start to sprout. Just rinse and drain them one last time before you store them in the fridge.

Sound off

What is your favorite sprout?

How to Make a Seed Watering Pot

Do you have problems watering your seeds?

Not sure the best way to water them?

I’ve had this problem too.

That’s why I am happy that I came across this DIY project on FunInTheMaking.net that I can share with you.

It’s DIY seed watering pot and it will help you to easily water your seeds without having the impact of the water harming them.

What you’ll need

  • Plastic jug of some kind – I used a milk container, but you can use a maple syrup container or something similar.
  • Drill and a 1/16″ drill bit or whatever size you find appropriate.

Make it in two simple steps by drilling

  • A hole in the cap.
  • Several holes in the bottom of the jug.

[vimeo clip_id=”36255737″ title=”0″ byline=”0″ portrait=”0″ width=”525″ height=”393″]

To use your seed watering pot

  • Fill a bowl or dish with water.
  • Place your thumb over the hole in the cap and submerge it in the water.
  • Remove your thumb and you’ll feel the water being sucked up into the pot.
  • Remove the pot from the water with your thumb over the hole.
  • To water your seeds, put the watering pot over the seeds and remove your thumb.
  • A gentle flow of water should come out from the bottom.
  • To stop the flow, place your thumb back on the cap.

[flickrset id=”72157629149521591″ thumbnail=”square” photos=”” overlay=”true” size=”medium”]

This is a much gentler way to water your seedlings and not damage them.

Sound off

How do you water your seedlings?

Storing Your Seeds For the Long-Term…in the Freezer

The strangest posts wind up causing some controversy.

It doesn’t make sense to me.

When I wrote about why having an emergency seed bank is important, I didn’t quite get the reaction that I’d expect.

I received emails, Facebook comments and Tweets saying that I couldn’t be more wrong about storing the seeds and that freezing them was a horrible idea.

I’ll admit that I have never frozen seeds before and then used them. It is a recommendation that I’ve seen countless time before.

So I did a bit of research and here’s some excerpts from sites:

Last year we planted a variety of different seeds that we had put in the freezer over 10 years ago and forgotten about and they came up just fine. They were just in ziplock bags. — via Survivalist Boards

Seeds dried to a low moisture content with silica gel and then stored in a freezer can usually retain viability for many years. — via HowToSaveSeeds.com

Freezing seeds will put the embryo into suspended animation reducing its need to consume the sugars that are encased in the seed. This increases it’s storage life immensely… — via Ready Nutrition

Takeaways for Storing Your Seeds in the Freezer

The main takeaways that I got in my research were the following:

  • Make sure the seeds are dry when placed in the freezer. Using a silica gel pack can help with this.
  • Put the seeds in an airtight container. This can be a mason jar or even a ziplock bag. Vacuum sealing works well too.
  • Allow the seeds to thaw before planting. These are for long-term storage, but good to keep this tip in mind.

How do you store your seeds for the short or long-term?

Get 10% Off your Vegetable Seed Purchase Online from SeedsNow.com

All you have to do is click here and use the discount code URBAN10 to get 10% off.

Why Having an Emergency Heirloom Seed Bank is Important

Some believe that one of the best investments to currently make is in an emergency seed bank.

With everything that is going on with the global economy and food system, it’s hard to argue.

What would happen if our food supply was cut-off? or the price of food sky rockets too high?

Yes, it is important to have the canned goods and non-perishables, but what happens when they run out and the supermarket shelves are dry?

That’s where having an emergency seed bank helps out. I’m not getting all sensationalistic and saying it’s going to happen today or in the near future, but like any other emergency kit, it’s best to be prepared.

How to use your emergency seed bank

There are two ways that you can use your bank:

  • Keeping it in storage for emergencies. One of the best places to store them is in the freezer.
  • Start your garden. This way you can start to grow your food and build up the seed bank by saving your seeds.

Where to buy a seed bank?

It’s really important you buy a quality seed bank from a place that sells good seed.  SeedsNow.com has a huge selection of seed banks and best of all their seeds are all 100% NON-GMO and Heirloom varieties.  If you don’t know what NON-GMO or heirloom is – don’t worry – that’s the good stuff you’re looking for in a seed bank.

Here’s a couple options worth checking out:

Have you thought about getting an emergency seed bank?

Harvesting Parsley Seeds: A Simple How To

There is a parsley plant on my balcony garden that has been going to seed for a few weeks now. The seeds have finally developed.

They emerged in about 3-4 stages, which are difficult to explain, but the the picture about clearly shows what the seeds look like.

You just have to carefully pull them.

What is your favorite way to use parsley?

Saving Lettuce Seeds: A Simple How To

The first thing you want to make sure before you plant anything in your garden is that you’re growing heirloom or non-hybrid seeds/transplants.  This is really important when it comes to saving your seeds.  With heirloom or non-hybrid varieties you’ll be able to successfully save the seeds from the plant. With hybrid seeds you won’t.   What’s the difference between hybrid and non-hybrid?

Buy seeds from places that only sell heirloom and non-hybrid varieties. 3 sources to buy your vegetable seeds.

When I started my balcony garden from scratch, I left two bolting lettuce plants in a container.

It’s been about 3-months and they are starting to flower, so it’s time to harvest and save the seeds. This was my first time doing it and I was pretty stoked on it.

You will know that it’s time to harvest and save the seeds because the plant will first bolt, then it will flower and little white puffs will emerge.

To harvest the seeds, simply grasp the end of a white puff between your fingers and pull it out. At the end will be a few seeds. Just that simple and pretty f’n cool.

Now I’ll replant these seeds in the late summer/beginning of fall and bring everything full cycle.

Learning and experiencing something new all the time. This is what it’s all about.

Have you ever saved seeds before?

I’m Not Stopping Because Some Seeds Died

It hasn’t been a great week for my balcony garden. First the oak green leaf container was infested with little black eggs that I later learned was cabbage worm crap. Now my tomato seeds that were doing so well have all died.

I had each of them planted in a plastic strawberry container. Last weekend I went away from Friday to Sunday. When I left on Friday morning, the seeds were doing well. Three of the four seed starter pots were about 2-3 inches and had some leaves.

Before leaving, I watered them and decided to leave them outside. Upon my return, they were all dead. The next time I go away, I’m not sure if I should leave them inside or what to do. I’ll have to figga that out.

Fern from Life on the Balcony wrote a post that this reminded me of titled, “What Gardening Has Taught Me About Life.” Check it out, some great insight from Fern and by people who left comments.

What this has taught me is that I won’t let the setbacks in life stop me. I haven’t had the best of luck with seeds so far, but I’m learning and am now just one step closer to getting it right.

httpv://www.youtube.com/watch?v=o3HpJXvH0Lg

Make Sure To Have A Container To Transplant Your Seeds

Yes it might sound obvious, but when you start your seeds make sure that you have a container to transplant them into. I didn’t and had a tray of dead seedlings. This could very well be one of the biggest gardening mistakes that I’ve made.

Last week the seedlings were slanting a bit. This week they are all dead.

A few of the pots were popped open and the roots appeared to be a bit compact causing their demise.

The toilet paper roll seed starter pots are so shallow and don’t allow for much root expansion. There is about 1/2″ of soil at most in each one.

This is not to say that these seed starter pots aren’t good to use. What I am saying is that if you are going to use them to make sure that you have containers or pots readily available to put them in or something larger to transplant them into before putting outdoors.

All is not lost. The dead seedlings were tossed into my worm composter and will eventually make their way back into my urban gardens.

Point your finger and laugh, but I’m sure you’ve made your own obvious mistakes in starting your seeds. Let’s hear them.

httpv://www.youtube.com/watch?v=vA91cqTZkdE

Update on the Seed Experiment

It’s been a little over a week since I started the experiment with planting the same set of seeds indoors and outdoors to see which would do better.

There were two sets of four different kinds of seeds that were planted in toilet paper roll seed starter pots. They were leaf lettuce, basil, sunflowers and calendula.

At this point, the seeds that were started indoors are performing a million times better. A million times in the sense that they’ve actually sprouted as opposed to the ones outdoors that have nothing to show.

The weather outside has been in the high 60s at night and 50s during the evening. It possibly could’ve dipped down into the 40s.

The carrot and mesclun seeds that were planted outdoors in the containers are starting to show sprouts as well. There are some green carrot tops poking their way through the soil and same for the mesclun.

Mesclun Seeds. May 16, 2010. Carrot Seeds. May 16, 2010.

Yes, the indoor seeds have begun to sprout, but they are leaning and stretching towards the sunlight since they are sitting in an east facing window that only gets the morning sun. I am pretty sure that this should be a concern because they are leaning and looking stretched out.

I’m going to start putting them outdoors for a few hours a day to get them more in the direct sunlight to hopefully straighten them out some. I really don’t want to have to buy grow lights. What do you think?

httpv://www.youtube.com/watch?v=4amGwb9CcOg

Using Coconut Shells as a Planter

After you are done with your coconut, hollow it out out and use it to plant vegetables with shallow roots in them such as lettuces and other greens.

Much like the toilet paper roll seed starter pots, these are the great price of free.

    What you’ll need to get your coconut shell container made:

  • Coconut shell
  • Potting mix
  • Seeds
  • Spray bottle filled with water
  • Drill with 1/4″ bit
    How to make a coconut shell container:

  • Drill 2-3holes in the bottom of the shell. Drill from the inside of the shell.
  • Fill up with potting mix.
  • Dig a small 1/4″ deep hole in the middle of the soil and drop in your seeds.
  • Spray with some water and cover up with soil.
  • Spray down again and place in the sunlight.

[flickrset id=”72157623948778573″ thumbnail=”square” overlay=”true” size=”medium”]

httpv://www.youtube.com/watch?v=8W6F8V_Obxc

Which Tomato Seeds To Start In A Small Space?

Now that I have some seeds directly sown and another seed experiment going on, I am trying to figure out which tomato seeds to start for my balcony garden.

I have 7 packets that I received for free from WinterSown.org. You just need to fill out the form, send them a SASE and they’ll send you free seeds. Nice.

I learned on my fire escape that just because they are cherry tomatoes doesn’t mean it’s going to be a small plant. I don’t want to have a tomato tree on the balcony, but would like to grow some tomatoes.

A plant that grows to be about three to four feet tall would be great. I know that there are determinate and indeterminate plants, but am not sure of the exact difference between the two. Help identifying which seeds to start for the balcony would be appreciated.

    I have the following seed packets:

  • Principe Borghese – determinate
  • Silvery fir tree – determinate
  • Old German – indeterminate
  • Pondersoa red – indeterminate
  • Giant Belgium – indeterminate
  • Costoluto Genovese – indeterminate
  • Red pear – indeterminate

My guess is that one of the determinate varieties would be best. It would also help if these people spoke in English and just said, “plant grows to approximately x feet tall.”

Which do you think I should start for the balcony garden?

httpv://www.youtube.com/watch?v=9dD9nHUIMng

Seed Starting Experiment

Last week I direct sowed carrots and mesclun lettuce into containers on my balcony garden. I’m not seeing anything coming up on them yet.

This week, I’m experimenting with starting seeds indoors and outdoors to see which light works better. I don’t have any self-watering containers to direct sow into, but I have seeds. So why not get some started?

For this test, I’m starting a leaf lettuce blend, basil and also some of the flower seeds that I’m going to grow – sunflower and calendula.

I made seed starter pots using toilet paper rolls. For each of the seeds, two were planted indoors by a window and the other two were planted on the balcony.

An old pie tin is being used to hold the pots indoors and the cover is serving as the greenhouse. For the outdoor seeds, a long strawberry box is being used to hold the toilet paper rolls and a cut-up ziploc bag as the greenhouse.

My apartment is east facing and gets about 4-6 hours of direct morning sunlight. It’s been in the 60-70s during the day and in the 50s at night.

Which do you think is going to work better the indoor or outdoor sets?

httpv://www.youtube.com/watch?v=676qYQOEuUs

Planting My First Seeds On The Balcony Garden

Two more self-watering containers were made and put out on the balcony garden. I started seeds in each of them.

After some discussion about if it was better to start seeds indoors or by direct sowing, I decided it was best to start the carrot and mesclun seeds by directly planting them into the containers.

When I started to plant the carrot seeds, I noticed that the package said, “Packaged for 2009.” It’s now mid 2010. I still planted the seeds and will see what happens.

The mesclun seeds were dated for 2010, so I’m not too concerned with them being ok to grow.

To plant the seeds, I used my finger nail and made some rows in the containers. Took some seeds, put them in the soil and spaced them out about 1/2 – 1″ apart.

I wasn’t about to get all crazy, picking individual seeds and measuring everything out to a tee. My goal is grow food. If it doesn’t grow perfectly, I’ll adjust along the way. This way I got seeds planted and am starting to grow food.

As for the rest of the garden, it’s been about two weeks since I first planted, and I am happy with the way that it’s coming along.

The two containers of kale have grown a noticeable amount, so have the purple kale and romaine lettuce. The oak green container doesn’t seem to have grown too much.

Now I have a total of seven self-watering containers on the balcony.

The next thing that I want to do is start some of the other seeds indoors, so when I make more containers I can transplant them.

As for the carrots seeds that were packaged in 2009, my Grandmother eats food with expiration dates from the 1990s. You think these seeds are gonna grow? What are your favorite seed stories?

httpv://www.youtube.com/watch?v=QrbQWnDdcpg

What’s Better – Starting Seeds Indoors or Direct Sow?

Now that I have my LA balcony garden started, I want to work on starting some seeds.

There are about 12 packets or so that I’d like to get started of lettuces, kale, beets, carrots, tomatoes and some herbs. Since the weather is warm here in LA, I’m wondering whether it will be better to direct sow the seeds into the containers or to still start them indoors?

I have accumulated toilet paper rolls, newspaper, plastic strawberry containers and some other things to use to start seeds indoors.

The past few nights it’s reached down into the 40s, but it’s mostly at least 50 degrees at night and 70s during the day. Which I would think to be warm enough temps to direct sow into the containers.

There is a lot of space for more self-watering containers on the balcony that I’d like to get planted in. For that reason I think that it’d be better to start the seeds indoors, so I can have veggies growing outside while the seeds are doing their thing indoors.

Then I can with succession planting or whatever it’s called when they are ready to be placed outside.

What’s your recommendation? Start the seeds indoors or direct sow into the containers?

httpv://www.youtube.com/watch?v=87c1V7yh4xE

Is Direct Sunlight Required For Starting Vegetable Seeds Indoors?

The final question that I have before starting my vegetable seeds is do they require direct sunlight? Can they get by with indirect sunlight?

I could easily put them out on my window garden. It gets a few hours of indirect sunlight a day, but no direct sunlight.

The fire escape is an option as well, but having to get into and out of it everyday would be a pain since it’s in my roommate’s room.

I’d have go through his room to set them out each morning, then bring them in each night. My preference would be to avoid that.

I’ll likely experiment and put some on the window garden and some on the fire escape.

Do you think the indirect sunlight of the window garden enough? Is there somewhere else that I could put them?

httpv://www.youtube.com/watch?v=EPPLqJq4CLY

How To Make Seed Starter Pots Using Toilet Paper Rolls

An easy way to start your seeds indoors is to use toilet paper or paper towel rolls.

There are two advantages of using toilet paper rolls. The first is that they are free. It’s likely that you already have both items available in your apartment. Ain’t no better price than free. The other is that that they can be put directly into the soil when transplanted because the cardboard will biodegrade into the soil.

    What you’ll need to get your toilet paper roll seed starters made:

  • Toilet paper or paper towel roll
  • Razor
  • Scissors
  • Duct tape
    How to make a seed starter pot using a toilet paper roll:

  • Cut the toilet paper roll in half using your razor and scissors.
  • Take one of the halves and cut four slits about 3/4″-1″ or so up the roll.
  • Fold the toilet paper roll into each other to form the bottom of the seed starter pot.
  • Use tape to secure the bottom.
  • To fill put your soil inside, followed by your seed and cover with more soil.

[flickrset id=”72157623905884153″ thumbnail=”square” overlay=”true” size=”medium”]

After a few weeks, when the seed is ready to be transplanted into the soil, you can undo the bottom of the toilet paper roll and stick the whole thing into the soil. The toilet paper roll will biodegrade into the soil.

httpv://www.youtube.com/watch?v=7-nnzX-Cd0I