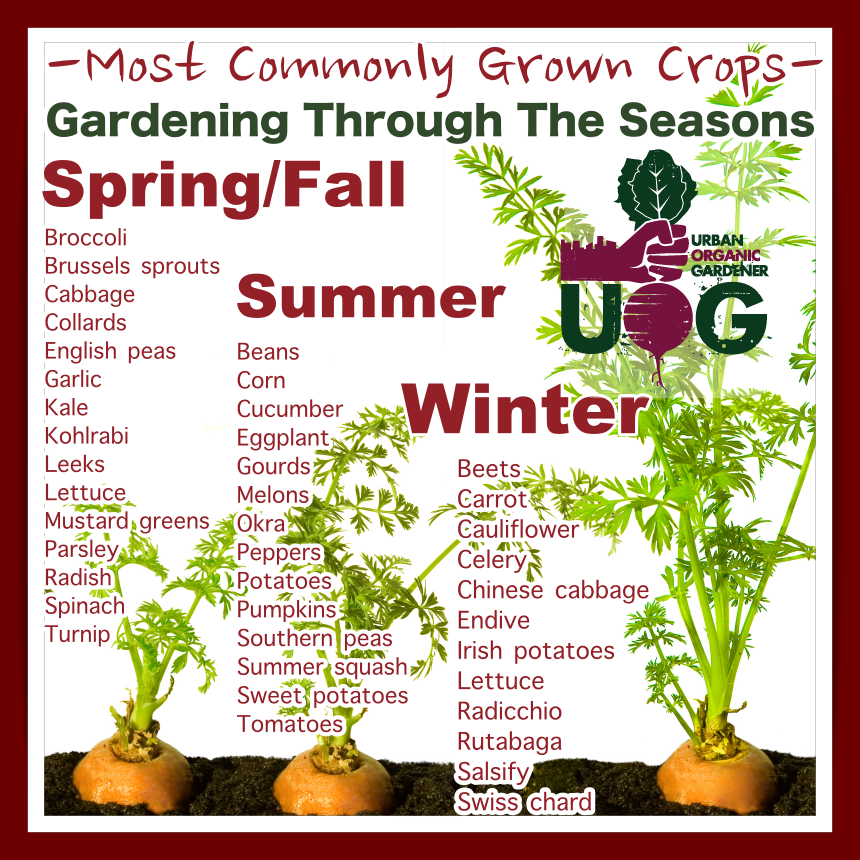
Most Commonly Grown Crops -Gardening Through The Seasons-


Urban-style organic gardening blog about growing your own food with limited space and creative resources.
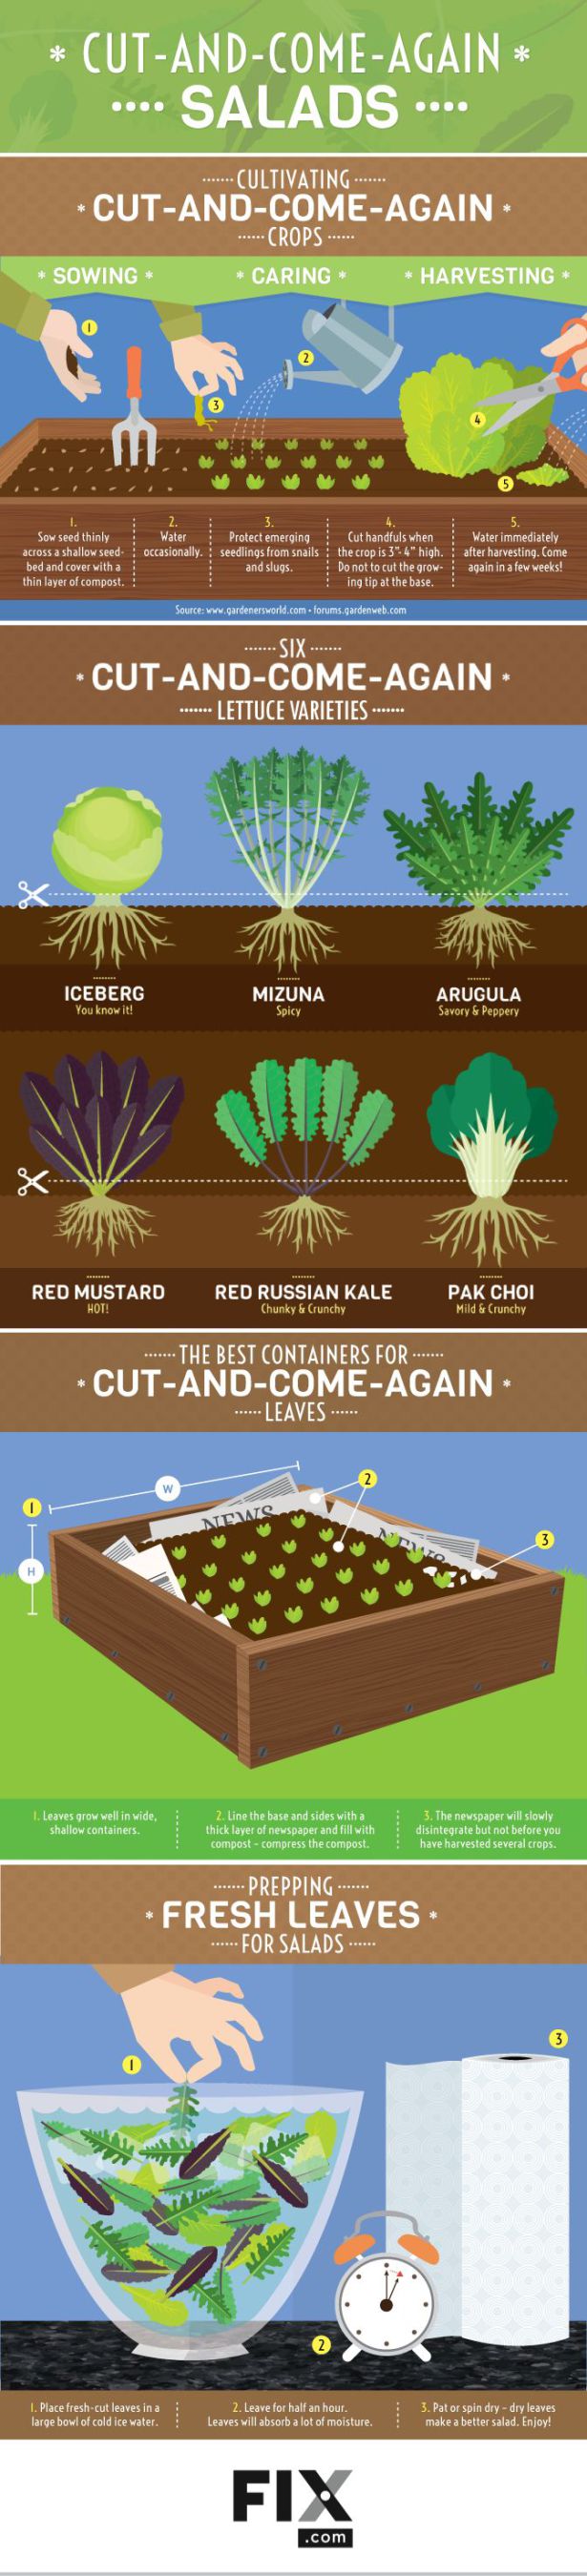

One of the best ways to bet on a healthy garden, is to incorporate using some kind of mulch. Mulch comes in many forms, and doesn’t have to be expensive. The info-graphic below will help explain the in’s-and-out’s of using mulch in your vegetable garden.
“The most basic benefit of mulch is moisture retention. Yields are directly affected by the amount of water in the soil. And, in dryer climates where rainfall is scarce, gardeners will want their soil to retain as much water as possible. Simply by covering the top of the soil in a thin layer of organic material, you will drastically reduce the level of moisture evaporated from the soil. The graphic below shows just how dramatically mulching can reduce evaporation. Mulching can retain up to 80 percent of added moisture in your soil. When you keep the top of the soil protected from direct heat, it will lose less water, and thus be a better environment for your plants. Great mulch also has the ability to breathe, and not become a place where mold issues arise, which would be unhealthy for plant life.”
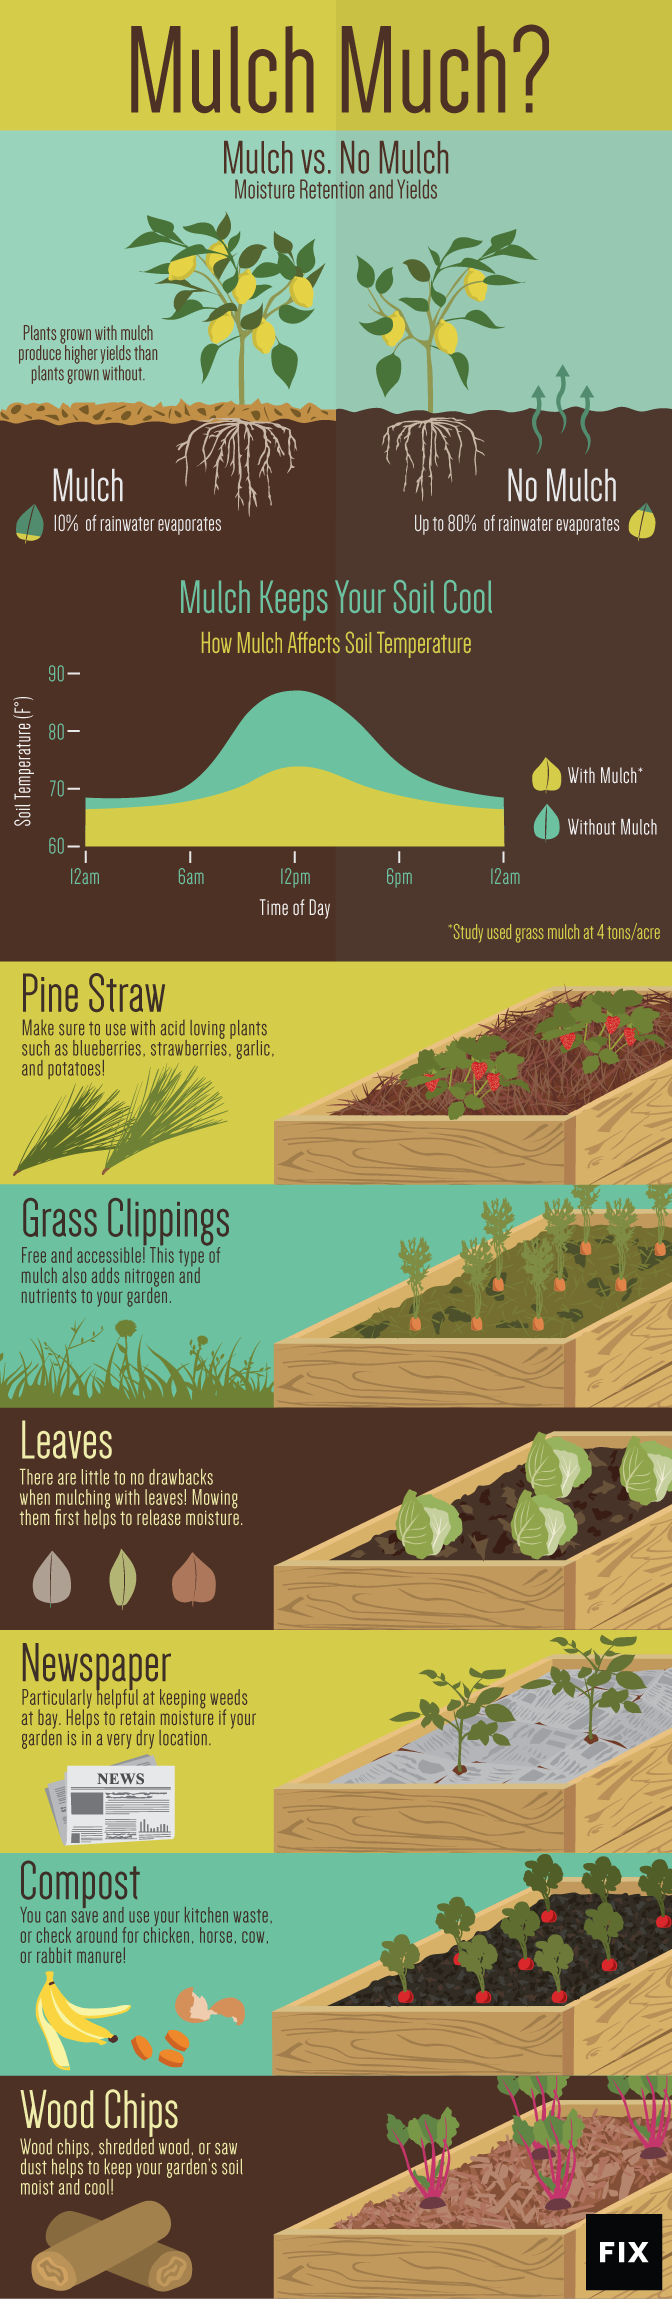
Source: Fix.com

Source: Fix.com
 source: “CustomMade.com“
Even if you’re short on space, or gardening in urban areas, you can still grow some of your own food and enjoy a year-round garden. Container gardening can be very productive as long as you maximize your containers potential. As long as you have one large pot, (we suggest 18″ or larger in diameter) you can grow “10 different crops in a single year if you combine compatible plants and plan the growing year carefully.” -source “Telegraph.uk.co”
To Get Started, You will need:
• 1 large pot – a rubber tub bin is ideal or any plastic pot at least 45cm diameter
• Household drill and drill bit if no drainage holes
• Multipurpose, organic, peat-free compost
• A wigwam support made from bamboo canes or any strong flexible sticks such as willow
Click here to read the rest of the article on how to grow 10 different crops in one container!
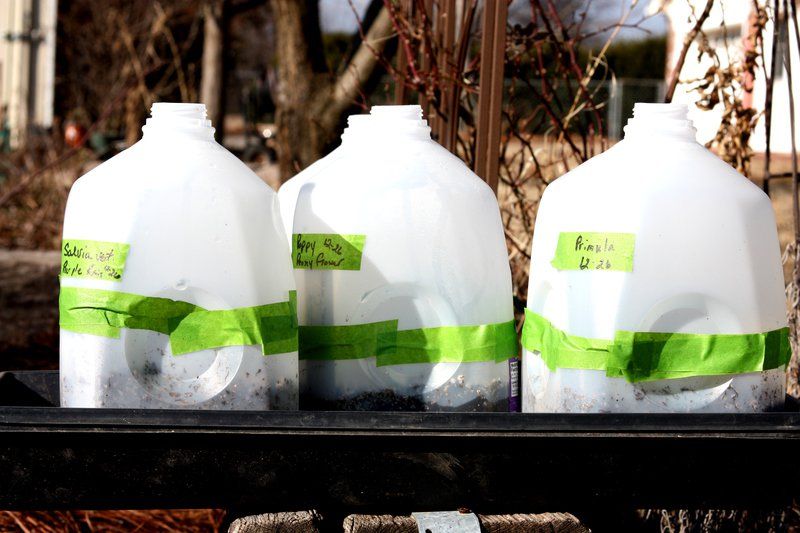
If you want to get a jump start on your gardening outside, but temperatures are still quite cool, you can use milk jugs to create mini-greenhouses.
“Three cold-treatment methods that work include: 1) Plant in recycled containers that are monitored outside; 2) Pre-chill the seeds in the refrigerator; and, 3) directly sow the seeds on prepared beds that are either open to the elements or mulched.”
Steps for making a milk-jug greenhouse:
To read the entire article, visit: “TheMuskogeePhoenix.com”
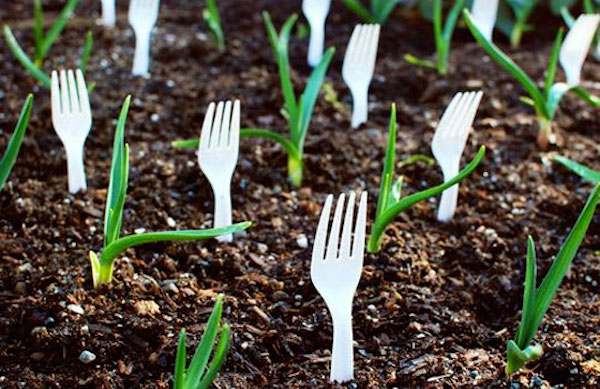
Everyone loves simple and genius ways to save time in the garden. Over at OneLittleProject, they’ve outlined 17 Clever Vegetable Gardening Hacks that will save you time, money and headache in the garden.
To get you excited, here’s just a handful of those tips!
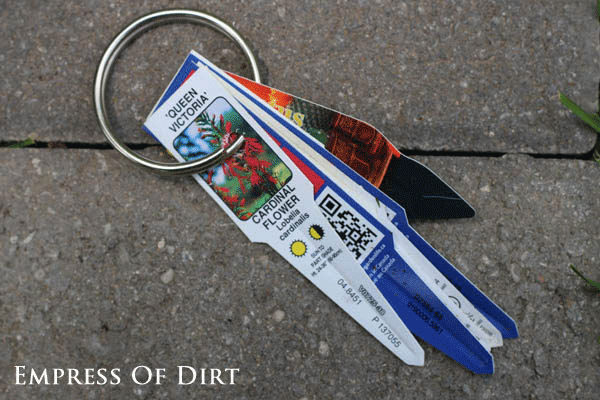 Keep Those Instructions Handy
You know those plant tags you throw into the shed because you know you should save them, but you aren’t exactly sure what to do with them? Put them on a key ring to keep them organized!”
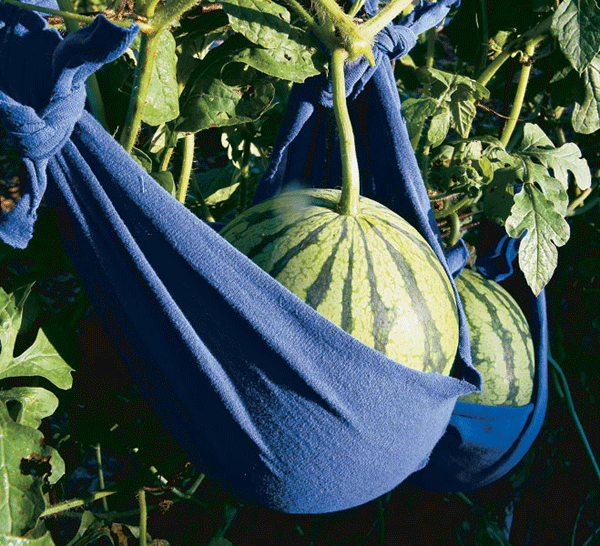
Put Those Melons in a Sling
“The bigger and heavier melons get as they grow, the more likely they are to break from the vine before they are ripe. Give them a bit of support by making a sling out of an old t-shirt to reduce the strain on the vine.”
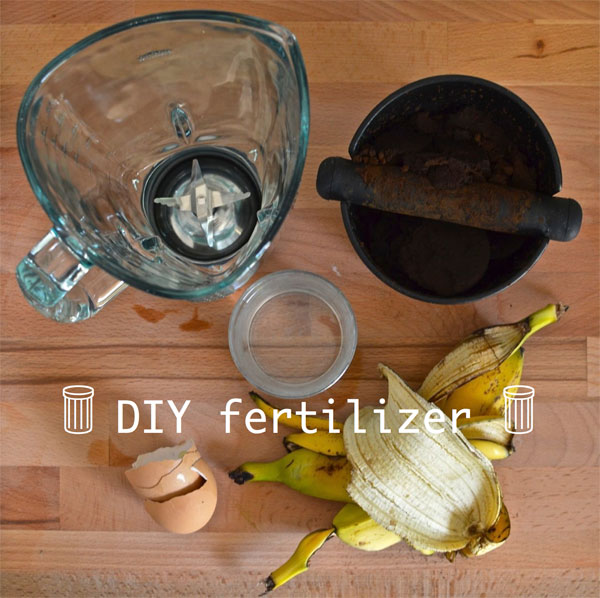 Make your Own Fertilizer with Kitchen Scraps
Let’s face it, composting isn’t for everyone. But, guess what? You can still make your own compost in small quantities from kitchen scraps. Get the step-by-step directions here.
Read the other 14 amazing gardening hacks, here at: “OneLittleProject.com“

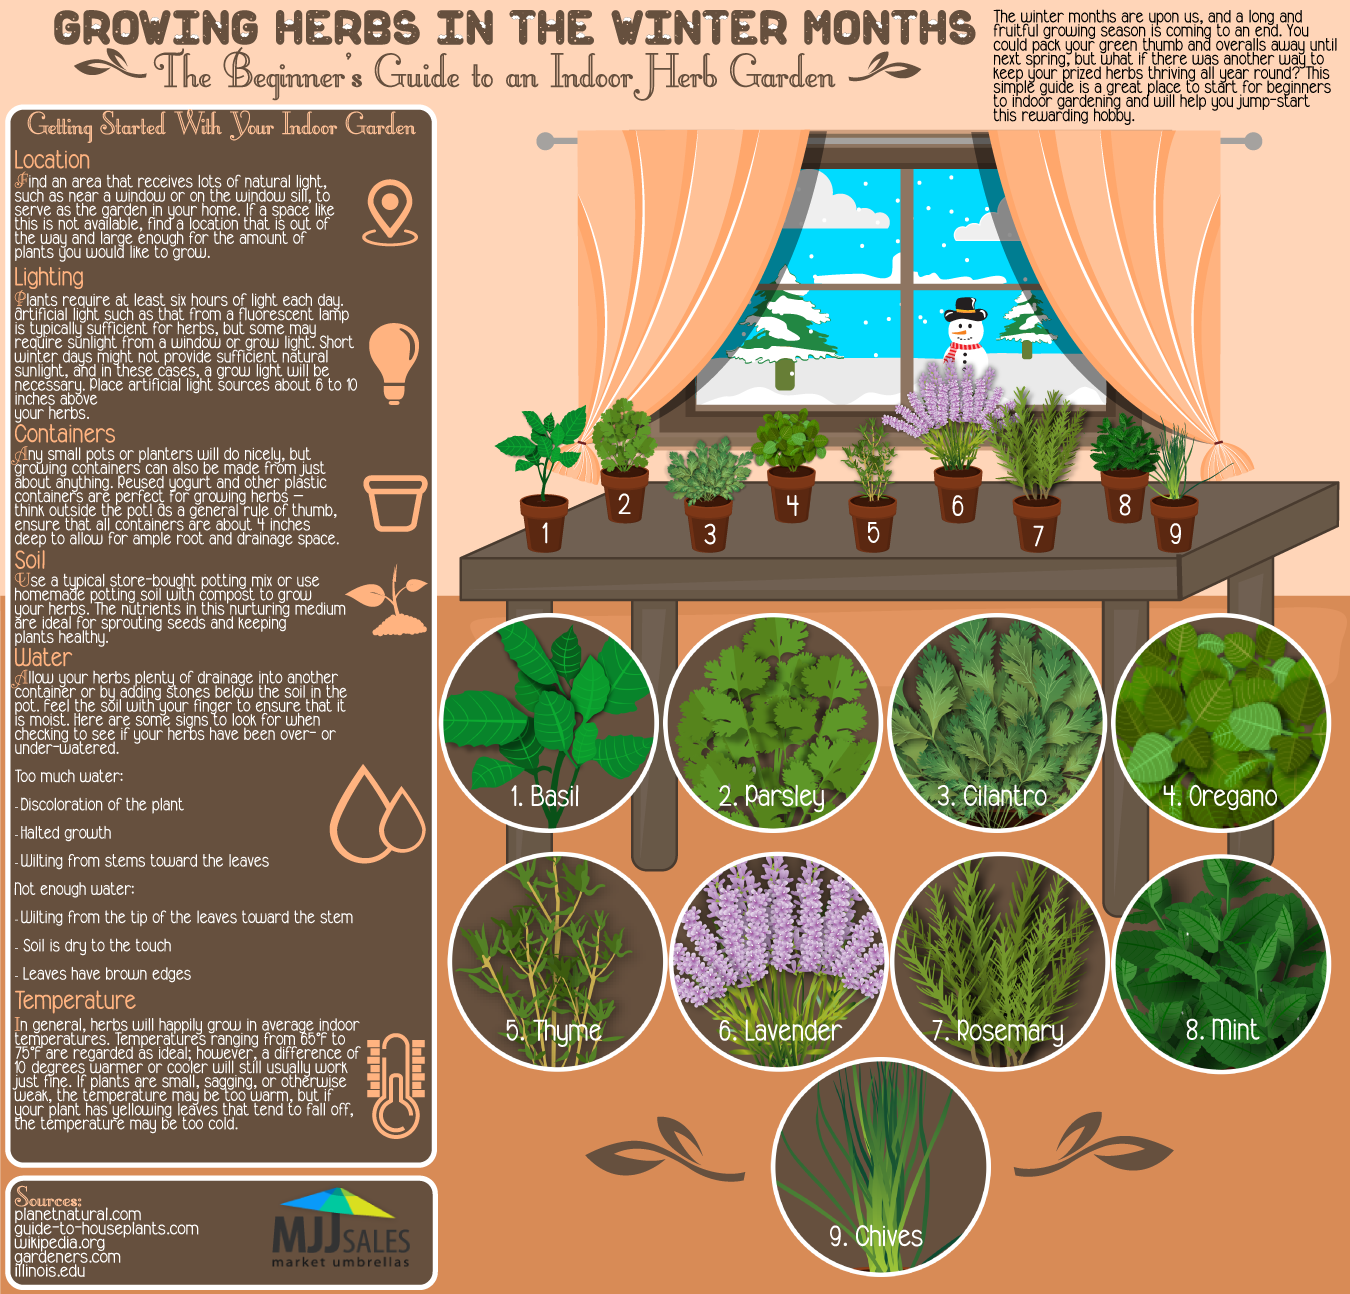
Gardening in small space can be just as rewarding and fun as growing in a large garden area. These days, urban gardeners are growing more of their own food in sometimes less than 100 square feet. Balconies, patios, even indoor windowsills are a great place to grow vegetables and herbs. Almost anything can be grown in a container, and if you’re wanting to know what you should plant to maximize your yield in a small area, here are 9 of the best vegetables/herbs to grow in a small garden.
1. Shallots:
Space shallots approx. 4-6 inches apart with the rows 18 inches apart. Plant the bulb root side down, the top of the bulb 1 inch below the surface. Planting too deep grows elongated bulbs that don’t store well.
2. Carrots:
Sow seeds evenly in a very shallow trench, about 1/4 inch deep. Keep seeds moist so they will germinate. Space rows about 12″ apart and when the first leaves emerge, thin to 1″ apart; when true leaves emerge, thin to 3″ apart.
3. Cherry Tomatoes:
To start tomatoes indoors, sow seeds using expanding seed starting soil pods about 8 weeks before the last frost date for your area. Seedlings will be spindly with less than 12-14 hours of light per day, try to keep them in a warm sunny location. When seedlings have 4 leaves, transfer to a deeper pot (3-4″) and again when 8-10 inches tall. Each time, place the uppermost leaves just above the soil line and remove all lower leaves. Transplant into the garden when the stem above the soil has reached 8-10 inches tall. Be sure to harden them off before transplanting them outdoors. Allow up to 10 days for the tomato plants to harden off to the outside temperature fluctuations.
4. Runner Beans:
Set three 6 foot poles in the ground, tepee fashion, and tie together at the top. Leave 3 to 4 feet between the pole groups. Make a hill at the base of each pole, enriched with compost or well-rotted manure, and plant 6-8 seeds in each. After the second pair of true leaves appear, thin to 3 plants per pole. With regular harvesting, the pole beans should bear all summer.
5. Garlic:
Break apart cloves from bulb but keep the papery husk on each individual clove.
Ensure soil is well-drained with plenty of organic matter. Plant in Full Sun.
Plant 4 inches apart & 2 inches deep, in their upright position (the wide end down and pointed end facing up). Come springtime, shoots will begin to emerge.
6. Kale:
Plant Kale in rows 18 inches to 2 feet apart. When the seedlings are 3 or more inches high, thin plants to 10 inches apart and use the thinnings for salads or as a cooked vegetable.
7. Basil:
Try to space your basil plants about 12 inches apart. As long as you harvest the leaves when they are young, basil plants make a wonderful container crop.
8. Lettuce:
Seed should be sown thinly in rows 1 foot apart; for leaf types, thin plants to 2-3 inches apart, then thin again by pulling every other plant when half grown. This will encourage thickly developed plants. For head, Bibb, and cos types, space rows 18 inches apart, plants 8-10 inches apart. Closer spacing results in smaller heads, which may be preferable for small families.
9. Beets:
Sow seed 1/2 inch deep in rows 12-18 inches apart. The beet seed is a compact ball of many tiny seeds. Many plants germinate where each seed is sown, so seed should be placed sparingly. When seedlings are 4-6 inches high, thin plants to stand 1 1/2 inches apart. (They can be used in salad or cooked as spinach.) Then, as these beets grow to about an inch in diameter, pull every other one to allow larger beets to grow.
Original post can be found at: “SeedsNow.com“


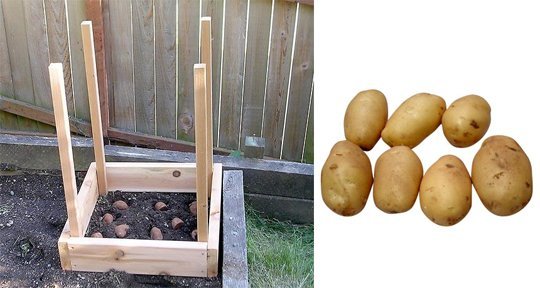

Do you love growing spuds but you don’t have room in your garden to have rows of mounding hills? By building a “potato box” you’ll increase your yield of food without having to use more square feet in your garden space. Plus, by using this method or one similar, you can grow up to 100 lbs. of potatoes without taking up much room in your garden at all!
Here are some pointers from the original article over at “ApartmentTherapy.com“!
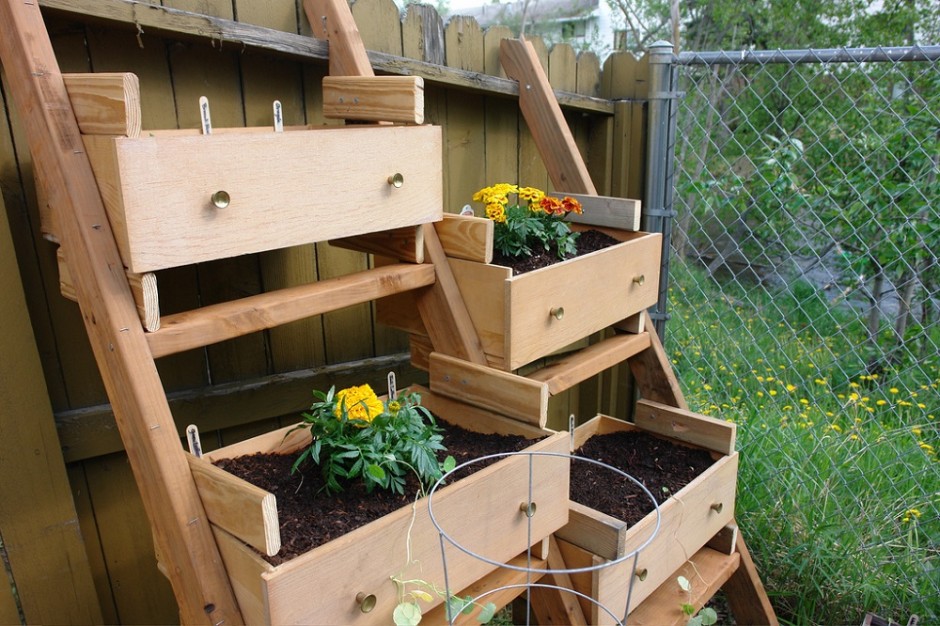
Old dressers are easy to come by and for balcony gardeners or anyone who’s wanting to grow more food in less space by creating a vertical garden, this project might just be for you! “Making a container garden from up-cycled dresser drawers is pretty simple. You’ll want to start with a plan. Things you’ll want to consider…
Once you know what you want to plant and where your garden will grow, it’s time to inspect your drawers.
Next, you’ll need to drill holes in the bottom of your drawers so moisture has somewhere to drain out. Now it’s time to fill your new dresser drawer vegetable garden with potting soil. Be sure to add some of your homemade compost to give your veggies an extra boost!
At this point, you’re finally ready to plant your seeds. Be sure to read the instructions on the seed package and properly space the seeds so your plants have room they need to thrive.”
Read the full article and find more step-by-step instructions here: “Earth911.com“.
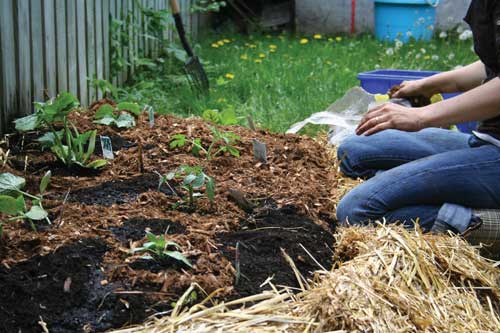
Do you dislike tilling? Have you heard about lasagna gardening yet? If not, you may want to read up on this popular gardening technique that allows you to do more with less work. It’s also referred to as “sheet composting” or “layer gardening”. It’s a no-dig, no-till method that provides the gardener with rich and fluffy soil, perfect for vegetable and herb gardening.
“Just like the lasagna you cook, your lasagna garden has to be layered in a general order.
In general, you want your “brown” layers to be about twice as deep as your “green” layers. There is no need to get this exact. Just layer browns and greens, and a lasagna garden will result. What you want at the end of your layering process is a two-foot tall layered bed. The layers will ‘cook down’ (compost) in only a few weeks.” -via “GreenThumbscedwvu.org”
Read the full article here: “Accessible Gardening: Lasagna Gardening”
 “The new year is the perfect time to set new goals for yourself, especially if you have been thinking about growing a garden. THIS IS YOUR YEAR! Don’t be discouraged by lack of space, or knowledge about growing specific varieties. Set some small attainable goals for yourself in the gardening department and before the year is over you’ll be sporting that new green thumb you’ve always wanted but thought you’d never have.”-SeedsNow.com

The original source of this post can be found at SeedsNow.com
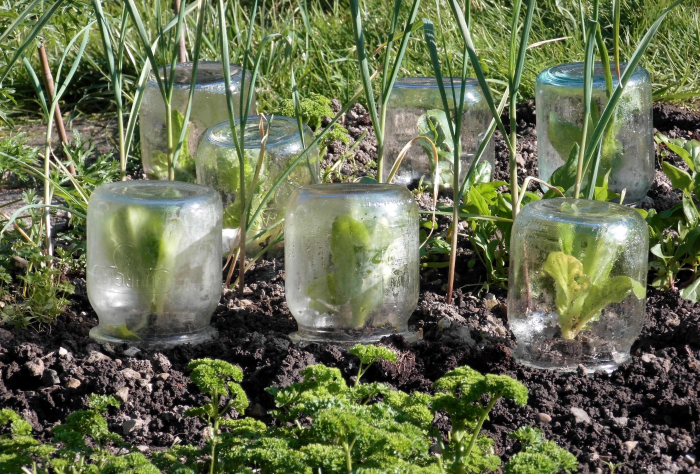
What is a garden cloche? It’s basically a fancy term for a glass bell or dome that you place over young seedlings or plants to protect them from cold weather, hail or in some situations…snow.
Simply place a mason jar over your sensitive seedlings or plants that you want to over-winterize. You can even place them over plants in the garden if you want to get an early start in spring. Use them when you suspect that the elements might damage your young seedlings, if they had no protection.
Watch the weather and keep them on your plants if freezing temperatures are in the forecast. Remove the cloches if the temperatures will rise in the morning or afternoon. You don’t want your plants to get too hot in the morning or mid-day sun.
Don’t have any mason jars? Milk jugs work great, too!
Learn more Season Extension Techniques from SeedsNow.com

#1. LETTUCE
Lettuce can be grown practically anywhere. Lettuce it is a cool-season vegetable, with an ideal temperature of 50-60 degrees. It does poorly in hot weather, and is tolerant to some frost and light freezes. The leafy types mature quickly and are more suited for warm climates. Cos is also more heat tolerant. It will prefer a little shade during the warmer part of the season. It can be grown year round with proper varieties, and some additional winter protection. Lettuce will generally grow best in the spring and fall seasons.
How to Grow Organic Lettuce from Seed
#2. CARROTS
Carrots grow quickly at first, sending down a tiny orange root that expands and develops more quickly toward the end of its growing period. As with all root crops, rapid, steady development produces the best results. Keep the row weed free with light shallow cultivation or heavy mulching. The seedlings must have steady moisture to develop well, with less moisture as the roots mature. Too much moisture at the end of maturing will cause the roots to crack. To prevent greening the shoulders, hill up dirt around the greens.
How to Grow Organic Carrots from Seed
#3. GREEN ONIONS & CHIVES
Chives are grown best in cooler weather, are cold hardy and usually are planted early in the spring. Chives can quickly take over your garden if you allow the plant to go to seed. Chives are also very easily transplanted in case you wanted to dig up the plants and move them to another area. Sow your chive seeds directly into the soil as soon as it is workable and at least 60 degrees F. Choose an area that is well drained, and add several inches of compost or organic matter around the plants to help fertilize the soil and to help cut down on weeds.
How to Grow Organic Chives (AKA Garlic Chives) from Seed
#4. SPROUTS
The easiest method of growing sprouts is to use a Mason jar. The key is to provide plenty of fresh air to enter the jar and only cover the top with a mesh screen. Step 1: Soaking — For a quart-sized jar, put 1 ½ to 2 tablespoons of small seeds (up to 1 cup if using larger seeds like green peas or garbanzo) in the sprouting jar. Cover top of jar with cloth or sprouting lid and rinse the seeds in warm (not hot) water. Drain and refill so that water is about an inch above the seeds. Let the seeds soak 8-12 hours (overnight). Protect from light by covering with a dish towel or placing in a cupboard. Step 2: Rinsing — Rinse 2 to 3 times per day for 2 to 3 days. After thoroughly draining the rinse water, lay the jar on its side to spread out the seeds. Do not expose to light. After 2 to 3 days the sprouts should be filling up the jar.
Order Organic Sprout Seeds Online
#5. GARLIC
Garlic can be planted in the spring as soon as the ground can be worked, but fall planting is recommended. Bulbs will grow bigger and more flavorful when you plant them in the fall. Plant 6 to 8 weeks before your first hard frost. In southern areas, February or March can be a better time to plant.
Guide to Growing Organic Garlic
#6. ONIONS
Onions are easy to grow, have a fairly short growing period and take up little space in the garden. If you don’t have a vegetable garden, plant a few onions in your flower garden or in a pot or box and set them on your patio or in a sunny window.
Onions are a cool-season crop, hardy to frost and light freezes, although certain varieties are exceptions. They can be grown practically everywhere, and prefer a cool- season start. Onions are as hardy as they come. Frosts, freezing temperatures and snow will not kill them. They should have steadily moist soil and even growing weather to mature at a steady pace. Otherwise they bolt to seed or do not form good bulbs. High temperatures and low humidity are advantageous during bulbing and curing.
How to Grow Organic Onions from Seed
#7. BROCCOLI
Broccoli is an annual cool-season crop hardy to frosts and light freezing, often overlooked and overcooked. Broccoli is sensitive to the heat, if the weather is too hot, it will flower quickly and won’t produce an edible head, it tends to grow best in the fall due to the more predictable cool weather. To prevent spreading clubroot and other soil-borne diseases, don’t compost brassica roots. Some gardeners won’t compost any part of the plant. Also, rotate the placement of brassica plants in your garden so they aren’t in the same 10-foot radius for at least 3 consecutive years. Some experts recommend a rotation of 7 years. Headed broccoli is the most common form in the United States, with big central heads closely packed with buds.
How to Grow Organic Broccoli from Seed
#8. BELL PEPPERS
Peppers are easily second only to tomatoes as a home gardeners favorite. Try spot planting them around the garden for bursts of beautiful color too. Pepper roots don’t like to be disturbed, so plant them indoors in seed starting pellets two months before your last frost date, usually three or four seeds to a pellet.
How to Grow Organic Sweet Bell Peppers from Seed
#9. THYME
Thyme can be grown in many climates. It makes for an attractive and fragrant ground cover, and has fragrant, tiny flowers that the bees love. Grow thyme to attract pollinators for your garden. Try using fresh thyme in meat dishes, incorporated into sausage, stuffing or your favorite soup recipe. It also does very well in containers, both inside and outdoors. Plant seeds when the ground temperature has warmed to at least 70 degrees. Loosen soil and then sprinkle seeds on top. Mist lightly, being careful not to allow the soil to become soggy.
How to Grow Organic Thyme from Seed
#10. STRAWBERRY
#11. ARTICHOKES
Artichokes have a preference for a long, frost-free season. They do not grow well when there is heavy frost or snow. The temperature should not be under 55°F at night. For best results, plant them on the average date of last frost for your area. Artichokes need rich, well-drained soil that will hold moisture. They also need as much sun as possible. 8 hours of sunlight is ideal.
How to Grow Organic Artichoke from Seed
#12. RHUBARB
#13. BEETS
Beets are an annual cool-season crop, half-hardy to frost and light freezes. They thrive in all parts of the country. Beets are closely related to spinach and chard, and once called “blood turnips” because of their bright red juice. Growing beets will provide delicious colorful roots and nutritious greens. Most beets are open-pollinated and multi-germ, where one seed yields a clump of 4-5 plants that need to be thinned.
How to Grow Organic Beets from Seed
#14. BASIL
Basil is planted in the spring and dies at the first fall frost. It can be grown year-round indoors or in frost-free climate. Basil also needs daytime temperatures over 70° F and nighttime temps over 50° F. Basil thrives in warmer temperatures. Sow your seeds outdoors in spring, after all danger of frost has passed. Basil needs at least 6-8 hours of full sun each day, so keep that in mind when choosing a location to start your seeds. Try to space your basil plants about 12 inches apart.
How to Grow Organic Basil from Seed
#15. ZUCCHINI & SQUASH
Squash is a warm-season crop, very tender to frost and light freezes. Plan an average of 2 winter plants per person and two summer plants per 4-6 people. Summer squash can be grown almost anywhere, as the vines develop quickly. Harvest begins in 2 months. Winter squash requires a longer growing season and more garden space for sprawling plants. They generally do not tend to thrive in hot, dry regions where there is a limited water supply.
How to Grow Organic Squash & Zucchini from Seed
#16. CUCUMBER
Cucumbers self regulate how many fruits they can carry at one time. In order to maximize production, harvest fruits as soon as they reach picking size. Pick daily, because under ideal conditions, cucumber fruits can double in size in just one day. Grow cucumbers where a long, warm growing season, minimum 65 days, can be assured. Cucumbers are a warm-season crop, very tender to frost and light freezing.
How to Grow Organic Cucumbers from Seed »
#17. GREEN BEANS
Beans can be grown in average soil, almost anywhere in the United States. They grow best if the soil is well drained and the summer is consistently warm. Seeds will rot in the ground in cold, damp weather. Plant seeds 2 inches apart, 1 1/2 inches deep in rows 2 feet apart. Thin to about 6-8 plants per foot of row. Bean plants produce the bulk of their crop for a 2 week period. Rather than plant the entire row, sections should be planted at 2 week intervals until mid-July or 8 weeks before the first killing frost. This will assure a steady crop all summer.
How to Grow Organic Green Beans from a Seed »
#18. MINT
Mint is said to be the easiest to grow out of all herbs. It’s great for beginning gardeners and grows best in zones 4-9. Use Mint leaves to add flavoring to a wide array of food and beverages. It also serves as a natural pest deterrent around other vegetables. Chewing on the leaves will freshen your breath and can calm an upset stomach. Mint is a hardy perennial that can really be started anytime as long as you’re about 2 months before your first Fall frost. It also grows well indoors, year-round. Start them inside in late winter, for your Spring planting, or wait until the soil warms up and sow the seeds directly outside in your garden.
How to Grow Organic Mint from Seed
#19. RADISH
Radishes are a fast growing, cool-season crop that can be harvested in as little as twenty days. Eaten raw they can be whole, sliced, diced, or grated. You can also cook and pickle them. Most of them are typically eaten fresh, and make a good addition to salad or a substitute to pepper on a sandwich.
How to Grow Organic Radish from Seed »
#20. TOMATO
The tomato is a warm-weather vegetable, it is very tender to frost and light freezes. Never plant near walnut family trees. The walnut trees excrete an acid that inhibits growth of nearby plants. Sow seeds using expanding seed starting soil pods about 8 weeks before the last frost date for your area. Seedlings will be spindly with less than 12-14 hours of light per day, try to keep them in a warm sunny location.
How to Plant, Grow, Harvest, and Save Organic Heirloom Tomato Seeds »
#21. POTATOES
The ideal potato soil is deep, light and loose, a well-drained but moisture retentive loam. Most potato varieties are very aggressive rooting plants, and are able to take full advantage of such soil. In ideal soil, potatoes can make incredible yields. Fortunately, the potato is also very adaptable and will usually produce quite well even where soil conditions are less than perfect.
How to Plant, Grow, and Harvest Organic Potatoes from Seed »
#22. KALE
Kale is a very easy vegetable to grow. It is generally more disease and pest resistant than other brassicas. Kale also occupies less space than other brassicas. Use it as a spinach substitute in a wide variety of dishes. Kale maintains body and crunch which makes it a good substitute in dishes where spinach might not be suitable; its especially delicious in stir-fry dishes. It is recommended to cook over high heat to bring out the best flavor and prevent bitterness.
Many specialty growers are planting kale in wide beds only 1/2 to 12 inches apart and harvesting kale small as salad greens. In England, close plantings of kale have been shown to prevent aphid infestations through visual masking.
#23. MICRO-GREENS
Each and every living seed will grow into a plant. It’s when that seed begins to grow (germinate) that we call the beginning growth stage of the plant a “sprout”. They are a convenient way to have fresh vegetables for salads, or otherwise, in any season and can be germinated at home or produced industrially. Sprouts are said to be rich in digestible energy, vitamins, minerals, amino acids, proteins, and phytochemicals!