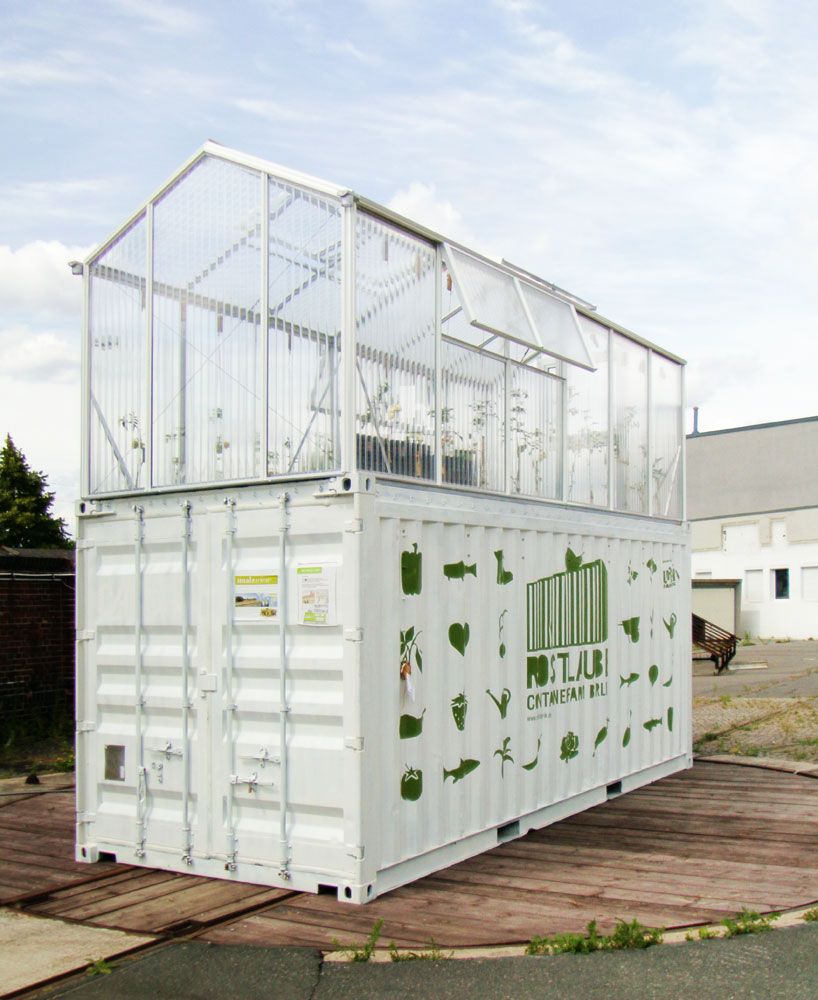
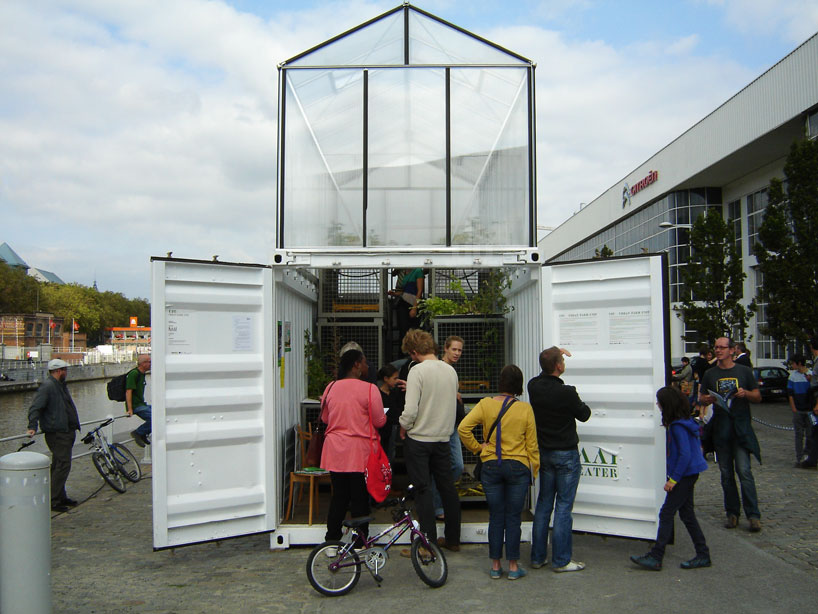
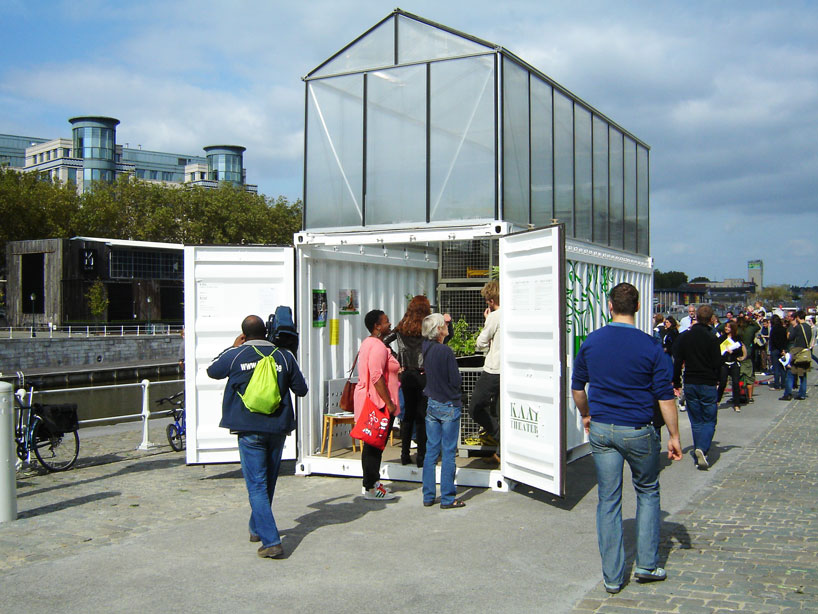
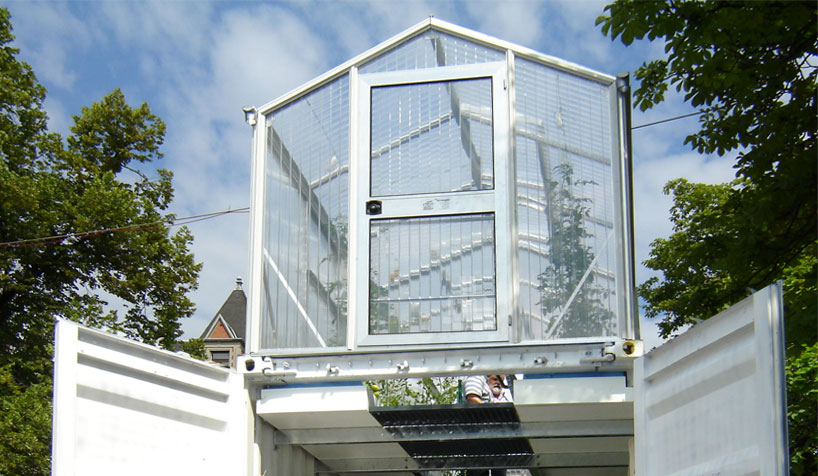
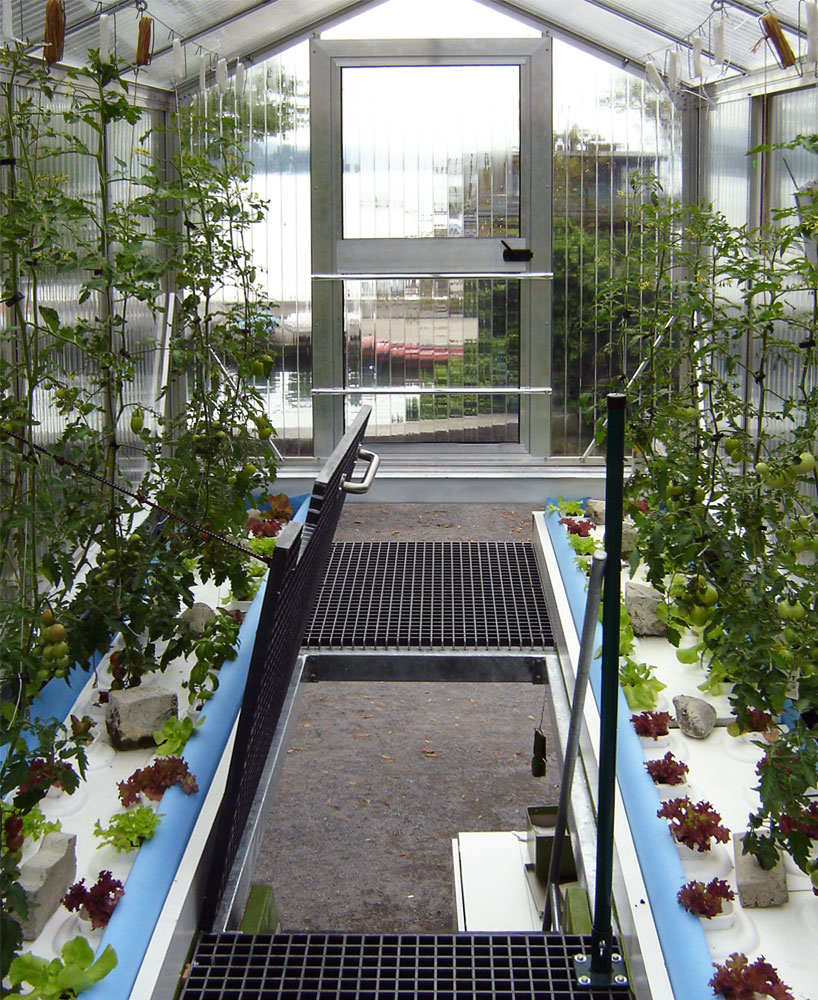
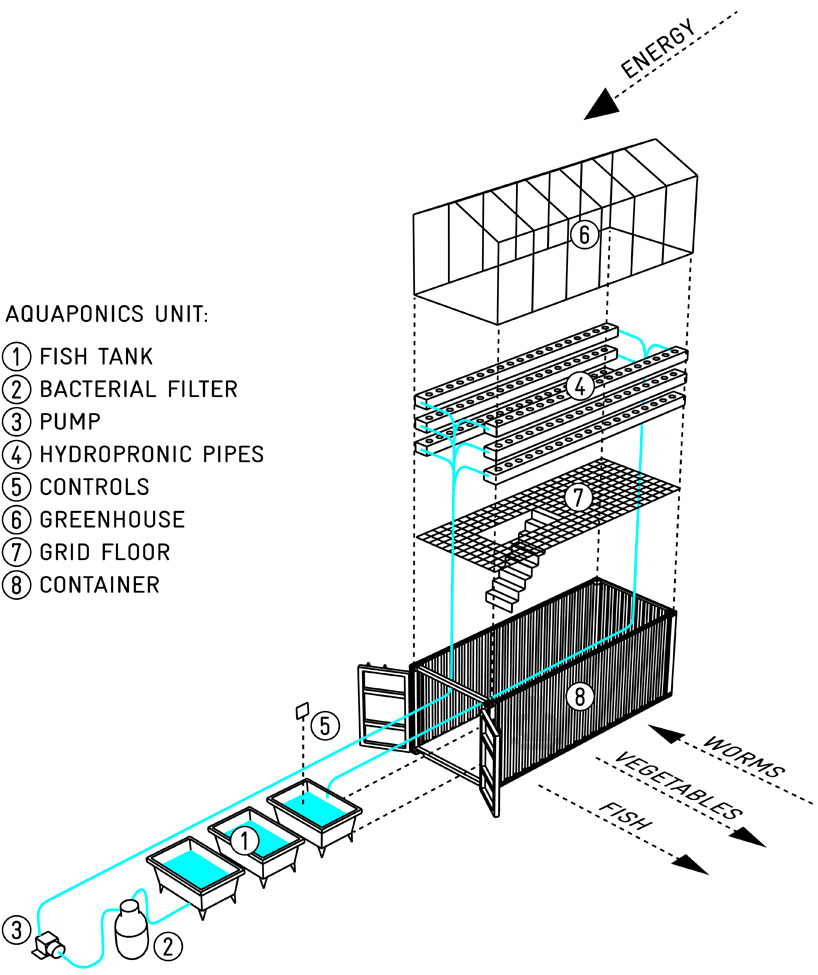
“The urban farm unit by damien chivialle is composed of a shipping container with a greenhouse built on its open roof – kaaitheater, brussels edition.” Source: http://www.designboom.com/


Urban-style organic gardening blog about growing your own food with limited space and creative resources.
“The urban farm unit by damien chivialle is composed of a shipping container with a greenhouse built on its open roof – kaaitheater, brussels edition.” Source: http://www.designboom.com/
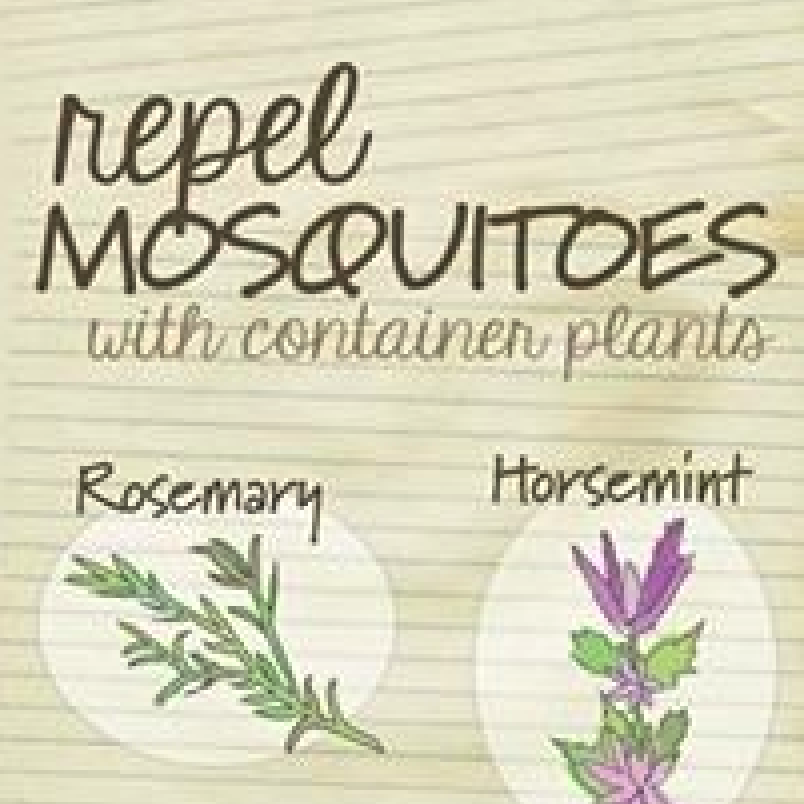
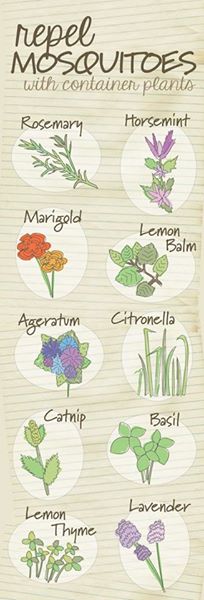
Easily repel mosquitoes just by growing these plants! These can all be planted in your container gardens. Just put the containers wherever you site outdoors and you’ll be mosquito-free! Good luck.
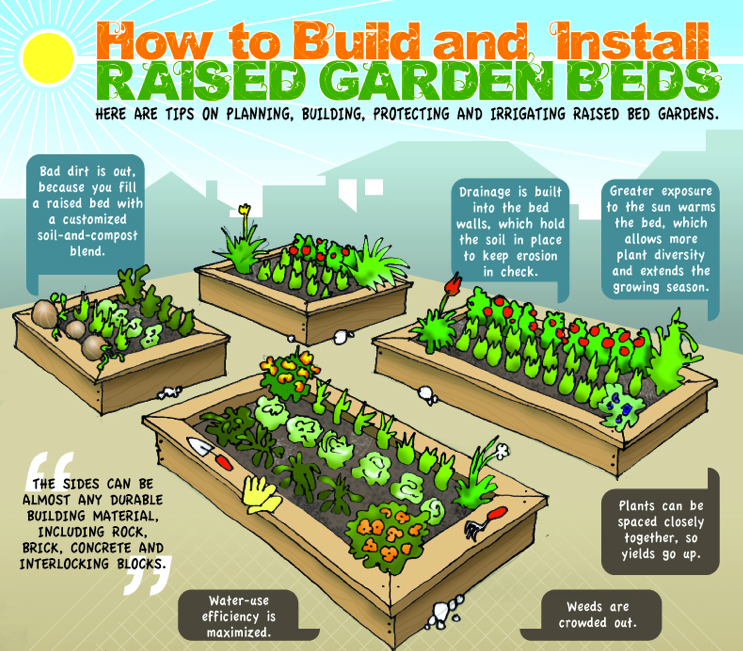
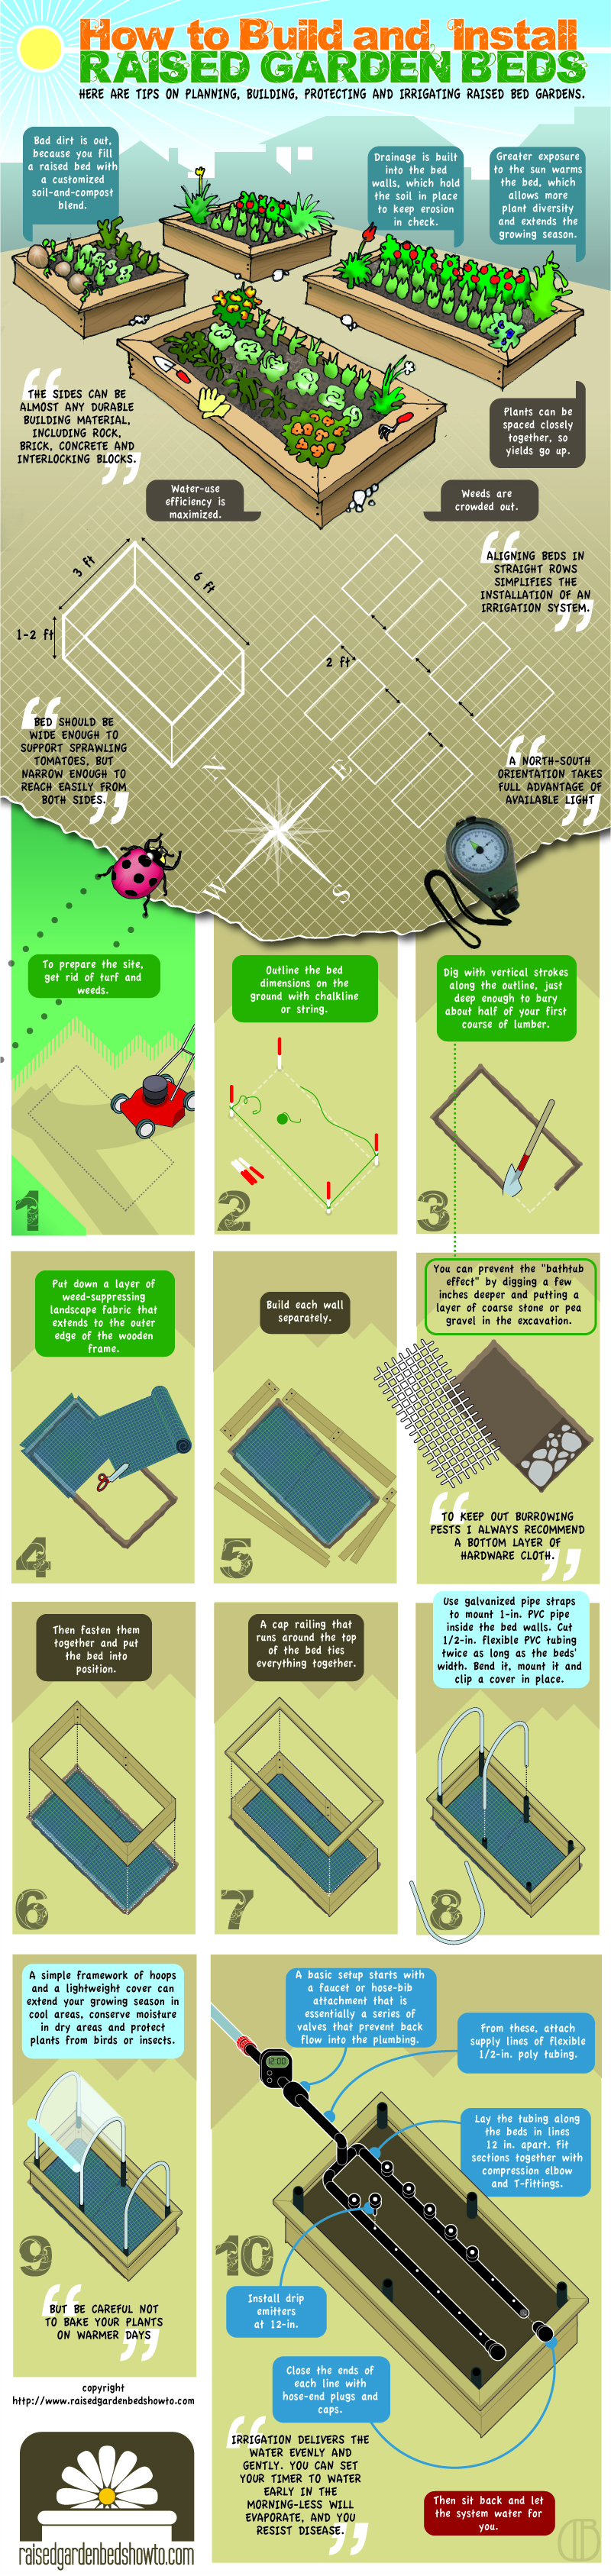
“A raised garden bed extends the planting season, offers versatility to the gardener and helps protect your knees by bringing plants up from a level position on the ground.
Also known as garden boxes, raised garden beds are ideal for growing flowers and vegetables virtually anywhere.
Knowing how to build them, how to use them and how to maximize the rewards you get from them is critical. Luckily, it’s fairly simple to do ALL this; both to build a “do it yourself” (DIY) raised garden bed, and to maximze its growing portential.” – http://www.raisedgardenbedshowto.com/
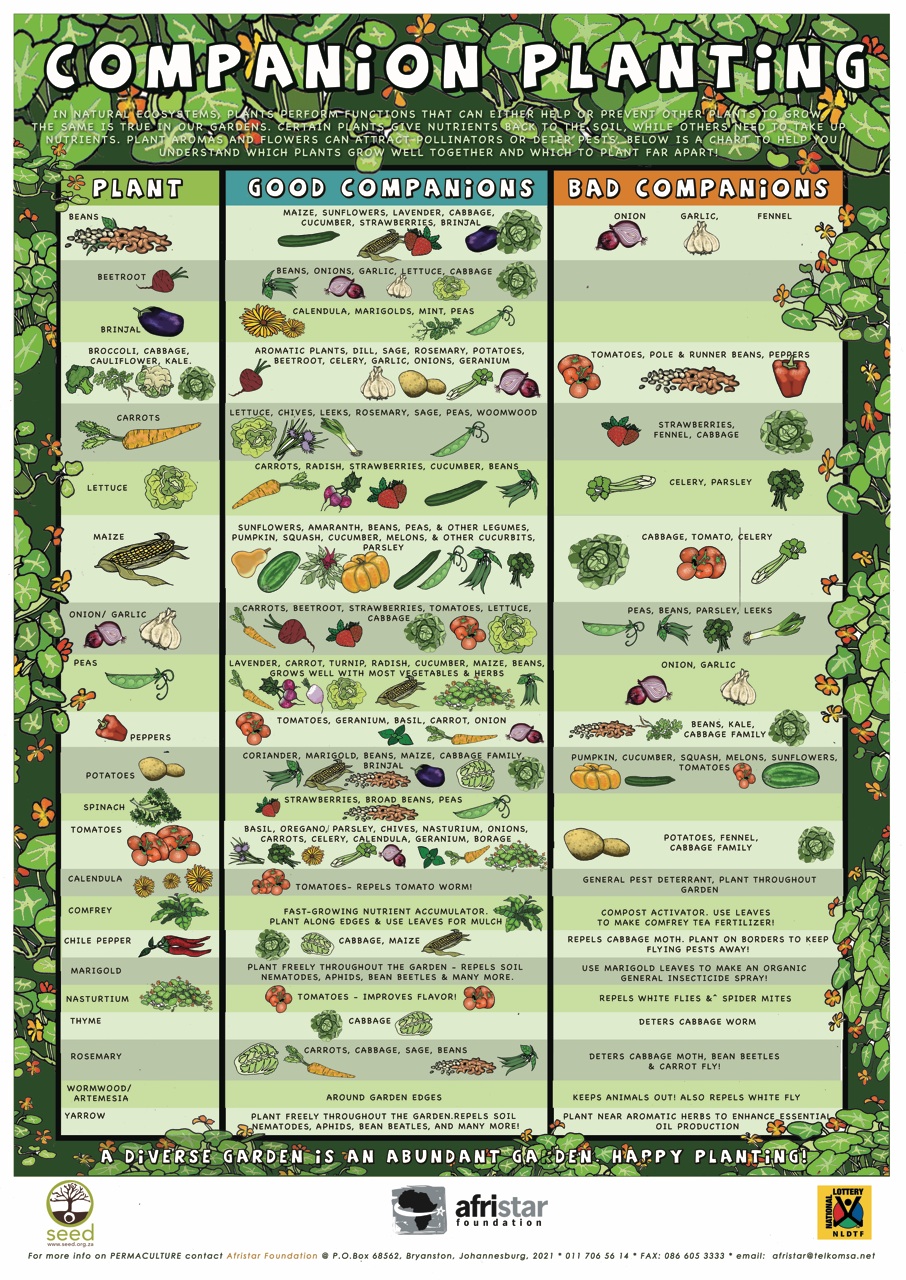
Companion Planting Chart by Afristar
Source: Fix.com
Luckily for all you green-thumb wannabees, gardening isn’t a passing fad. In fact, the act and art of growing flowers, vegetables, and herbs is only gaining in popularity. According to Greenhouse Magazine, nearly half of all people gardened in a year, while the Garden Writers Association found that edible gardening increased over 11 percent in 2013.

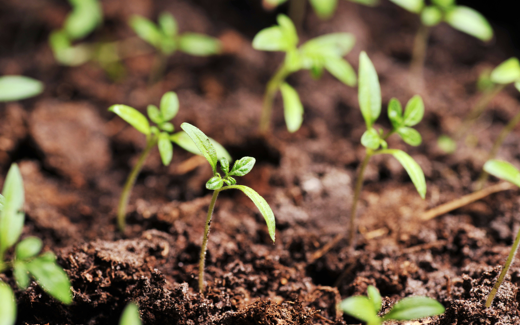
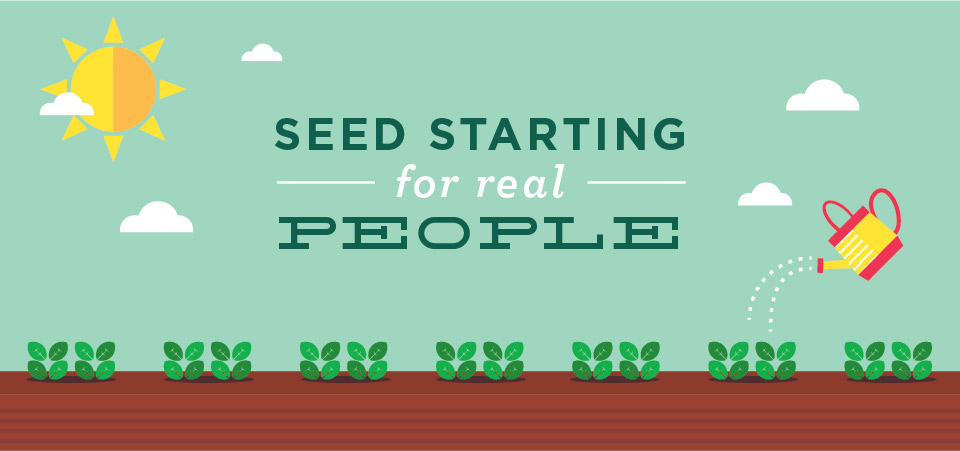
For budget-smart gardeners like you and me, the expense of buying new plants can be the biggest deterrent to establishing a new green space or adding to an existing vegetable or flowerbed. Fortunately there’s a solution that’s less difficult than it might seem: seed starting. As an added bonus, once you start your own seeds you can grow plants that you can’t find elsewhere, or want to try but are too price-tag phobic to purchase.
Seed starting isn’t complicated or messy—and it’s a good way to plan and think about your garden before growing season even begins. Here are the essential steps to help you start your own flowers, vegetables, and herbs from seed.
You can purchase a ready-made seed-starting flat made of plastic; it resembles a series of cubes. Or you can make your own using re-used plastic containers or egg cartons. If the material you choose is biodegradable—paper egg cartons, for example—you may be able to plant your seedlings along with the container directly into the soil. If not, you can re-use the seed starting pots from year to year as long as you sterilize them in a diluted bleach solution.
If you’re making your own container, pick something that’s about 3 inches deep. If your container doesn’t have drainage holes, use a nail and hammer to add a few as a way for moisture to escape the bottom.

While the containers used for seed starting are fairly flexible, the material your seeds first grow in are not. There are plenty of ways for you to mix your own seed starting material, but to reduce headache and complication, you can also just purchase a pre-made mix. The mixture may be soilless or contain soil; the difference is important (and we’ll discuss why later on in this post). It’s also helpful to have a spray bottle, and trays to place under your seed starting containers to catch any water runoff.
Printed on all seed packets are basic guidelines that help you understand when you can plant seedlings outside; use those to determine when you should start seeds indoors. The planting date is related to the average last frost date; to find your specific date, view the USDA Plant Hardiness Zones: http://planthardiness.ars.usda.gov/PHZMWeb/.
Once you’ve found your zone, use the seed guidelines to establish seed starting dates. Sound complicated? It isn’t. For example, if your last frost date is May 1 and the seed packet for green peppers recommends sowing seeds 8 weeks ahead of time, you would start those seeds around March 6.

Plant Your Seeds
Once you have your seed starting supplies and seed starting calendar, it’s time to begin sowing seeds. Start by filling your containers with seed starting mix. Moisten the mix so it’s wet but not soggy. Then plant your seeds; scatter them lightly over the soil and gently press into place. If the seeds are very small, you can plant more than one seed; if large (such as cucumbers) you can plant just one. And, make sure your seed starting containers are labeled with name and planting date.
Tend Your Seeds
Seeds need only regular moisture, warmth, and sunlight in order to grow. Once planted, place them in a spot that’s free from chills and cover with plastic or newspapers until the seeds sprout. As they begin to sprout, remove the covering.
Your seedlings should never dry out, but also should not be wet; use a spray bottle to apply moisture just a bit at a time. You can also add water to a tray and let the seedlings pull it up as needed, but don’t allow the containers to get overly saturated. If you are not planning on transplanting your seedlings into larger pots and have grown them in soilless seed starting mix, you also need to give them a weekly feed of diluted plant fertilizer. As seedlings begin to grow, you can thin them to select stronger, hardier plants.
Transplanting Seedlings
If you’ve chosen a large enough pot AND used a soil-based planting mix, you may be able to leave your seedlings until it’s time to place them in the garden. If the pot is very small or the mix is soilless, you’ll have to transplant them into a bigger pot until it’s time to put them outside. That way the plants will develop vigorous roots.
To transplant, start by filling larger containers with potting soil. Dig out your seedlings, saving as many roots as you can, and place the plant in the new pot. Spread out the roots and cover with potting soil; tamp gently and water well. Every two weeks give the seedlings a dose of diluted fertilizer.

Encouraging Healthy Seedlings While just-sprouting seedlings need super-warm temperatures, established seedlings have less stringent requirements. Overheating in particular can push plants to become spindly. Either way, you’ll need to offer seedlings about 16 hours of light—not possible in cold-weather months.
The solution is to supply supplemental light by using fluorescent tubes. If you have lots and lots of seedlings, you may want to think about setting up a grow station in a spare room or the basement (if warm enough). Lights should be adjustable in height so that you can keep them at a constant distance of about 4 to 5 inches from the tops of the plants. A timer can help maintain a lighting routine so you don’t have to worry about manning the on-off switch.
Best and Worst Seeds to Sow Indoors
Many state extension services have helpful lists of plants that work well (and those that don’t) to establish from seeds you start indoors. Some of the best include tomatoes, peppers, cucumbers, pumpkin, squash, and watermelon. The worst-from-seeds list? Asparagus, snap and lima beans, carrots, cilantro, corn, parsnips, radishes, spinach, and turnips.

Hardening Off
Once your seedlings are ready to make the big leap into the great outdoors, they’ll need to be hardened off. But that is a topic for another blog post! Until then, happy seed starting!
 Spring is here… getting lots of messages about starting your first container garden.
You are excited and nervous. And for good reason. You’ve lots to do in the next couple months!
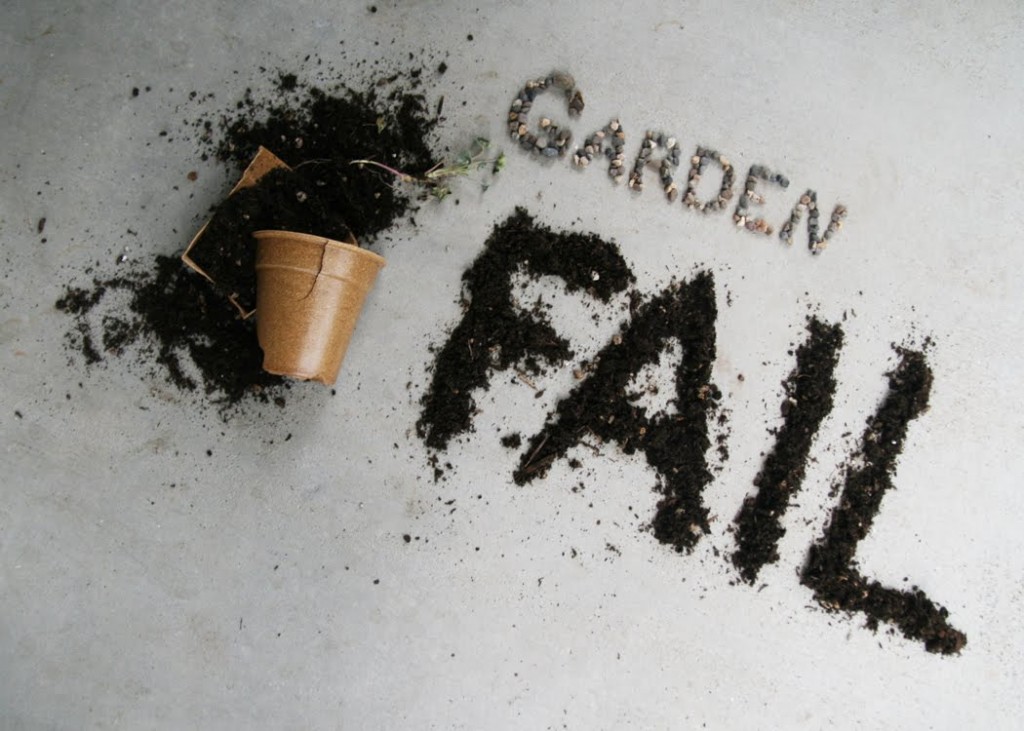
The 3 reasons your garden will fail this year.
You want to grow tomatoes, eggplants, cucumbers, peppers, kale, onions, garlic, strawberries and a billion other things.
A lot of those veggies require a bit more time and energy to grow. I’m not saying it’s impossible to grow them, just that to grow all of them when you are starting out might not be the best idea. You get an A for the enthusiasm, but you are just starting out. Chill out a bit.
Start by buying sampler seed packs only $0.99 cents over at SeedsNow.com. They’re 100% NON-GMO.
Growing your own food is overwhelming to start. So why try to grow a farmers market on your balcony?
Growing your own food is overwhelming to start. So why try to grow a farmers market on your balcony? — Tweet This
Scale it down a bit.
You read in a gardening book, magazine or on some site that you can increase your yield, protect against bugs and that companion planting was smart to do. Now you wanna cram hundreds of plants into one container.
Companion planting is a good practice to employ, but if you are new to the container gardening game, keep it simple. Why introduce other variables into the equation?
Get one crop in a container down first, then introduce others into the mix.
How did I know this? Because everyone wants to grow tomatoes.
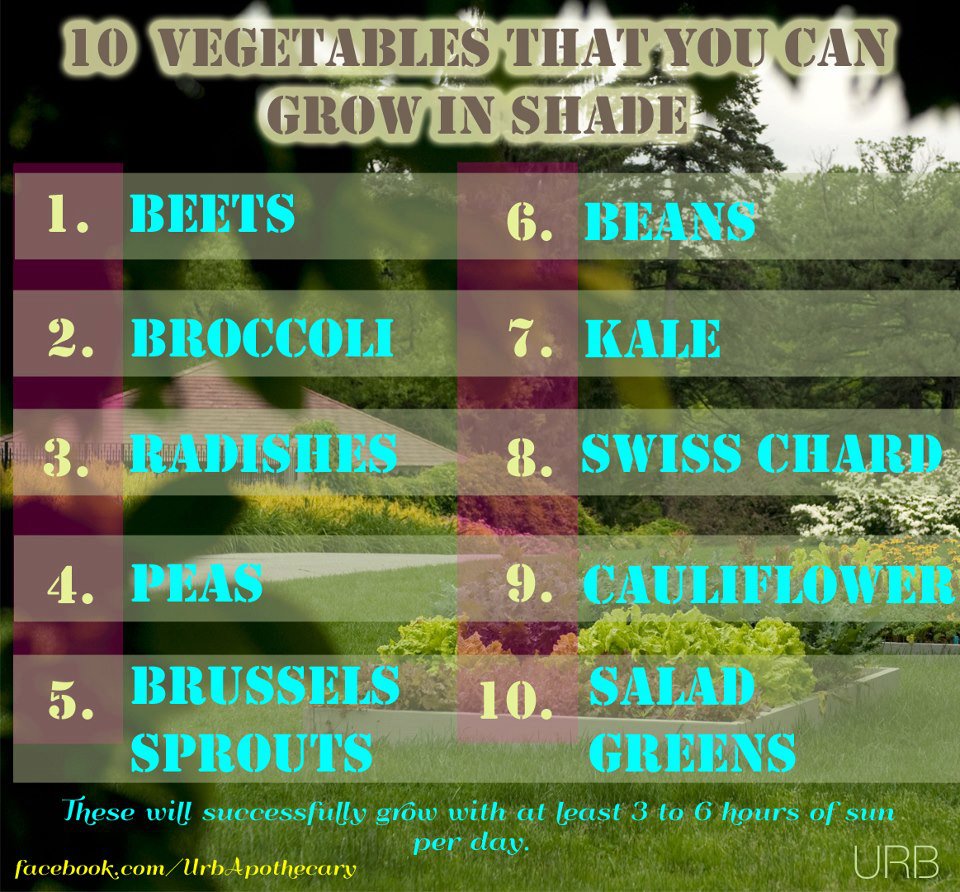
If you want to grow tomatoes and don’t get enough sunlight, you will likely fail. This is why it’s so important to determine the amount of sunlight your space gets and grow what suits those conditions. If you get less than 5 hours, then grow some of these shade loving veggies.
3 sources to buy your vegetable seeds
One of your big concerns in starting out is making sure that you are doing everything right because you are scared of failing.
That’s why I want you to minimize your failure and avoid those three mistakes. I’m not saying those ideas are and dumb and ridiculous, but to start out…they kind of are.
I know that you were planning one of these mistakes to start this year. In the comments below, ‘fess up and let me know which one you had planned and will be avoiding.

Think about the vegetables and herbs you enjoy eating. Make a list of those you enjoy most, and think about which are hardest to find or most expensive to buy in stores – those are the ones you’ll want to grow. Winter squash, tomatoes and watermelons are popular choices, but be aware that they take up a lot of space (winter squash, for example, should be planted at least 6 ft apart). Other vegetables take more space than you might think – tomatoes, for example, should be planted at least 24 inches apart. Some plants that get big (cucumbers and pole beans, for example) can be trained up structures called trellises so they take less space.
Divide the crops you want to grow into cool-season crops (which do best in the spring and the fall) and warm-season crops (which do best in the summer). Common cool-season crops include beets, broccoli, cabbage, carrots, cauliflower, collard greens, kale, lettuce and other salad greens, peas, radishes, spinach and turnips. These crops can survive cold weather (even some frost).
Popular warm-season crops include beans, corn, cucumbers, eggplant, okra, peppers, pumpkins, squash, tomatoes, and watermelons. These crops need very warm weather to grow and cannot survive frost at all.
Further divide the crops you want to grow into crops that can be grown from seed in the garden and those that are usually planted in a house or greenhouse and moved (or transplanted) into the garden as small plants.
Of the crops listed above in step 2, broccoli, cabbage, cauliflower, collard greens, eggplant, kale, peppers, and tomatoes should almost always transplanted by new gardeners. Cucumbers, pumpkins, and watermelons are sometimes transplanted and sometimes not.
Using your lists from steps 2 and 3, above, figure out which seeds you want to start with. Late winter, is usually the best time to buy the seeds you need.
In April, or as early after that as you can, find a garden spot. Use containers, build a raised bed, dig up your front yard, or whatever else you can think of. If you have a choice, your garden location should be flat and exposed to full sun all day.
Use whatever tool(s) you have handy to break up the soil throughout your garden. If at all possible, add some fertilizer and soil amendments. Talk to an experienced person at a good garden store for suggestions about what to buy, emphasizing that you want to grow organically. You can even have them test your soil and provide recommendations for special soil amendments.
Mark off the areas you plan to grow in with sticks. Leave paths in between that are at least 12 inches wide.
Use your tool(s) to prepare smooth beds where the topmost soil is very fine (no large lumps).
Start planting seeds of cool-season crops (again, this can happen as early as the beginning of April for many crops). Leave space for the warm season crops, which will not get planted until late May or early June (or plant very quick growing crops that will be finished by early June).
Weed your garden regularly (at least once a week), and put down leaves, straw, newspaper, and/or cardboard around your crops to keep weeds from growing. Harvest crops as they mature.
When all danger of frost has passed (in late May or early June), it’s time to start your warm-season crops and plant them in the garden as quickly as you can.
Continue weeding and harvesting through the summer, watering your garden thoroughly (for one hour or more) once a week if it has not rained.
As cold weather approaches in October, begin replacing warm-season crops with cool-season crops as the warm-season crops begin to die.


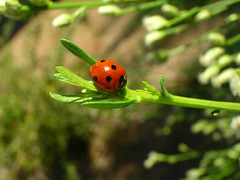
A Practical Solution to Attracting Beneficial Insects
Grow something that will serve two purposes. One for you to eat and one to attract the beneficial insects.
This isn’t a post of every single plant that will attract every single insect. Those aren’t useful.
It’s a post that will attract two beneficial insects that will help out most urban gardeners – ladybugs and lacewings.
Both of them will take care of aphids and other soft-bodied insects.
Here is a short list of herbs and veggies that you can eat and use to attract the good guys:
There are billion other flowers that can be planted to attract these and other beneficial insects, but want to help you really maximize your small space.
Which of these plants will you start growing to attract these beneficial insects to your urban garden?
Photo courtesy of marakawalv on Flickr
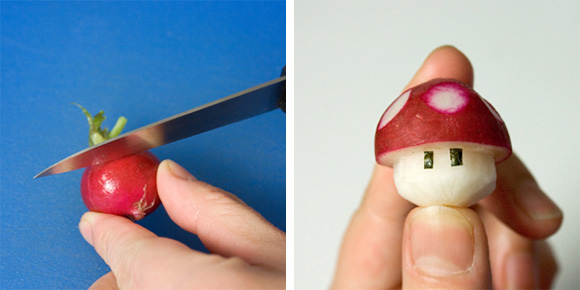

Mario Brothers Radish Head is brought to you by http://www.annathered.com
6 Steps:
Step 1. Put a knife in the middle of a radish, and make a small incision.
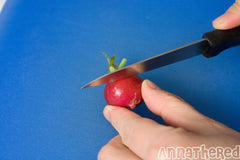
Step 2. Hold the radish, and spin the radish VERY SLOWLY, and cut all the way around the radish.

Step 3. Make four incisions on the bottom side of mushroom like in the pictures. *Don’t cut past the half line!


Step 4. Trim the stem part, and cut off the bottom.


Step 5. Put a knife on the surface of the radish, and peel the skin. *It’s kind of like peeling an apple, but you don’t rotate the radish, and just peel the skin off.


Step 6. You can make the stem part wider, put a small piece of seaweed and make a Mario Mushroom too.


A post on Organic Connections Magazine called People Don’t Want to Be a GMO Experiment got us thinking about a few things.
Most people assume that GMOs are safe because they are so widely available, which is not true. GMOs have never been proven to be safe and no they aren’t feeding the world.
It was some time in the late 1980s/early 1990s when they were first widely planted. So it hasn’t been that much time to see any kind of long term effects and if they are truly safe.
Ultimately this means that we are walking experiments to see how safe they really are. GMOs are found in most of the foods that are widely sold in the supermarkets.
This makes us all subjects in the GMO science experiment, not only with our food, but with grass too.
When he was campaigning in 2007, he specifically said, “We’ll let folks know whether their foods have been genetically modified because Americans should know what they’re buying.” Check the video to hear it yourself.
What are other ways to ensure that you aren’t consuming GMOs?
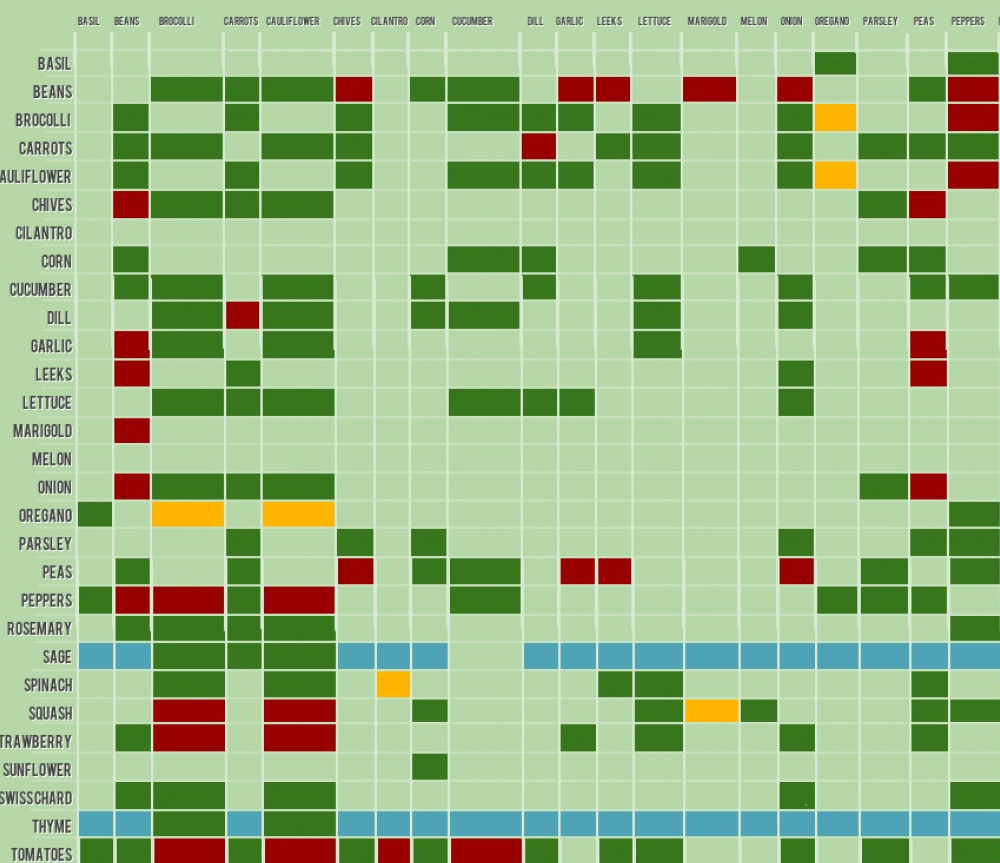
“Companion planting is one of the best techniques to grow a better garden and naturally repel pests. Some plants thrive next to certain other plants, while being completely incompatible with others (much like humans!). This infographic tells you at a glance the combinations that work best.
It highlights, for example, how thyme can be paired with just about any of the other plants in the list to improve your garden. Beans, on the other hand, are much pickier about their neighbouring plants.” – LifeHacker
CLICK HERE TO VIEW LARGE IMAGE SIZE.

CLICK HERE TO VIEW LARGE IMAGE SIZE.
Creator: Max Schau – http://www.paulsmowingmelbourne.com.au/

Summer is gone and September is upon us.
You think you missed your chance to start your garden and will start it next year…
…That’s just a lame excuse though.
You’ve made dozens of excuses why you can’t start. I’m sick of them and you should be too.
It’s not too late to start your garden!
That’s true for most of you in the United States.
Yes, your options are limited, but you can still start something.
It’s all about getting over the excuses and starting. You’ve made enough excuses that have kept you from starting.
Now is the perfect time to begin.
What can you grow?
Here is a list of veggies you can plant this month:
Where can I buy seeds?
Check out: SeedsNow.com for NON-GMO seeds. You can even find seeds that grow in containers, tower gardens, hydroponic systems, raised beds, and more. If you’re serious about getting started growing organic food then buy some seeds. That’ll at least get you pushed in the right direction. Check out the hundreds of vegetable and culinary herb seeds . There’s a huge variety of seed sampler packs for only $0.99/seed pack. Here’s a link to the Seed Shop. Use promo code: URBAN10 and get 10% off your entire order.
UOG on Facebook:
Come check out the Urban Organic Gardener Facebook page for more tips, tricks, and pics.
Don’t forget! Spinach is one variety that can be planted all over the country … so channel that inner-Popeye of yours, get over your excuses for not starting, and get that spinach planted!
For those of you that like the Urban Organic Gardener blog we also have a pretty active Facebook page where we offer tips, tricks, and other things you wouldn’t normally find on this site.
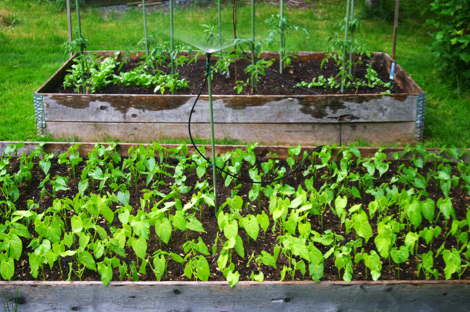
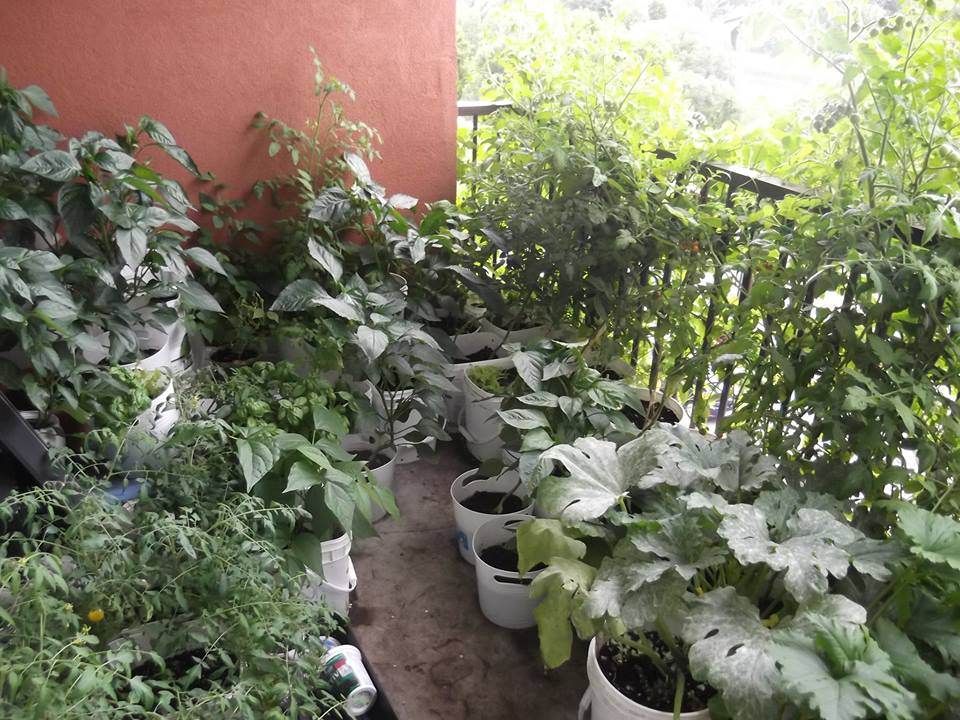
One of our fans, Lillian, sent these pictures of her urban garden:
Lillian writes:
Hello! I wanted to share with you a photo of my balcony container garden. It’s my first garden and I was inspired by your blog. One thing I did learn not to do again was “don’t plant your entire seed packet especially if you’re growing for only one hungry person”. I have about 40 tomato plants (some tied to the balcony railings, others are of tumbling variety), 8 baby bell pepper plants, 5 green bean bush plants, 2 zucchini plants, and one mysterious plant which I thought was going to be a red bell pepper..but it started growing purple berries (I’ve been dropping the berries off of my balcony for the wildlife, as they don’t taste very good to me). I also thought it would be a smart idea to plant morning glory too, so now I’m trying to fight it off of the tomato plants. Thanks so much for inspiring me! – Lillian


