The First Vegetable Harvest from My Fire Escape

After being away for six days, I was shocked when I returned to see the growth of the lettuces in my containers. It was definitely time for my first harvest. Most of the leaves were at least 6 inches and didn’t want them to get much larger.

This brings me one step closer to my goal of getting one salad. Didn’t turn this into a salad because I had already eaten dinner.

Made this post abbreviated because still playing catch up from being away. I definitely wanted to get something posted though as it’s pretty damned exciting (at least for me).

Will definitely do a more substantial post later in the week. Hopefully, it’ll include some fire escape salad in it.

How to Tell When a Self Watering Container is Full

We’ve been through how to build a self watering container, talked about what kind of potting soil to use and how to make it. Now I am going to tell (and show) you how to water them and how to tell it’s filled:

  • On my fire escape garden, I use a funnel and an empty juice bottle.
  • In my Brooklyn garden, I use a hose.
  • Fill with water (not Kool-Aid) through the pipe.
  • Once the reservoir is filled, it will start to come out of the overflow hole that was drilled into the side.
  • httpv://www.youtube.com/watch?v=cDpaMI6NEIQ

    Start Growing an Herb Garden, Not Killing One

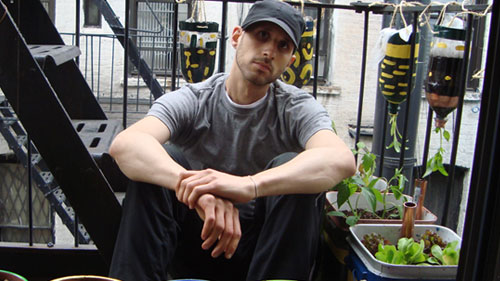
    It’s been a rainy week here in Seattle, I mean New York, so I haven’t been paying much mind to the vegetables out on my fire escape.

    When I finally checked on them, I was happy to see that the lettuces, peppers and tomatoes looked pretty healthy. Then I looked above them and noticed the sad, sad sight of the herb garden I started to grow in the upside down vegetable planters. They looked the opposite of healthy – dead.

    Here’s what I think contributed to my massacre of the herbs:

    My surgeon like touch. Much like planting vegetables, you need to be gentle when transplanting the herbs. Let’s just say if I was playing Operation, I would’ve lost and lost quickly.

    The soil was too heavy. I used the first batch of potting soil that I made myself. It might’ve been too heavy, retained too much water and over saturated the herbs.

    The planters just don’t work. I think this is the least likely of the reasons, but it still needs to be considered.

    I think it’s a combination of the first two that lead to the ultimate demise of the herbs. I am heading out of town later this week, for a few days (Bonaroo). When I get back, I’ll get some more herbs set up and planted.

    Hopefully, if any of you were thinking about starting to grow your own herb garden, this hasn’t discouraged you. Take this knowledge and use it to your advantage.

    Even though the upside down vegetable planters haven’t worked out so far, the self watering containers are doing real well. Peep this video:

    httpv://www.youtube.com/watch?v=yOXgkHOoD4I

    Making Potting Soil

    In a previous post, I explained the basic differences between coconut coir and peat moss based potting soils. Now I am going to show you how to make your own potting soil using a peat moss base.

    Here’s what you need to make your own organic potting soil:

  • Sphagnum peat moss – holds water and air; provides little nutriton
  • Vermiculite – provides minerals (potassium, calcium and magnesium)
  • Garden lime – provides minerals (calcium) and balances acidity of peat moss
  • Compost – provides the lion share of the nutrition to the plants
  • Large bin to mix it all in. Watch the video and you’ll know why you’ll need to use a large bin.
  • To mix it:

  • Add the mixture at a close 1:1:1 ratio of the peat moss: vermiculite: garden lime. You definitely want peat moss to be the dominant ingredient. Mix well.
  • Now that you have the peat moss mixture, add an equal part of compost. Mix well.
  • Add some water to dampen the mixture. Don’t want to saturate it. Mix well.
  • httpv://www.youtube.com/watch?v=4nbTWGoxJjs

    Five Things I Learned About Planting Vegetables

    This whole experience is all new to me, especially the part about actually planting. Here’s five things I learned about how to plant vegetables in a self watering container:

    Be gentle. Pop the vegetable out of it’s cell. Push it from the bottom and gently pull out.

    There are many plants in a cell. A lot of the cells contain multiple plants, so you have to thumb around the soil line to see the separation of the plants.

    Pry apart with thumbs. Use your thumb to gently pry them apart. You’ll wind up breaking up some of the roots, but don’t worry. Be gentle.

    Plant deep enough to secure plant in soil. Once the plants are separated, dig a hole about 3-4 inches in the soil (depending on the plant) and insert the plant.

    Support plant with soil Cover it with soil and make it compact to support the plant.

    Check this video on how to plant celery in self watering containers.

    httpv://www.youtube.com/watch?v=6LrCc31i_OU

    Checking in on the Gardens One Week Later

    It’s one full week since I’ve planted my vegetable gardens on my fire escape and in Brooklyn. Here’s an update on how things are progressing.

    Before I do that, I wanted to let you know that I decided not to garden at my parents in Staten Island and to move those containers to Brooklyn. Logistically, it makes more sense that way.

    My Fire Escape Vegetable Garden

    • The tomato plant started to bloom a bit and was picked. It was picked so that the plant can focus on growing as opposed to blooming at this point.
    • The pepper plant also started to bloom
    • The herbs in the upside down planters, especially the parsley and basil did not look so good. Need to take another look at what was done to remedy for next time.

    My Brooklyn Vegetable Garden
    httpv://www.youtube.com/watch?v=nK78ClpiIp4

    • For the most part the plants looked good.
    • The cucumber looked pathetic. Watered it from above to try and wake it up.
    • It looks like there was some kind of critter that was digging in the containers, but didn’t harm any of the vegetables, yet.
    • The celery and greens look to be very productive.
    • The nasturtium has started to bloom.

    Fire Escape Garden - Anna aasa tomato plant started to flower, so I picked it off. Saturday, May 30, 2009.Fire Escape Garden - The pepper plant started to flower and was picked as well. Saturday, May 30, 2009.Fire Escape Garden - The parsley definitely looks like it's hurting. Saturday, May 30, 2009.Fire Escape Garden - The basil pretty much looks like a lossed cause. Saturday, May 30, 2009Brooklyn Garden - The onions look ok, but it looks like something was digging. Sunday, May 31, 2009.Brooklyn Garden - The cucumber plant looks pathetic. I watered it from the top to wake it up a bit. Sunday, May 31, 2009.Brooklyn Garden - The celery has seen some good growth in the past week. Sunday, May 31, 2009.Brooklyn Garden - One of the buckets of greens is looking productive. Sunday, May 31, 2009.Brooklyn Garden - The Nasturtium has already started to bloom. Sunday, May 31, 2009.

    Starting My Second Batch of Compost

    After using all of the indoor compost to plant on my fire escape, I started a second batch.

    This went much smoother and I expect it to continue that way. Here are some of the lessons that I learned from my first go around:

  • Don’t put too many greens in the compost
  • When putting in the newspaper make sure it’s not in chunks. Separate the pieces.
  • Don’t fill it up too much. It’ll make turning a chore
  • With that in mind, I set up my indoor kitchen compost.

  • Put down a layer of newspaper.
  • Topped it with some soil.
  • Covered it with a small layer of greens and dehydrated cow manure.
  • Topped it off with another layer of newspaper and soil
  • Keeping the fingers crossed that there will be no odor.

    Potting Mix or Potting Soil? Peat Moss or Coconut Coir?

    First off, from what I can tell there is no difference between potting soil, potting mix and transplant mix. It’s all the same thing just different names.

    The reason that you want to use potting soil is that it allows for aeration and water to flow. If you use traditional soil in a self watering container, the roots would get too compact and not be able to grow. That’s no bueno.

    Of course it isn’t that simple, there are different kinds of potting soil. There is one that is peat moss based and one that is coconut coir based.

    Not being sure which to use, I decided to use both. Screw it why not? That’s part of this whole experience. Trial and error to find out for myself what works best.

    Besides the base, the other ingredients are pretty similar. They are vermiculite, compost and some kind of mineralization.

    The vermiculite makes the mix lighter and allows for better aeration. The compost provides the nutrients and the minerals, well they provide minerals.

    httpv://www.youtube.com/watch?v=D6y_gpetMkQ

    So I bought some 20lb bags of New York Paydirt Potting Soil from the local Lower East Side Ecology Center.

    This is coconut coir based, which according to the label is “a sustainable alternative to peat moss.” From some of the articles that I read coconut coir retains water, which is bad for self watering containers. I guess I’ll find out.

    I also bought ingredients to make my own organic potting soil – sphagnum peat moss, vermiculite and garden lime. This was mixed up with the compost that I made in my kitchen.

    So instead of reading 100 different arguments on which kind of soil to use, I’ll use both and see which one works best and so will you.

    Vegetable Gardening – Brooklyn Style

    After two long, but fun, days and some rain I set up my vegetable garden in my grandmother’s backyard in Brooklyn this past weekend. All said and done I planted in 16 containers and 5 herb planters.

    The vegetables I planted were – buttercrunch lettuce, cabbage, cauliflower, celery, collard greens, crisphead lettuce, cucumbers, escarole, onions, radicchio, romaine lettuce, sorrel, stinging nettles, swiss chard, sweet red pepper and wild leaf lettuce.

    The herbs that were basil, chocolate mint, dill, oregano, parsley, rosemary, sage, spearmint,thyme, zataar and nasturtium (which is an edible flower).

    Here’s a quick video of the garden:
    httpv://www.youtube.com/watch?v=oh4lhCTToiU

    My Fire Escape Vegetable Garden

    I set up my vegetable garden on my fire escape this afternoon with 3 buckets and 5 upside down herb planters.

    One bucket has Mottistone Crisphead lettuce, Parris Island Romaine lettuce and Anna Aasa tomato. Another has Mottistone lettuce, Parris Island Romaine lettuce and Buttercrunch. The third bucket has Jimmy Nardello’s sweet pepper and Chile Releno.

    The herbs that I planted were parsley, basil, sage, oregano and dill.

    Check this video tour of the set-up:
    httpv://www.youtube.com/watch?v=ST5rQAt5-_0

    Completing the Self Watering Containers at My Parents

    After getting the news yesterday that the vegetable gardening season already started and some plants should already be out, I need to get moving quicker.

    I went out to visit the ‘rents place today in Staten Island to make all of the self-watering containers at their crib.

    All of the materials were there, so it was just a matter of putting everything together. At their spot, I have am going to have two containers and two buckets set up. Each container took about a half hour to put together regardless of the size.

    There are two 30 quart containers that are about 17X12X11. In those I built room for a 3-4 quart water reservoir.

    Also going made two buckets a five gallon that’s about 15″ diameter and 14″ height. I built about a 1.5 gallon reservoir in that. The other bucket is a little taller at 15″, but it’s more square shape. The reservoir holds about 3-4 quarts of water.

    Each of the containers was marked at the bottom with the reservoir size, so I know for the future.

    The biggest challenge is still cutting out the circles, but it’s getting somewhat easier. Cutting the circle around the pipe was a bit of chore. I am hoping that duct tape will sure things up.

    At this point I have two concerns. The first is the level of the water reservoirs. Are they too much? Not enough? I have most of them measured off at about one gallon. That’s all part of this project though, documenting and learning for the next time.

    The other concern is that the wicking containers and vinyl tiles will be able to handle the weight of the soil. I am thinking there will be some leakage of the soil into the water, but the soil won’t be as heavy because it won’t be water logged.

    It’s the Season for Vegetable Gardening

    I took a trip to the Farmers Market at Union Square today to find out when it’s ok to start putting the containers out and how many plants go in each bucket.

    Yes, it would make sense if I had all of the containers and buckets ready, but I have just about zero complete. Still want to know how much of and what can be grown.

    Went straight to the Silver Heights Farm stand and spoke to Trina, who was helpful.

    Much to my shock she told me that it is the season for vegetable gardening. The containers should be out now because there are some vegetables that don’t stand the heat. That puts me behind a little bit then huh?

    So now I need to truck ahead and build all of these containers. Oh yea, I also need to figure out what I am going to grow where. She said that I can email her any questions that I may have about what can grow in the containers once I have decided.

    Now I need to decide.

    Video: The Compost is Saved

    It’s been two days since I attempted to get rid of the smell of the indoor compost pile.

    httpv://www.youtube.com/watch?v=bsxvgPNor-w

    There is no more leakage out of the bottom and the smell gone. The takeaway from this is not to take it easy on the food scraps.

    Now I can take that and use it when building and maintaining my home composting bins at my parents and grandmothers. They’d be less willing to deal with the smell than my roommate.

    Composting Mistake: Too Many Greens

    On Tuesday when I turned the compost all was well and there was no smell. Two days later not so much. It stank and it stank bad.

    The batteries on my video camera died, so there is no video, but that has nothing to do with the smell. I had a feeling that the last pile of composting greens were too much. Just got too over zealous.

    Instead of scrapping the bin all together, I am attempting to remedy the situation. The bin was leaking through the holes in the bottom and the smell was awful.

    My plan was to remove a lot of what was in the bin and replace it with browns to soak up the moisture and get rid of the smell. I shoveled the existing compost into two of the buckets and mixed them around. It was packed pretty tight in there and took about 20 minutes to get all of the stank compost out.

    Once I got it all out and separated into three buckets, I mixed them around much like would be done in an outdoor composting bin. A fresh bed of newspaper shreds and soil was layered on the bottom, topped with a small layer of the existing compost.

    Did this for about three or four layers. I wound up taking about two full three gallon garbage bags out of my compost bin and brought it to my local composting garden.

    I’ll give this a few days to see if that awful smell subsides. Another lesson learned, don’t put too much food into the compost bin. Especially when that bin is in your kitchen. Have I mentioned the smell?

    Video: Turning the Compost

    It’s been a about a week since the last layer of food scraps were added to my < a href="/category/composting/indoor/">indoor compost bin, so I figured it was time to give it a turn.

    To turn it I use a broomstick to poke around and loosen everything up, then I take a small shovel to mix it. It’s been taking me about 10 minutes each time I turn it.

    httpv://www.youtube.com/watch?v=TwyFFpE-yYg

    It’s pretty full at this point. The last batch that I put on was a lot on top of what was already there, but no smell and nothing seems to be going wrong. It just takes a while to turn it because there isn’t much space and everything is packed in there pretty tightly. It’s a lot of poking, then turning, poking and turning – a bit of work, but didn’t get me out of breath like cutting the pipe.

    I’ve been turning it about once week. This week no new food was added because it was a bit damp. After it was turned a new layer of browns (newspaper and potting mix) were added.

    Hoping it’s going to be ready soon because I plan on getting things growing soon.

    Video: Cutting Copper Pipe for the Self Watering Containers

    After days of back and forth, I decided to go with copper pipe instead of the vinyl tubing in the self watering containers. Wasn’t very clear on the benefits of one over the other because read lots of pros and cons on each of them.

    For using copper pipe, came across a few articles that spoke about leaching into water.

    Came across the same articles for vinyl tubing.

    Since I was going with the vinyl tiles for the insert, I felt better about choosing the copper pipe.

    httpv://www.youtube.com/watch?v=vxXZ1vMyFdI

    In shopping around for the pipe, the ranges varied greatly from $25 to $65 for uncut L copper pipe. The handyman at the hardware store said it was better suited for water.

    I bought two ten foot pieces and tied them on top of my grandmothers car. Yes, I tied them. The back seats in her car don’t go down. Not sure how, but the pipes and I made it back safely. Then I went to town and cut up the pipe.

      Tools required

    • Hacksaw
    • Marker
    • Glove (I’d recommend a vice instead)
    • Table
    • Tape measure
      Materials required

    • Copper pipe

    Each of the buckets are about 13 inches, so the first pipe I marked off every 15 inches to cut off. The other pipe, I marked at about 20 inches.

    The first lesson that I learned was to make sure that the hacksaw is tightened. If not, it’ll pop off.

    Now I need to ration out the cut pipe to my apartment and grandmothers. Still need to figure out what I’m going to grow and where. There is that looming.