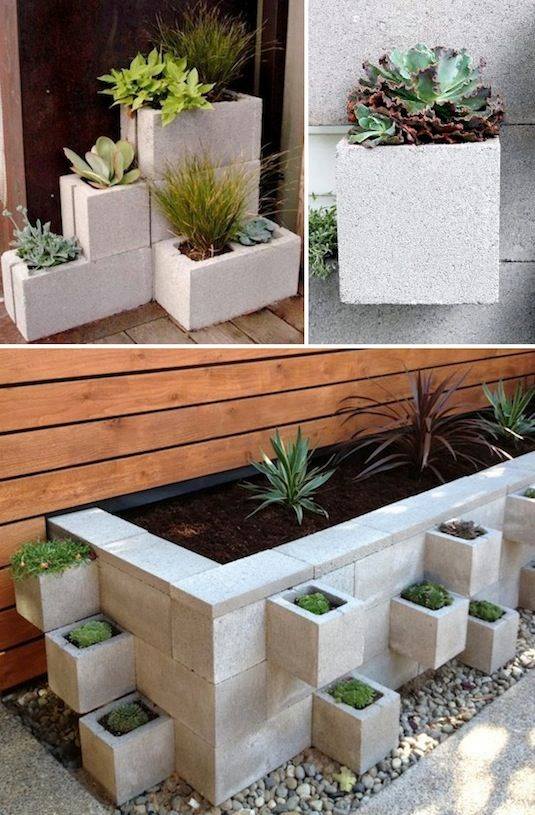
Check out this incredibly brilliant design using only cinder blocks. Simple, effective, and practical. What more could you ask for?


Urban-style organic gardening blog about growing your own food with limited space and creative resources.
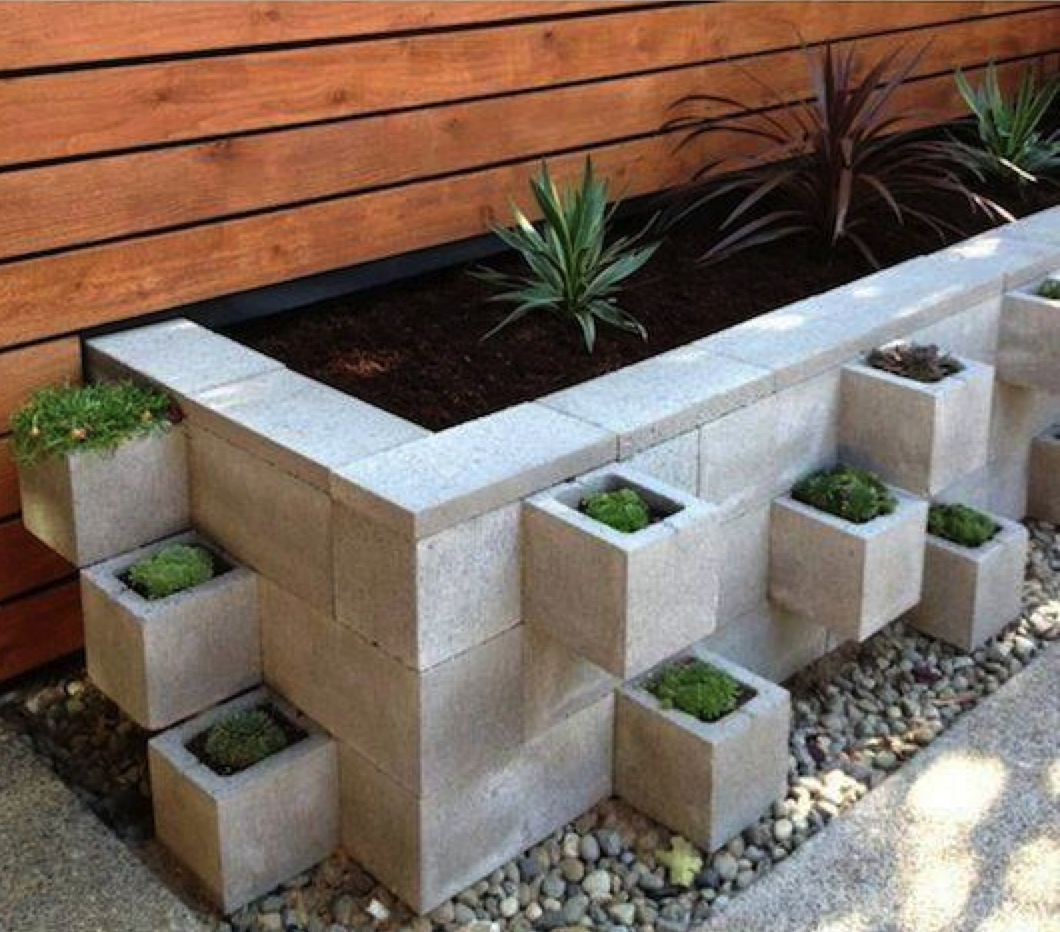
Check out this incredibly brilliant design using only cinder blocks. Simple, effective, and practical. What more could you ask for?
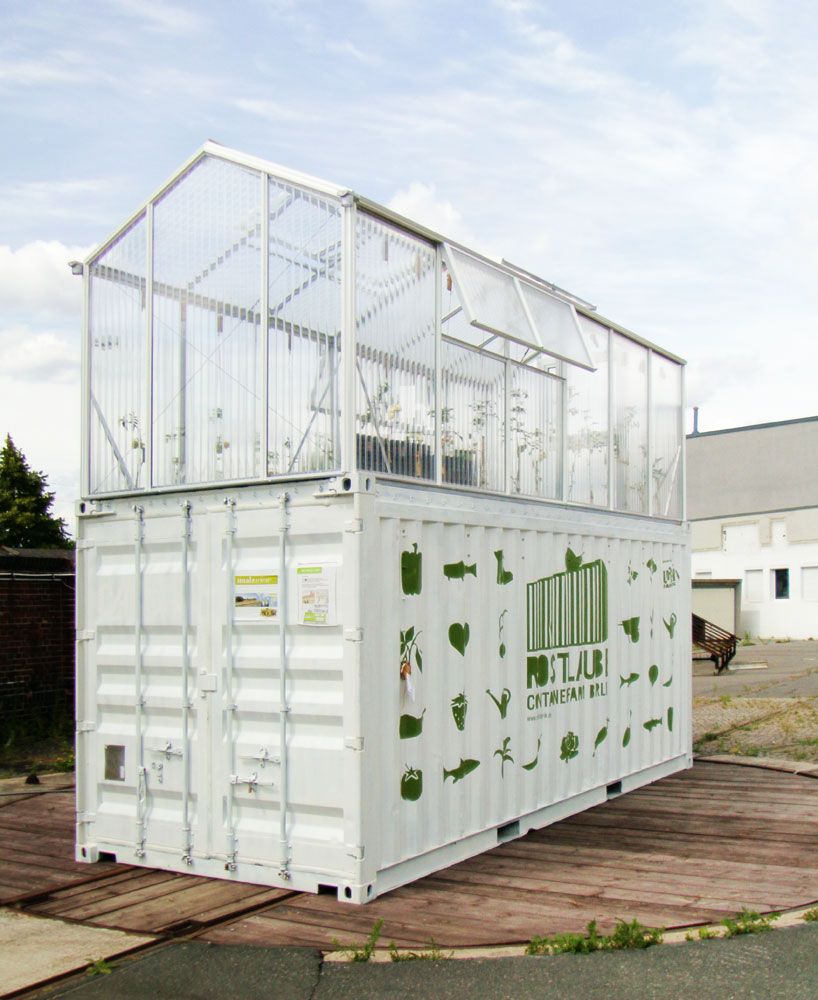
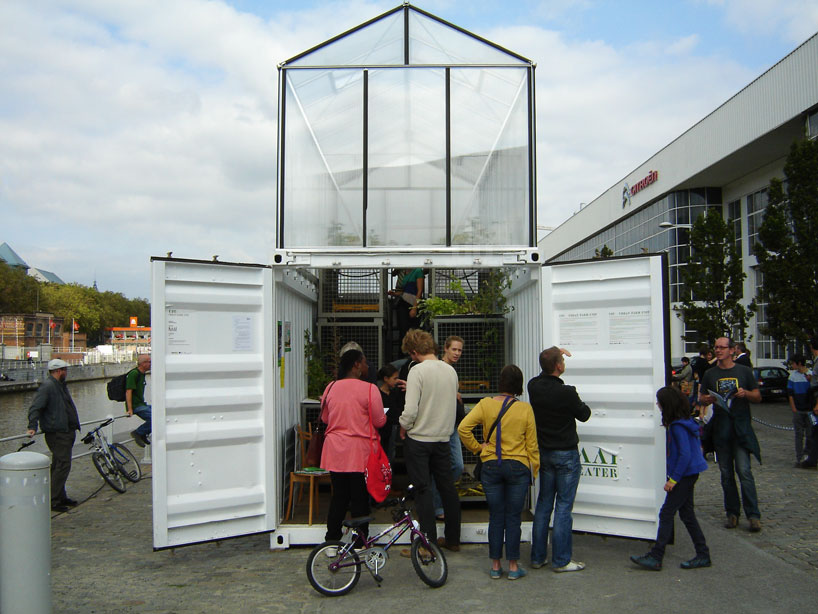
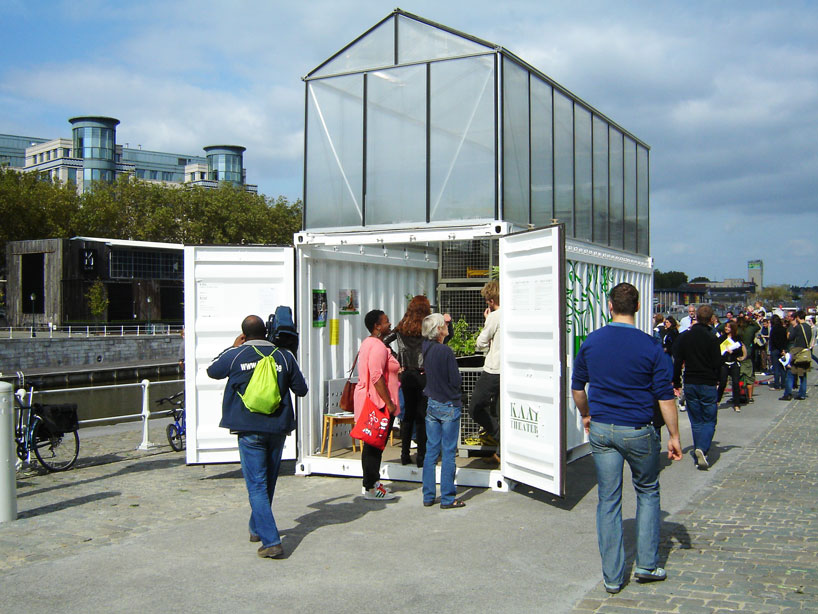
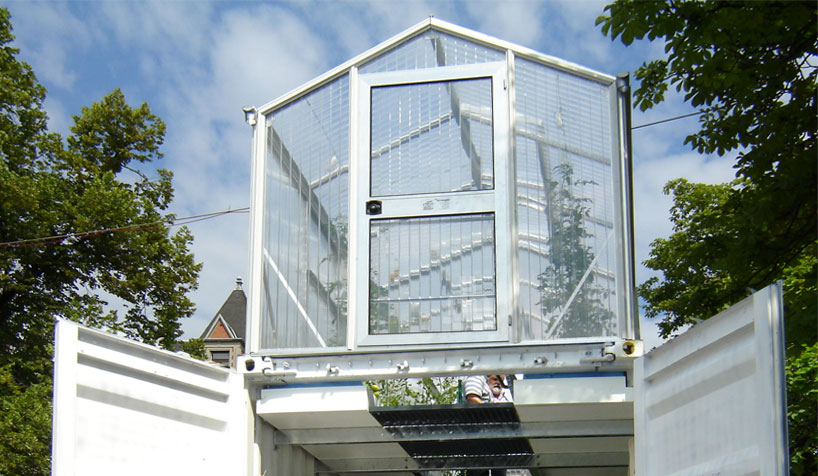
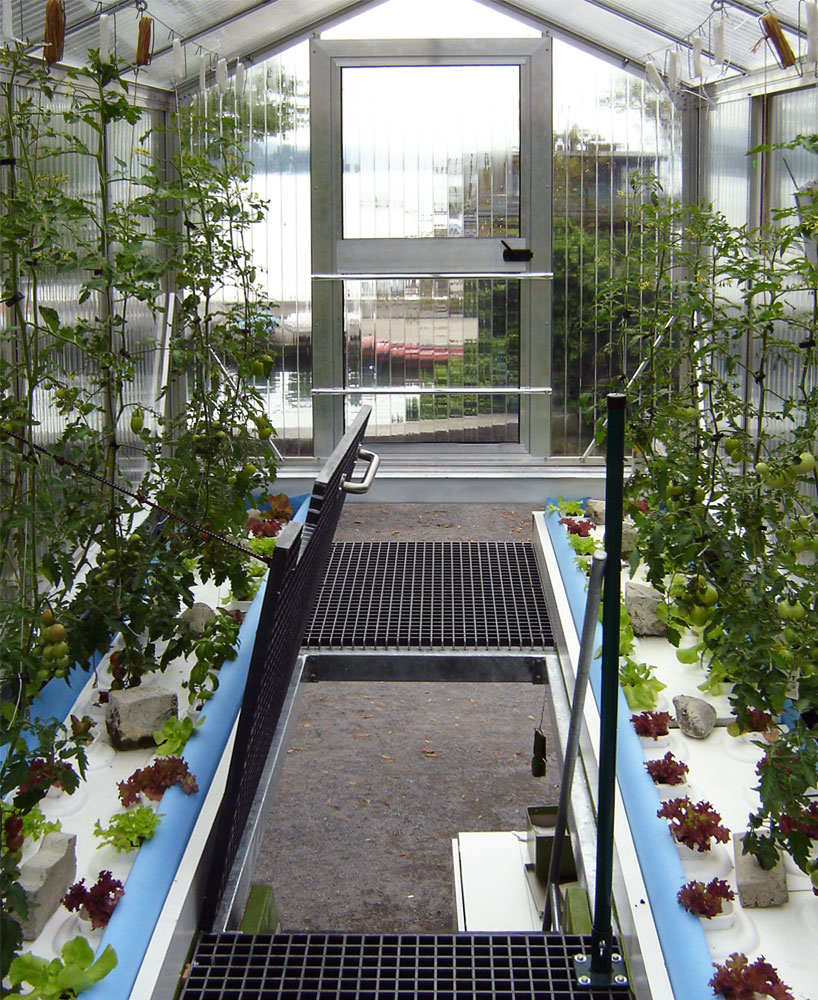
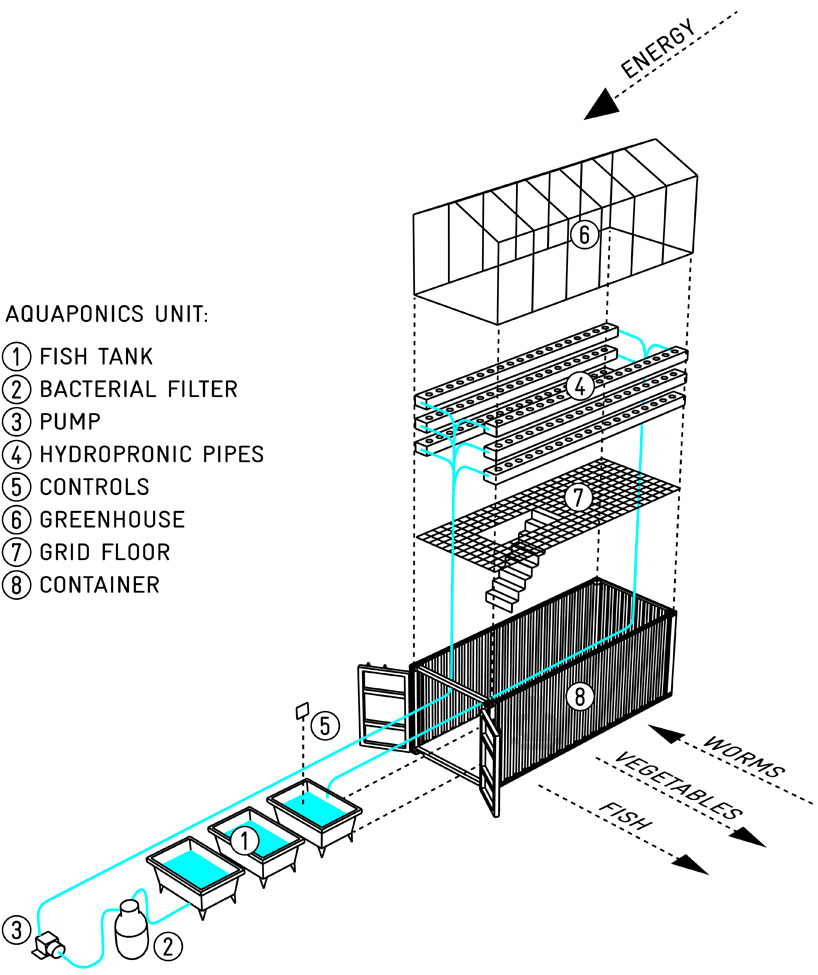
“The urban farm unit by damien chivialle is composed of a shipping container with a greenhouse built on its open roof – kaaitheater, brussels edition.” Source: http://www.designboom.com/
Source: Fix.com
Luckily for all you green-thumb wannabees, gardening isn’t a passing fad. In fact, the act and art of growing flowers, vegetables, and herbs is only gaining in popularity. According to Greenhouse Magazine, nearly half of all people gardened in a year, while the Garden Writers Association found that edible gardening increased over 11 percent in 2013.

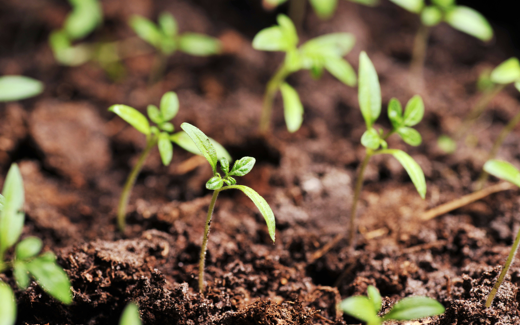
For budget-smart gardeners like you and me, the expense of buying new plants can be the biggest deterrent to establishing a new green space or adding to an existing vegetable or flowerbed. Fortunately there’s a solution that’s less difficult than it might seem: seed starting. As an added bonus, once you start your own seeds you can grow plants that you can’t find elsewhere, or want to try but are too price-tag phobic to purchase.
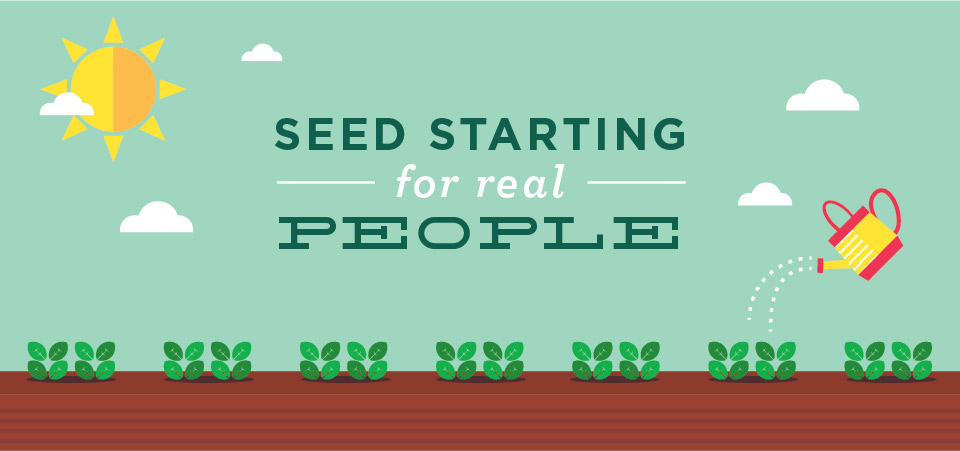
Seed starting isn’t complicated or messy—and it’s a good way to plan and think about your garden before growing season even begins. Here are the essential steps to help you start your own flowers, vegetables, and herbs from seed.
You can purchase a ready-made seed-starting flat made of plastic; it resembles a series of cubes. Or you can make your own using re-used plastic containers or egg cartons. If the material you choose is biodegradable—paper egg cartons, for example—you may be able to plant your seedlings along with the container directly into the soil. If not, you can re-use the seed starting pots from year to year as long as you sterilize them in a diluted bleach solution.
If you’re making your own container, pick something that’s about 3 inches deep. If your container doesn’t have drainage holes, use a nail and hammer to add a few as a way for moisture to escape the bottom.

While the containers used for seed starting are fairly flexible, the material your seeds first grow in are not. There are plenty of ways for you to mix your own seed starting material, but to reduce headache and complication, you can also just purchase a pre-made mix. The mixture may be soilless or contain soil; the difference is important (and we’ll discuss why later on in this post). It’s also helpful to have a spray bottle, and trays to place under your seed starting containers to catch any water runoff.
Printed on all seed packets are basic guidelines that help you understand when you can plant seedlings outside; use those to determine when you should start seeds indoors. The planting date is related to the average last frost date; to find your specific date, view the USDA Plant Hardiness Zones: http://planthardiness.ars.usda.gov/PHZMWeb/.
Once you’ve found your zone, use the seed guidelines to establish seed starting dates. Sound complicated? It isn’t. For example, if your last frost date is May 1 and the seed packet for green peppers recommends sowing seeds 8 weeks ahead of time, you would start those seeds around March 6.

Plant Your Seeds
Once you have your seed starting supplies and seed starting calendar, it’s time to begin sowing seeds. Start by filling your containers with seed starting mix. Moisten the mix so it’s wet but not soggy. Then plant your seeds; scatter them lightly over the soil and gently press into place. If the seeds are very small, you can plant more than one seed; if large (such as cucumbers) you can plant just one. And, make sure your seed starting containers are labeled with name and planting date.
Tend Your Seeds
Seeds need only regular moisture, warmth, and sunlight in order to grow. Once planted, place them in a spot that’s free from chills and cover with plastic or newspapers until the seeds sprout. As they begin to sprout, remove the covering.
Your seedlings should never dry out, but also should not be wet; use a spray bottle to apply moisture just a bit at a time. You can also add water to a tray and let the seedlings pull it up as needed, but don’t allow the containers to get overly saturated. If you are not planning on transplanting your seedlings into larger pots and have grown them in soilless seed starting mix, you also need to give them a weekly feed of diluted plant fertilizer. As seedlings begin to grow, you can thin them to select stronger, hardier plants.
Transplanting Seedlings
If you’ve chosen a large enough pot AND used a soil-based planting mix, you may be able to leave your seedlings until it’s time to place them in the garden. If the pot is very small or the mix is soilless, you’ll have to transplant them into a bigger pot until it’s time to put them outside. That way the plants will develop vigorous roots.
To transplant, start by filling larger containers with potting soil. Dig out your seedlings, saving as many roots as you can, and place the plant in the new pot. Spread out the roots and cover with potting soil; tamp gently and water well. Every two weeks give the seedlings a dose of diluted fertilizer.

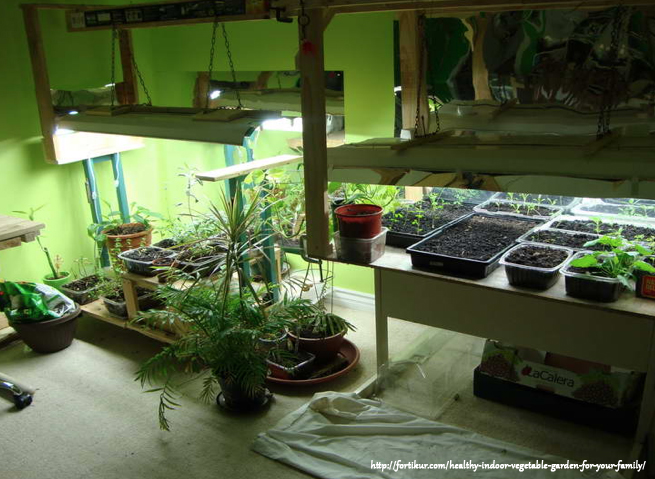
Encouraging Healthy Seedlings While just-sprouting seedlings need super-warm temperatures, established seedlings have less stringent requirements. Overheating in particular can push plants to become spindly. Either way, you’ll need to offer seedlings about 16 hours of light—not possible in cold-weather months.
The solution is to supply supplemental light by using fluorescent tubes. If you have lots and lots of seedlings, you may want to think about setting up a grow station in a spare room or the basement (if warm enough). Lights should be adjustable in height so that you can keep them at a constant distance of about 4 to 5 inches from the tops of the plants. A timer can help maintain a lighting routine so you don’t have to worry about manning the on-off switch.
Best and Worst Seeds to Sow Indoors
Many state extension services have helpful lists of plants that work well (and those that don’t) to establish from seeds you start indoors. Some of the best include tomatoes, peppers, cucumbers, pumpkin, squash, and watermelon. The worst-from-seeds list? Asparagus, snap and lima beans, carrots, cilantro, corn, parsnips, radishes, spinach, and turnips.

Hardening Off
Once your seedlings are ready to make the big leap into the great outdoors, they’ll need to be hardened off. But that is a topic for another blog post! Until then, happy seed starting!
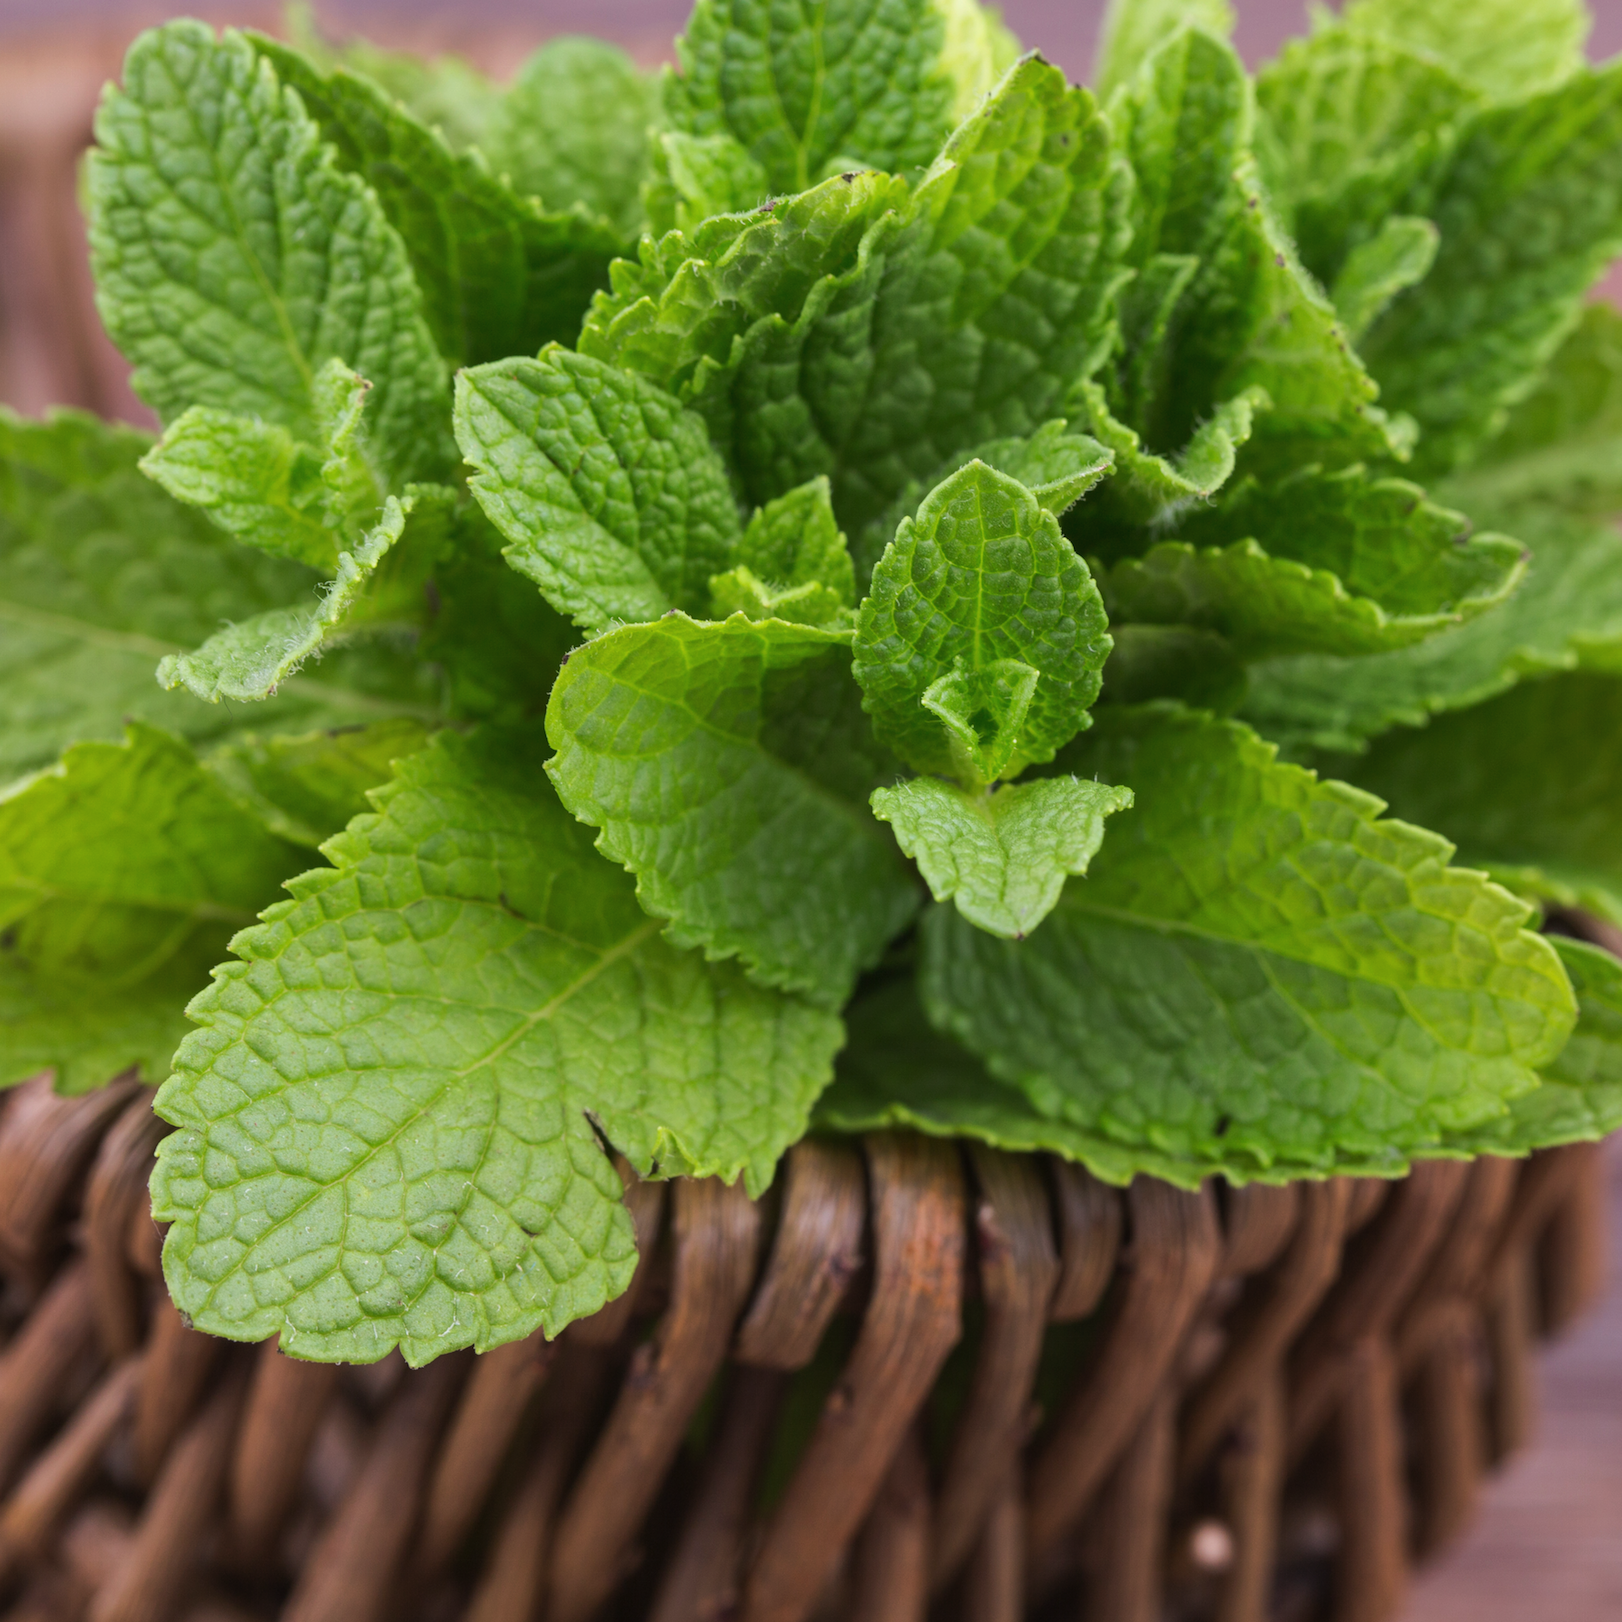
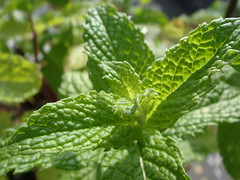
 Mint is a weed…
…that means it grows like crazy and should be kept in a container.
If you are growing mint, you likely have more that you know what to do with. You can easily harvest it to encourage more growth too.
There are lots of posts out there that give you dozens of ways that you can use mint. How many of them can you actually use everyday though?
That’s why I wanted to write this simple and practical post for you.
Let’s begin. Here they are:
This is a simple one. Put some mint leaves in a mug. Boil up some water. Pour the water over the mint leaves and let it sit for a few minutes. That’s it.
Mint tea is good for upset stomachs and helps with digestion.
We should all be drinking more water. It’s essential for our health and well-being.
Some people complain that drinking water is too bland and boring.
You can add some flavor to it pretty easily. This is slight variation of the tea. All you have to do is fill up a large pitcher with water and add in mint leaves.
It will give the water a minty flavor.
Face it, your breath stinks. I can smell it through my computer.
So why not pull off some mint leaves and chew on them. It’ll help to freshen your breath and help you to make more friends.
Share this post with friends and family that have so much mint they don’t know what to do with it.
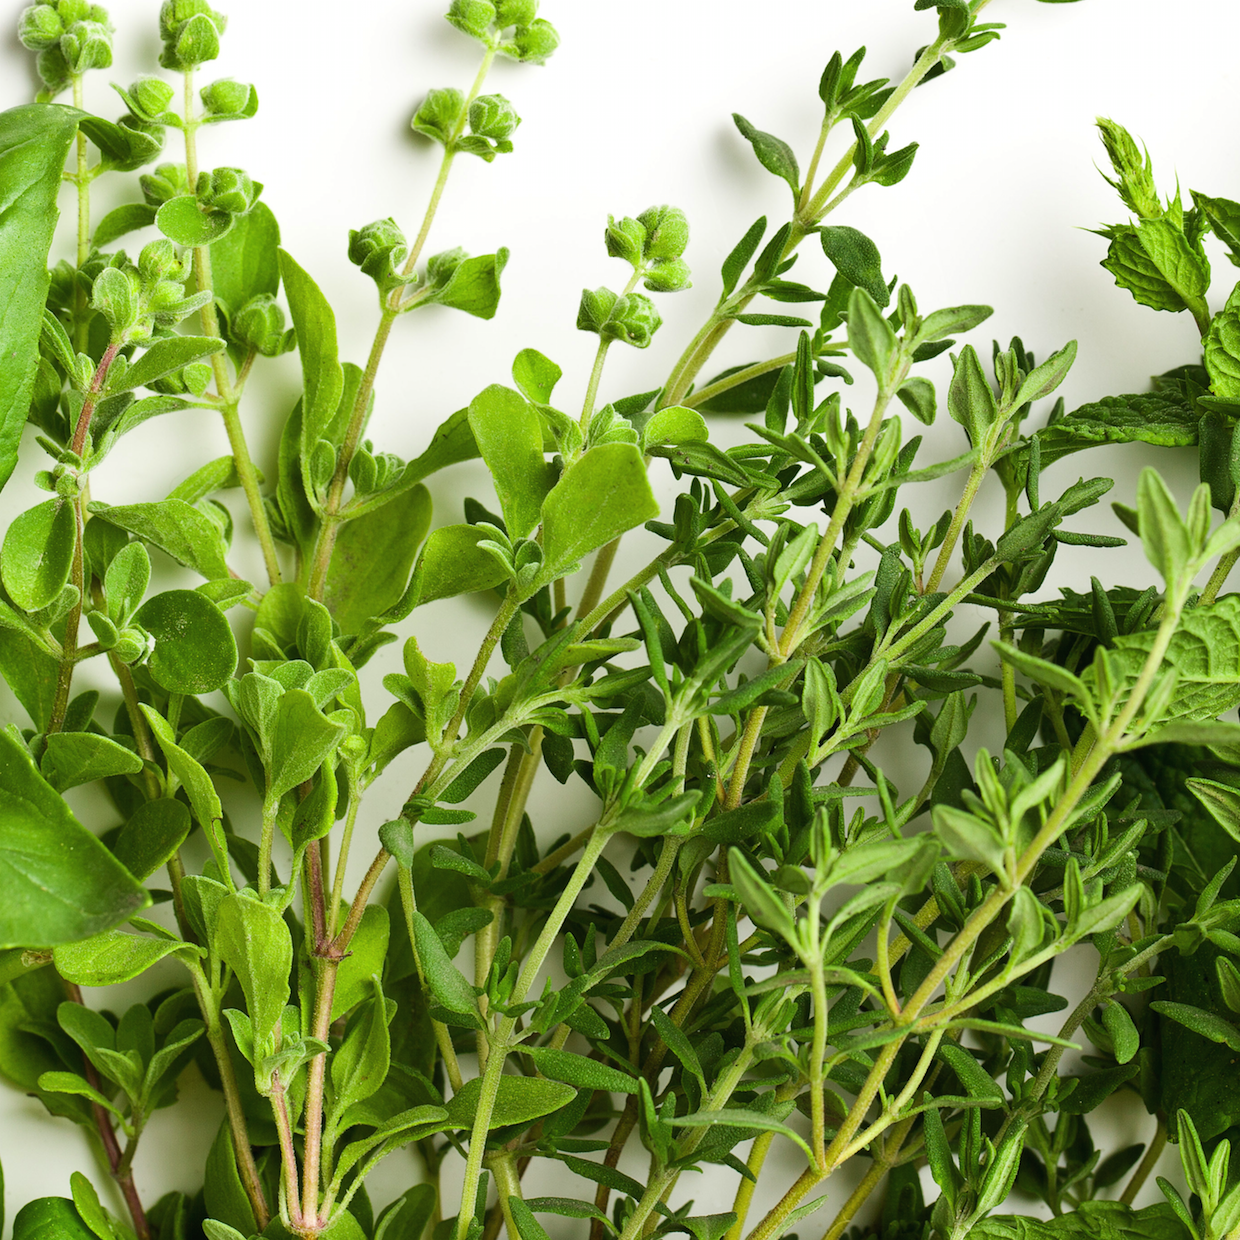
 You were all happy to start your herb garden.
You picked out your location and determined how much sunlight it gets.
Your happiness turned to sadness when you realized that you only get 3-4 hours of sun.
Those dreams of an herb garden were dashed. At least you thought so. In that shaded space, you can still grow your herb garden.
There are a few dozen herbs that will grow well in the shade, but I’m not going to list all of those for you.
Why not? Because having feverfew, lady’s mantle and lovage aren’t very practical to grow when you are starting out.
My goal is to provide you with practical herbs that you know what to do with and can use, such as:
Those aren’t the only ones, but they are the most common and useful. There is nothing wrong with borage and sweet woodruff, but I don’t think that’s what you are going to start with.
Share this post with family and friends to help them start their herb garden. Then in the comments below, tell me the herbs that you are growing in the shade.
Photo courtesy of Murugananth C on Flickr
 Michelle Moore
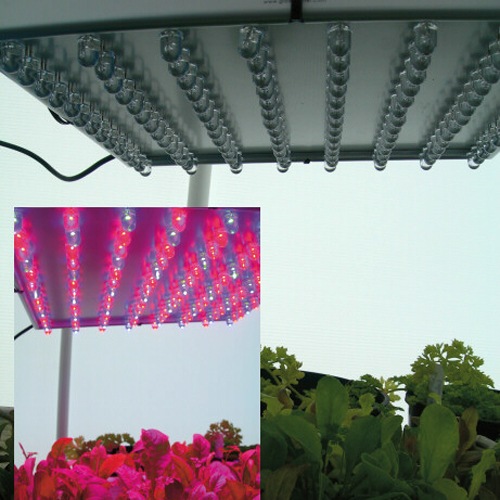
Not all light is the same.
Plants respond differently to different colors of light.
Light on either end of the spectrum, blue light or red light, have the greatest impact on photosynthesis.
Blue light, referred to as cool light, encourages compact bushy growth.
Red light, on the opposite end of the spectrum, triggers a hormone response which creates blooms.
Grow lights producing the orange and reddish light typically produce substantial heat, however, some lights are able to produce full spectrum light without the heat.
Grow lights come in all shapes, sizes and price ranges.
As a general rule, inexpensive lights to purchase tend to be the most expensive to operate and the least effective. While price is not necessarily an indicator of performance, many of the efficient grow lights require ballasts as well as specialized fixtures.
Image of vegetable being grown indoors under artificial light is via fortikur.com.
Check out SeedsNow.com if you’re looking to grow organic vegetable and herbs from seed.
Click here to read more about what GMOs are. It’s really easy for you to grow all kinds of vegetables, herbs, and sprouts inside. All year long! Invest in a grow light and you’ll be happy.

Basic Types of Grow Lights
These lights run the gamut of performance and price range.
The least expensive lights to purchase cost around $30. These incandescent lights work well for specific plants where the light is placed a minimum of 24” from the plant. These lights get extremely hot so they must be used with care. Spot grow bulbs, color corrected incandescent lights, install easily and are good for use with a specific plant or a small grouping of plants. Most spot incandescent bulbs last less than 1,000 hours. Some light fixtures come with a clip handle so you can put them exactly where they’re needed.
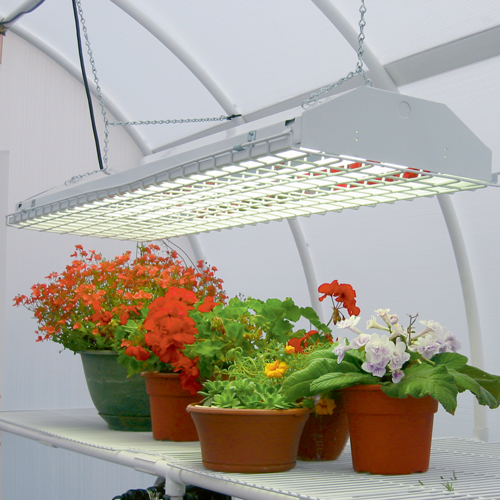
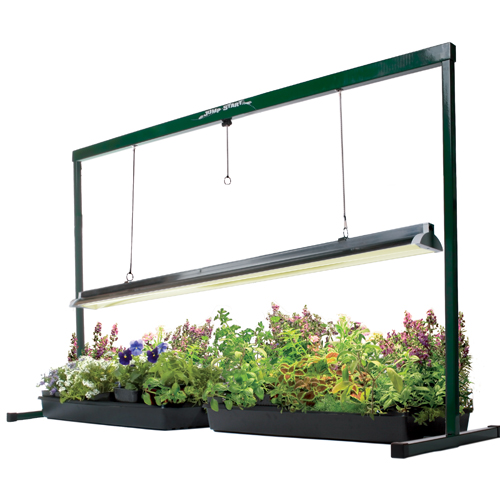
They are a common choice for homeowners. Fluorescent lights are reasonably energy efficient and relatively easy to install. A typical fluorescent bulb will last approximately 20,000 hours. Fluorescent light is typically on the blue end of the spectrum. Blue light encourages bushy compact growth which makes them perfect for seed starting. Blue light is also cool to the touch making it possible to place lights within just a few inches of the seedlings.
 Provide the red spectrum as well to encourage blooming.
Combining the lights in a fixture makes for even, all around growth.
The next generation in fluorescent lighting includes the new T-5 lights.
These new lights have extremely high output but are energy efficient and long lasting.
The T-5 lights triple the light output of normal fluorescent lights without increasing the wattage. Plants absorb a high percentage of T-5 lighting because the fixtures function well very close to plants. High output bulbs require a high output fixture to operate, so the bulbs and normal fluorescent fixtures will not work together.
 The newest type of grow lights use LED technology.
One major advantage to the LED lights is the small size.
LED lights are only a few inches in diameter and are easy to mount.
In some greenhouses, LED lights may be the only practical light option.
Hanging most grow lights requires a strong greenhouse structure and a place to hang the lights.
LED lights weigh a fraction of other lights and are easy to configure where needed. According to LED manufacturers, LED grow lights maximize blue and red light to provide and excellent balance for plants.
They do not have much green-yellow light. Since humans see green-yellow light best LED grow lights appear dim to our eyes. This is an exciting new technology that will be interesting to watch as it develops.
Now that I’ve given you a good rundown on greenhouse lighting options, it’s also important to mention darkness.
Almost all plants benefit from a period of six hours or more of darkness.
It’s a good idea to know how much light your plants need, but unlike commercial growers, hobbyists often have a wide variety of plants so they need to take a broad approach to lighting.
Fluorescent lights offer excellent overall lighting options.
If you chose to use any type of fluorescent lighting, you will need to account for plant growth.
Fluorescent lights perform best when positioned very close to plants.
As plants grow into the light, it is important to raise the fixture.
Generally only the plants touching the lights will burn, but be prepared because they grow quickly.
Adjustable hangers are a good solution. These hangers move easily allowing you to make quick adjustments.
If you’re looking for non-gmo seeds that grow well using hydroponic systems, click here.
Are you currently using grow lights to grow indoors? What kind? What are you growing?
Do you plan on growing indoors using grow lights?
Let me know in the comments below.

The one question that I most often get from people is where I get the containers for my garden from. When I posted a question on Facebook asking what posts people would like me to write, it was mentioned again by some friends.
The first thing is that I never buy the containers brand new. I don’t for a few reasons. The most important is that I don’t want to use any unnecessary resources and materials, especially plastic. The other reason is that there are much cheaper ways.
Here are some places that you can easily get the containers for free or for a $1:
Bodegas
When I was living in NYC, the containers used on my fire escape garden, I got containers for free from the local bodegas.
All bodegas use the containers to put their flowers in. When I walked by and saw a big stack, I’d ask if I could take 3-4 of them off their hands. The usual answer was no. I’d follow up with how about just 1 or 2. They would usually say yes just so I’d stop bothering them. Free containers. That simple.
Farmers Market
Since I’ve moved to Los Angeles, and stared my balcony garden, there aren’t many bodegas where I live. So I’ve been sourcing them from the flower vendors at the farmers market for $1 each. It’s not free, but still not too bad.
Other places that you can likely get the containers from are:
Restaurants, Delis, Bakeries and Deli Section of Supermarkets
All of these places usually get their shipments of mustard, mayonnaise, pickles, etc in the 5-gallon containers. Check with them to see if they have any that they aren’t using.
It’ll be much easier if you are a regular customer or have a relationship with them. If you aren’t, it’s still worth inquiring.
Where you don’t want to get your containers from:
Construction Sites
It’s likely that the containers from construction sites had plaster, concrete, paint or something else nasty mixed inside of it. You don’t want to be growing your food out of that.
What other places are good to get containers from?
httpv://www.youtube.com/watch?v=4jNbC2-hhCA